
If you purchase an independently reviewed item through our site, we earn an affiliate commission. Read our affiliate disclosure.
Wiring a beehive frame gives it strength and better support for wax comb. It prevents sagging and enables the frame and comb on it to endure honey extraction without breaking apart. This article shows you how to wire a beehive frame by yourself, using simple home and garden tools. Beekeepers should keep in mind that the purpose of wiring frames is not so much to hold comb in place, but rather to prevent it from sagging.
About this Series
This post is part of a series on how to build a Langstroth beehive.
Sections
In this series you will learn how to build:
- Brood boxes
- Super boxes
- Beehive frames and wire them
- Queen excluder
- Bottom board
- Hive cover
- Entrance reducer
- Hive stand
About Beehive Frames
Beehive frames hold honey comb and brood comb and are integral in modern beekeeping. Frames are made of wood, and have varying shaped dependent on the type of beehive they will be used in. Frames are removable from beehives for inspection and honey extraction. To hold comb well and strongly, beehive frames are often wired.
Frame wiring is best done before you install foundation (if you so choose). You may still wire your frames that already have foundation installed on them, but the results may be a little less than perfect. Additionally, foundation sometimes comes with its internal support wires that may not work well with your added wires. Beekeepers often cite this as one of the reasons they do not wire frames on which they have installed crimp foundation. If you are looking to wire your beehive frames, make sure they do not have foundation on them, or the foundation they have is not internally wired.
Should you Wire Beehive Frames?
Before we proceed, you should know that a school of thought against wiring beehive frames exists. Those who disagree cite varying reasons. Foremost is the fact that frames that will never need to be extracted do not need wiring. These are the frames that you use in your deep brood boxes. It may not be necessary to spend time, money and energy strengthening these frames that will never be taken out of the beehive or exposed to the forces of a honey extractor.
A second reason given by beekeepers against wiring frames is that foundation is strong enough to hold itself up. Those using crimp foundation often see no need to add extra wires in their frames. However, a blow out is all that is needed to convince you of the need to wire your frames. During honey extraction, wired frames have greater chances of remaining intact than unwired frames.
Disadvantages of Wiring Beehive Frames
A disadvantage of wiring frames is that they make it difficult for you to cut away comb. This is in cases where you want to remove a queen cell, or just harvesting comb for other uses in your apiary. The wires in a wired frame get in your way. They make you harvest small pieces of comb in sections. This is especially true with cross wired beehive frames. In spite of this, beekeepers should not be worried about wired frames when harvesting honey. The wires in a wired frame do not come into contact with your uncapping knife during honey harvesting.
Materials Needed to Wire a Beehive Frame
The general materials you need to wire a frame are:
- Pliers
- Beehive frame wire (click here to see our choices for the best wires to use)
- Small nails
- A hammer
- Brass eyelets
- Unspent rivet or eyelet inserter tool
- A beehive frame wire tensioner tool
Other tools and equipment you might use vary depending on your individual preferences. It is also great to have your own electric wire embedding equipment for embedding wire in wax foundation.
Some key points to note:
- The wire you use in wiring beehive frames can be made of stainless steel or copper. It may be galvanized or not. Wire for beehive frames can be bought online or at your nearest beekeeping supplies retailer.
- Use small nails that do not split your frames. The nails should be thin and not too long. Beekeepers may take a precaution against splitting frames by pre-drilling the holes where nails go.
- Collect all your materials and equipment in one place before you start wiring beehive frames. A strong stable work surface is required for the job. It should have grips that hold your frames tightly in place without interfering with the path of the wire you will be using.
- You do not need to wear bulky protective wear while wiring frames. The job can be done away from your beehive. A garage or work-shed does just fine for wiring frames.
Steps to Wire a Beehive Frame
- Using a nail, make holes in the sides of your beehive frames. Some frames may come with the holes already pre-drilled in them. These holes that you are making are for the brass eyelets. Deep frames for your should beehive have 8 holes on their sides: four on the right and four on the left. Make sure that all your side bars have eyelet holes on them. Medium frames may have 3 holes in each of their sidebars. For shallow frames, the number of holes on each sidebar can be 2. While making holes for your wires on the frame, space them out evenly.
- Insert the brass eyelets in each hole on the sides of your frame. The eyelets should be pushed into the holes until they fit snugly. Brass eyelets help keep the tension of your wires over time. If you do not use eyelets, the wire you use on the frame cuts into the wood gradually. After a number of seasons, you have to re-tension the wires or rewire the frame altogether. To avoid this hassle, use eyelets. Brass eyelets work best because brass does not impart odors or flavors to honey.
- Thread your wire through the eyelets. If you start from your right, the last eyelet threaded will also be on the right in most cases.
- Tensioning the wire requires you to use some nails on the frame. Hammer a small thin nail onto the side of your frame, away from the eyelet but on the side. Wrap the wire around one nail and hammer the nail all the way in.
- Next, hammer a nail halfway through the last eyelet and wrap the end of your wire around it. Tighten the wire through successive eyelets until you get to your last eyelet. You may use pliers or other suitable gripping tool to rotate the nail and further tighten your wire. A properly tightened wire gives a twang when plucked.
- Once you are comfortable with the tightness of the wire, you may hammer the second nail all the way into your frame.
- At this point, your frame is properly wired. If there are long ends of wire peeking past your nails, you should cut them off with a pair of pliers.
How long does Wiring take?
Wiring a frame should take you less than 30 minutes on average. As you gain more experience wiring frames, you will be able to wire them faster and do it in approximately 10 – 15 minutes. Beekeepers with many frames to wire may go at them one at a time, or try mimicking a production line. With many frames, you punch holes for eyelets in all frames, then insert eyelets in all the frames, and thread wire in all frames. You then tighten the wires and nail them down in all the frames. After that, you proceed to installing foundation on the frames and embedding the wires in wax foundation on your beehive frames.
Using a production line technique when you have many frames to wire allows you to get through wiring the frames in less time and leaves room for fewer errors. Additionally, you do not need to keep picking and dropping tools and equipment you use.
Alternative Method
An alternative method is using twists in your wire. In place of nailing the wire into the frame, beekeepers may twist the wire until it is tight. This applies only for medium and shallow frames that use only two runs of wire from right to left. Twisting the wire gives you less tightness and tension than nailing the wire onto the frames’ sides. You may use a kink on the opposite side from your twist to add tightness and tension to your twisted wire. However, the wire will still get loose over time.
Minimalist Wiring
Some beekeepers go minimalist in wiring their frames. These beekeepers use only two strands of wire in their frames despite the size of the frame. In some climates, this may work. However, the two strands of wire will not be of much help with a deep hive frame in warm climates where comb tends to sag due to heat. Minimalist wiring of frames can only be practiced in the cooler northern hemisphere where temperatures rarely go too high in the beehive. Beekeepers should consider that there are temperature rises in beehives, even with bees cooling the hive when it is too hot in the environment.
Using Different Materials
Beekeepers use different materials and equipment on their beehives. The important thing is to get the wiring of frames right while understanding the concepts and ideas behind wiring frames. Some beekeepers use fishing line in place of stainless steel wire. Fishing line is strong, durable and also serves the purpose of strengthening and holding wax comb in place. Fishing wire is however not usable with wax foundation. Bees will build comb around fishing wire, over time, but you cannot heat fishing wire to embed it into comb on your frame.
Wiring Foundationless Frames
Wiring foundationless frames is easy and can be done by both amateur and professional beekeepers. Foundationless frames are easy to work with. The process of wiring foundationless frames follows the general procedure of wiring a beehive frame detailed above. Once you have wired your frame, you may proceed to add foundation wax to the frame. Foundationless frames may be used as they are in a beehive once they are wired. Without foundation, bees build comb around the wires in your frames.
The best time to wire foundationless frames is when they are new. Before you use frames in a beehive, decide if you are going to wire them or not. Beehive frames that are for use in brood boxes and honey supers can be wired. Wiring frames while they do not have foundation or comb on them is easy and the process is a tad friendly to beekeepers. It does not create a mess as may be seen when working with frames that have foundation installed on them or which bees have been using in a beehive.
Embedding Wire in Wax Foundation
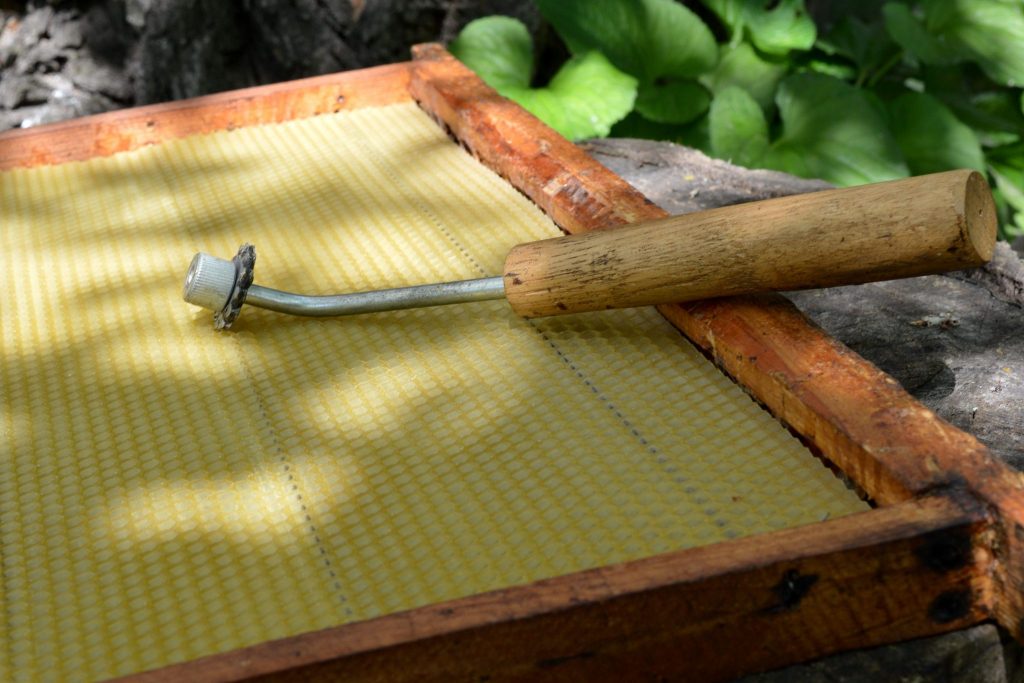
Embedding wire in wax foundation is done using heat. An electrical source such as an embedder is used to heat the wires. Once hot, the wires in the frame melt and becomes embedded into the foundation. Do not worry about some section of the foundation losing shape where the wire cuts through it. With time, bees repair the areas where the wire cuts into the foundation you use. Wax foundation is the best to use with wired frames.
The electrical source you use may run on either AC (Alternating Current) or DC (Direct Current). It should however give an output of DC in most cases. The current must be just enough to heat up the wires once it is connected. Very high current or voltage may cause your beehive frame wires to break.
Steps
- While heating the wire on your frame, connect the terminals of your electric source to one length of wire after the other. Immediately the wire is hot enough and starting to cut through your beehive frames’ wax foundation, you should cut the flow of electricity through the wire. Too much heating causes the wires to cut through the foundation instead of embedding itself in the wax foundation.
- To get the best results while embedding wire in wax foundation, place the frame on a working bench and then place the foundation over the wires. As your wire gets hot, the foundation settles onto the wire. Repeat for each length of wire until you are satisfied with the results. Cross wired frames require you to embed both the right-to-left wires, and those running in a top-to-bottom direction too. Beekeepers may gently push the wax foundation onto the wires of their frames as they cool down.
- Foundation on beehive frames fits into a specific groove cut into the top wooden piece of the frame. Make sure to have your foundation in this groove after wiring it. Once the foundation is in the groove, you may then embed your wires in the foundation. Inaccuracies in installing foundation result in bees not using up all the space provided in your beehive frame.
Beekeepers may use different contraptions to embed wire in wax foundation. The aim is to run a low current through the wires for a few seconds or until they heat up sufficiently. If you do not have the money to purchase a commercial electric foundation wax embedder, you may have your local electrician make something suitable for you.
Cross Wiring Beehive Frames
Cross wiring beehive frames is a method of adding strength and support. It is about having both horizontal and vertical wiring on your beehive frames. Beekeepers with deep beehive frames are most likely to cross wire their frames. Cross wiring leads to more wire being used per frame. In medium and shallow frames, cross wiring does not confer any additional advantages. Cross wiring is done using the same materials, equipment and procedure as the usual wiring of beehive frames as outlined above.
After finishing the right to left wiring, beekeepers then embark on wiring the same frame in a top to bottom direction. If you choose to cross wire your beehive frames, do not twist the wires around each other at their intersections. You may however alternate the cross wires to move under and on top of your right to left wires. Cross wired frames have the wires intersecting at angles of 900. The wires form rectangles or squares depending on how many wires you use on each side of the frames you cross wire.
It may often not be very necessary to cross wire shallow frames. Medium frames too may not need much in the way of cross wiring. The large frames of deep boxes are the most suitable for cross wiring.
Conclusion
Wiring beehive frames can be done for frames used in different beehives. This includes top bar hives, Layens beehives and Langstroth beehives. The Langstroth beehive is the most popular beehive you see in most apiaries. It gives you maximum yield of honey per unit space. It is also very secure for bees, and works well with integrated disease and pest control methods that beekeepers deploy in their apiaries. This article bout wiring frames focuses on the frames found in the Langstroth beehive, but also has excellent content for beekeeper that use other beehives in their apiaries. Wiring frames is done in the same way for all beehive types and uses the same materials and equipment.
Given the pros and cons of wiring frames, it rests upon individual beekeepers to decide if they will wire their beehive frames. Wired frames last longer and vertically hold up comb properly. They do not allow sagging even in hot climates. Beekeepers should adopt wiring in their beekeeping to save themselves from the hassle of blowouts during honey extraction. Those who practice beekeeping in hot climates should also use wired frames even in their brood boxes.
What do you think of this DIY guide? How do you suggest it could be improved, or how would you do it in your own way? Leave a comment below and let us know.
[…] electric embedder is a device that is used to embed wire into wax foundation. It uses electric currents to heat wires looped through the frame. The hot wire […]