
If you purchase an independently reviewed item through our site, we earn an affiliate commission. Read our affiliate disclosure.
Regular beehive inspection is important in monitoring the progress of your bees. You are able to identify problems early and solve them. Inspecting your beehive is important for both the beekeeper with a single beehive and those with apiaries. Different beehives have their unique inspection and maintenance schedules. Some hives may easily go for a long time without needing inspection while others may require weekly inspections. Beehives in their first year generally require more frequent inspections. In its second year, the hive will require considerably fewer inspections. It is generally recommended, however, to inspect your beehives at least every two weeks. To assist in this task, you can use the BeeKeepPal apiary management software, which is available for free.
The Beehive Inspection Basics
1. What to look out for
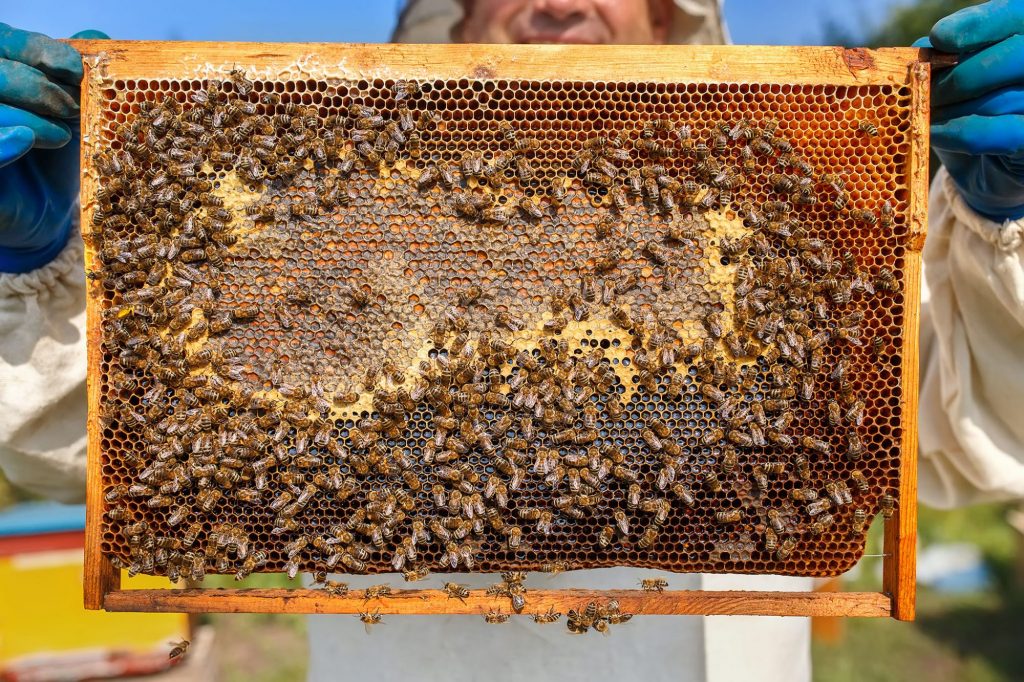
There are a number of things you can be on the lookout for during a beehive inspection. Generally, the health of the bee colony and the structural integrity of the beehive is topmost. Watching your bees often and listening to them will help you establish baselines for the easy noticing of problems. Those with a great sense of smell may also use it to get a hint of how well things are in their beehives. Beekeepers should know that good brood health must be assessed every now and then. Take every opportunity to determine brood health during a beehive inspection. Drops in bee numbers show poor brood health. If you’ve noticed brood decline in your hive, you may consider using a brood booster or feeding your bees with pollen patties.
2. Planning Ahead
A beehive inspection allows you to anticipate colony growth. Use the opportunity to decide about the addition of space for your bees. This involves adding more frames or beehive boxes. Beekeepers should add more space for bees before it becomes absolutely necessary. Larger bee colonies are more capable of surviving harsh weather.
Things to Note:
- A bee colony that gets too big for the space it lives in may splinter or move away from the beehive.
- There are various methods of controlling bee colony sizes such as splitting a hive. Your beehive inspection will tell you if it is time to reduce the size of your bee colony.
- Splitting the colony is one of the methods to control swarming. Queen cups and other preparations for swarming will alert you during beehive inspections.
3. What Not to Wear
During hive inspections, avoid wearing perfumes, colognes or using scented hair sprays. Sweet odours draw the attention of bees more than you want during an inspection. You should also remember to take off jewellery, especially rings. If you get stung on the finger, the swelling will be much tougher for you to deal with when you have on a ring. This is because rings do not expand. Leather and wool are materials that may irk bees. Their smell aggravates bees and the materials retain a significant amount of body odor that is perceptible to bees.
4. What to Wear
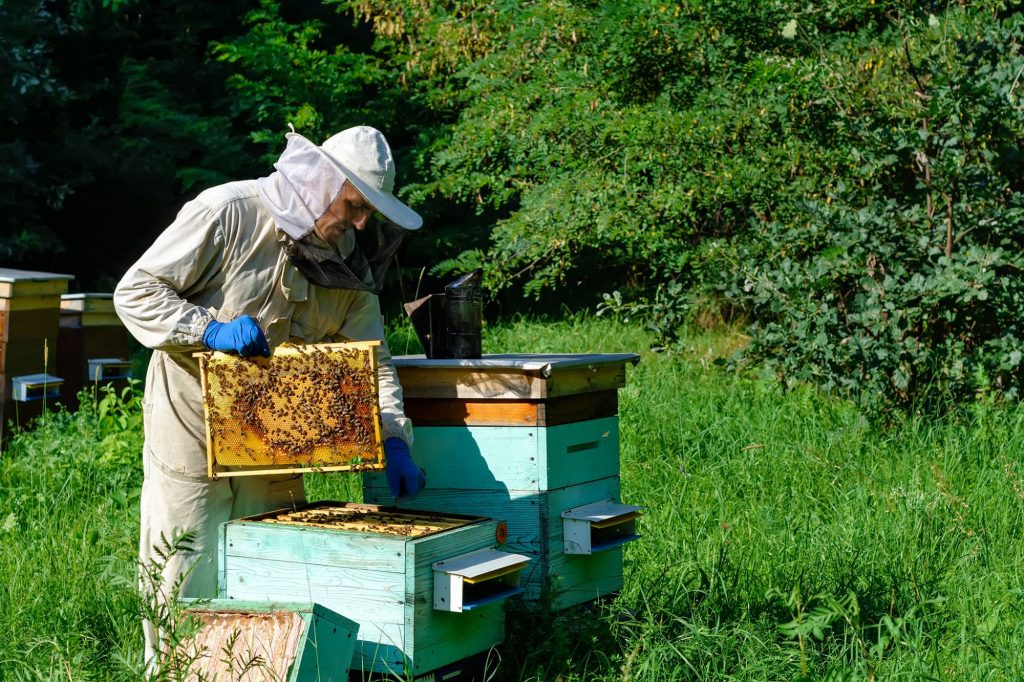
A beehive inspection by its nature and goals places you in close proximity to bees. Safety is foremost for beekeepers. You should remember to wear protective clothing and seal it up well during beehive inspections and every time you are near a beehive. It only takes one angry bee stinging you and aggravating a whole lot of worker bees in the hive. In addition to safety equipment, make sure to have a hive tool and a smoker for beehive inspection.
Safety Tips
- If a bee manages to find its way into your veil or under your beekeeping suit during a beehive inspection, try not to panic. Walk away from the hive without squeezing the bee.
- Only take off your veil or suit while at a safe distance from any beehive. At a safe distance, you may address the issue of the bee under your beekeeping suit.
- Thrashing and other panic behaviour will lead to more aggravation of the bees. You will also be more likely to make a mistake if you panic.
5. How Often Should you Inspect a Beehive
The frequency of opening a beehive varies from one to the next. Beekeepers too may vary their beehive inspection schedules based on their availability to carry out said inspection. While beekeepers need to keep tabs on their bee colonies and beehives, they should also not be bothersome to the bees. The average beehive should be inspected every 2-3 weeks. Newer beehives require inspection every 7-10 days for progress monitoring.
As the beehive stays longer with bees in it, beekeepers gradually increase the time between hive inspections from days to weeks. Consider that every intrusion into the beehive takes the bees a day to recover. This means wasted time that would be better spent collecting nectar and pollen for use in the hive. This applies even to newly installed bee colonies. If you take to disturb them too much, they may decide to leave the beehive and go live elsewhere.
Beginner beekeepers may be anxious about how well their bee colony is faring. In their inexperience, they may end up opening up their beehives too often. Very frequent beehive inspections may lead to colony stress. Bees do not consider it normal to have intrusions around and into beehives. The effects of colony stress are not good for beekeeping. Bees may leave the hive or kill off their queen. Others have been observed to change queens with higher frequency. It is right to inspect a beehive, but do not overdo it. Every time you are carrying out a beehive inspection, be sure you have a valid reason for it.
6. When Not to Open a Beehive
Opening a beehive is quite a stressful time for bees. Bees need time to recover after every intrusion you make during a hive inspection. To prevent lowered productivity and health of your bees, you should not open a beehive very often. Weather considerations also determine the suitability of carrying out a beehive inspection. Use the CheckInspect web app to see if your weather conditions are suitable for a beehive inspection.
In cold weather, beekeepers are advised to avoid opening beehives. Mild weather conditions are best for beehive inspections. It should not be too hot, windy or cold. Rainy or cloudy weather is also not suitable. Lifting out brood frames is especially injurious to your bee colony. Cold affects the brood leading to poor development.
In the months of winter, bees warm the hive using honey as an energy source. Opening a beehive during winter adds the pressure to keep the beehive warm. Bees will consume more honey, reducing the resources available for the bee colony to use over winter.
7. Best Time of Day to Inspect the Beehive
To make beehive inspection friendly and an easy time for bees, make sure not to cover or block the entrances of the beehive with your body. Timing a beehive inspection is practiced by professional beekeepers. They approximate the time of day most bees are out foraging and inspect the beehive during that time. This allows for fewer bees in the hive to be aggravated. Between the hours of 11 AM and 2 PM, you have a great window to carry out your inspections. You should be very careful with the queen bee during the inspections.
About the Queen
- You may not have to see the queen in every beehive inspection.
- Eggs laid in cells are an indicator that the beehive has an active queen bee.
- Beekeepers that do not have experience identifying the queen bee may mark her for easier spotting.
Rely on Natural Light
It is not usual for beekeepers to carry with them lighting equipment for use during beehive inspections. Beekeepers rely on natural lighting while opening up the beehive and putting it back together. The hours of the day between 11 AM and 2 PM have an additional advantage in that the sun is high in the sky. It lights up the inside of the beehive as you open it up and inspect it. Doing a beehive inspection outside these recommended hours means that you will have less light to work with.
8. Inspections During Winter
Wintering bees become less active. They cluster deep in the hive and may not come to the top. Winter beehive inspections should be done quickly. They are best done when the temperature is not too low. A quick peek is all you may have. Your beehive inspection in winter is also a good time to feed your bees. Sugar cakes and protein patties are the common foods beekeepers give their bees over winter. Do not take the full beehive apart during winter. Beekeepers carrying out a beehive inspection in winter may only remove the top cover and inner cover. If you have insulation covers on your beehive, you may remove the top panel. For more information, check out our article on helpful tips for beekeeping in winter.
When to Inspect a Beehive
Having seen the value of inspecting a beehive in beekeeping, let us now explore when you should inspect a beehive. There are several factors that influence when to inspect a beehive. They lead us to decisions on what time of the year to carry out a beehive inspection, and what time of day.
Ultimately, the purpose for which you are carrying out a beehive inspection determines when you carry out the inspection. Major reasons include:
- to check the accumulation of beehive resources such as honey and beeswax
- to check on the progress of newly installed honeybee colonies
- to find out if the treatments you applied are working
- to find out anomalies in drawn honeycomb
- to check honeybee colony growth and anticipate swarming
- to monitor the health of your honey bee colony
- to install and remove feeders and watering equipment
- to install and remove traps for pests and parasites of honeybees
- to install and remove beehive components and equipment
Time of Year
Beehive inspections are required during each of the four seasons of the year. You have to be especially careful not to forget to inspect the beehive so that you can track progress well. Additionally, you are able to notice problems and challenges facing the honeybee colony on time.
Each season there are different things to check for, which we’ll discuss below:
Winter
In winter, the honeybee colony is under highly stressful conditions. You should check on the colony when it is safe to do so. The cold of winter and lack of forage in the environment causes honeybees to eat stored honey. In each beehive you have in your apiary, the survival of the colony depends on the availability of feed for the bees. If they exhaust the feed they have, they starve to death.
Beehive temperature is also something you should keep track of. Insulate the beehive if you can. Keep beehive inspections to a minimum in winter. Opening up the beehive gives the bees too much work warming it up again.
Spring
In spring, check for colony growth, collection of beehive resources and materials, pests, parasites, diseases and creation of honeycomb. You may also check for accumulation of beehive products to harvestable levels. As the year moves through spring, the level of activity in the beehive increases. You thus need more frequent beehive inspections.
Summer
Ensure to inspect the beehive in the summer. Look out for the need to harvest accumulated beehive products of your interest. Additionally, check for colony health, the risk of swarming and colony growth characteristics. You may need to make adjustments to the beehive to help with temperature control, such as adding a screened bottom board. Summer is a very active season for honeybees. You need more inspections in summer to ensure everything is alright in the beehive.
Autumn
In autumn, the supply of forage material dwindles. You should carry out several beehive inspections to help you foresee swarming before it happens, determine colony health, and see if the colony has enough resources to last it through winter. The number of beehive inspections you should carry out in autumn is not many since the level of activity in the beehive is less.
Time of Day
There are times of the day when carrying out a beehive inspection works best for the purpose of your inspection. Factors that determine what time of the day to carry out a beehive inspection include the aggravation of the honeybee colony and whether you want to work with a full hive or a few honeybees in the beehive.
If you are looking to work with a few honeybees in the hive, go for a mid-day beehive inspection when worker bees are out in the fields foraging for beehive resources. Do not wait for the afternoon when bees may be back in the beehive due to too hot temperatures outside the beehive.
For working with the entire population of bees in the beehive during an inspection, wait for late evening time. All the bees will have returned to the beehive ready for the night. You may wait for the temperature to drop so that the honeybees are not very active.
Carrying out a beehive inspection when there are few honeybees in the beehive causes minimal aggravation. Only the honeybees in the beehive at the time will know that the beehive was opened up. Additionally, an evening inspection gives the bees the entire night to calm down. By all means, avoid having to carry out a beehive inspection in the morning and, therefore, have the bees angry during the day.
Using a Beehive Inspection Checklist
Beekeepers may use a beehive inspection checklist during beehive inspections. A checklist will help you to accurately carry out all the planned activities for a beehive inspection. It helps you keep track of what you have done during every inspection and helps to create a historical record of the health of your hives.
Beekeepers may have a template checklist for different types of inspections. A checklist may have a number of set items and space for you to add more.
Beehives are unique in their own way and each may require its own checklist. Varying designs of beehives have different structural issues to look out for. Some beehive designs may encourage the improper drawing of comb by bees. Such burr comb should be removed promptly during beehive inspections. The checklist helps you notice trends and patterns quickly.
The general number of areas and beehive integrity aspects that you need in your inspection checklist include (but are not limited to):
- The general hive appearance
- Evidence of pests and diseases
- Prevailing weather conditions and reproduction
There are many checklists available to beekeepers and some may prefer to have more detailed checklists than others. Indeed, each beekeeper is free to choose the level of detail in the checklist they use in their apiary. Sign up now for free for the BeeKeepPal apiary management software that provides you with an easy-to-use checklist as you digitally record your beehive inspection.
A Beehive Inspection Plan
Heading out to inspect your hive must be done with a plan. Beekeepers should have it clear what they intend to do during the inspection. A beehive inspection plan gets into motion as soon as you approach the hive. Your movements around the beehive should also be friendly to bees. Gentle movements are encouraged. They perceive fast movements more than slow movements. Beginner beekeepers may often end up feeling like they have not fully inspected a beehive. This feeling diminishes as you gain experience and as the bees settle more into a hive.
1. Identifying Diseases
Diseases you may note during a beehive inspection include foulbrood disease. You will identify this disease when you see a lot of dark dead brood. Honey bee brood is puffy white coloured. Foulbrood is darker coloured. When checking for foulbrood, you should have your back to the sun. The frame under inspection for foulbrood disease should have its top bar towards your chest. If you notice any signs of foulbrood infection, take containment measures immediately.
2. Practice Cleanliness
Cleanliness around your beehive should be observed during inspections. Beekeepers acknowledge that they are directly involved in the production of food for human consumption. Hygienic production of honey and bee products is a target for all beekeepers. Before heading out to your apiary for a beehive inspection, make sure that all tools and equipment you will be using are clean. You should also get into the habit of cleaning the tools and equipment after every inspection.
Conducting Your First Beehive Inspection After Installation
The first hive inspection after installation is a very exhilarating time for beekeepers. It is time to know if the bees have really taken to the hive and accepted the queen. This assurance of a working colony of bees assures you that you have successfully started on your beekeeping journey. The first hive inspection after installation should be very well planned. Beekeepers should use a checklist so they do not miss any important detail.
Beginner beekeepers on their first hive inspection after installation should make sure to wear protective clothing. There are many types of beekeeping protective wear including beekeeping suits, smocks and jackets. Gloves too and veils are available in beekeeping supplies stores. Some retailers also sell online. With various sizes, colours, designs and functional additions to beekeeping protective wear, beekeepers have no reason to err by being not cautious enough. You may get stung once or twice in your beekeeping journey, but being stung up by many bees is a painful experience that you should not encounter.
How to Carry Out a Beehive Inspection
A beehive inspection is a process of methodically taking apart your hive and putting it back together while bees are living in it. You may practice how to do an inspection before you install bees in it as this will allow you to be familiar with the process. Having practiced an inspection without bees, you will find it easier to carry out an inspection with bees.
A beehive inspection can be intimidating for beginner beekeepers but you should know that an inspection is an easy activity that is carried out procedurally. After gearing up and getting everything you need for a hive inspection, approach the beehive slowly. Remember your movements have to be gentle and relatively slow. By knowing how to carry out a beehive inspection well, you avoid damaging the beehive, hurting your bees and reducing the risk of getting stung.
- Beekeepers on a beehive inspection should aim to keep bees calm. This involves the use of smoke and your behaviour as well.
- Avoid making loud noises. Thumps and bangs on the hive only serve to aggravate bees.
- While opening up the hive for inspection, place items gently. This especially applies to metal parts such as top covers.
Steps
- To begin your beehive inspection process, remove the outer cover of your beehive and place it facing up on the ground.
- Next, remove empty hive boxes and place them on the outer cover if possible.
- Using your hive tool, next, pry apart the inner cover and lift it a couple of inches.
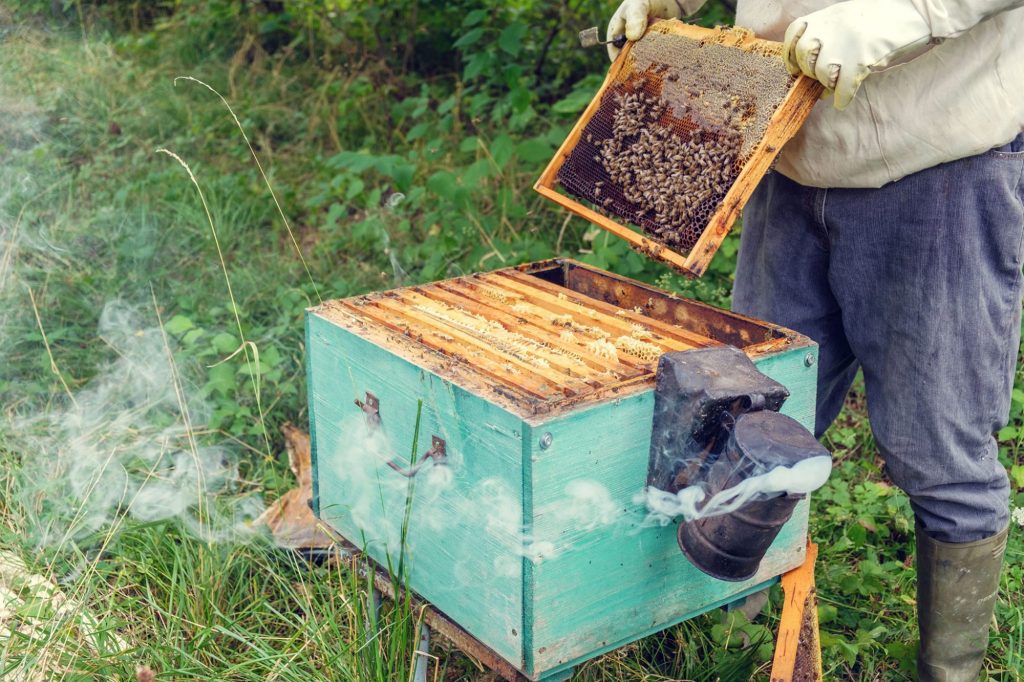
- Through the created gap, puff in a little smoke using your smoker. Smoke makes bees start gorging on honey. During the time they are eating honey, they generally leave you to your devices.
- After blowing some smoke into the beehive, gently pry apart honey supers and remove them one at a time. You may stack your honey supers on the outer cover. While removing the honey supers, puff smoke between them.
- When you reach the queen excluder, remove it and then place it facing upwards on the honey super boxes that you removed. You may then proceed to remove the brood chambers and place them on the queen excluder.
- Observation of the insides of your beehive starts with the bottom chambers. Use your hive tool to push the frames to one side of the deep box.
- Frames can be pried apart using the hive tool if they are stuck to each other. Begin inspecting the frames one after the other. While inspecting frames, hold them over the hive body by their top corners.
- Inspect both sides of the frames and take note of the queen’s presence. You should also be on the lookout for the quality and amount of pollen, signs of disease, and unsealed and sealed brood.
- After inspection of each beehive box, reassemble it and restack the beehive. Smoke the bottoms of each hive body before placing it on your beehive. After restacking all the hive bodies and covers, replace the outer cover. You may then weigh down the outer cover with a heavy object such as a brick, or any other object of your choice.
Tips for Using the Bee Smoker
The amount of smoke you use in during a beehive inspection is very important. You should not use too much smoke since it upsets bees. If you use too little, the bees will not be calmed as desired. Cool smoke in small quantities does the trick. As you gain beekeeping experience, you will get better at using just the right amount of smoke in a beehive during a beehive inspection. To approximate the temperature of your smoke, place your hand in the path of the smoke. With a few puffs to your hand, you will tell if the smoke is too hot for use.
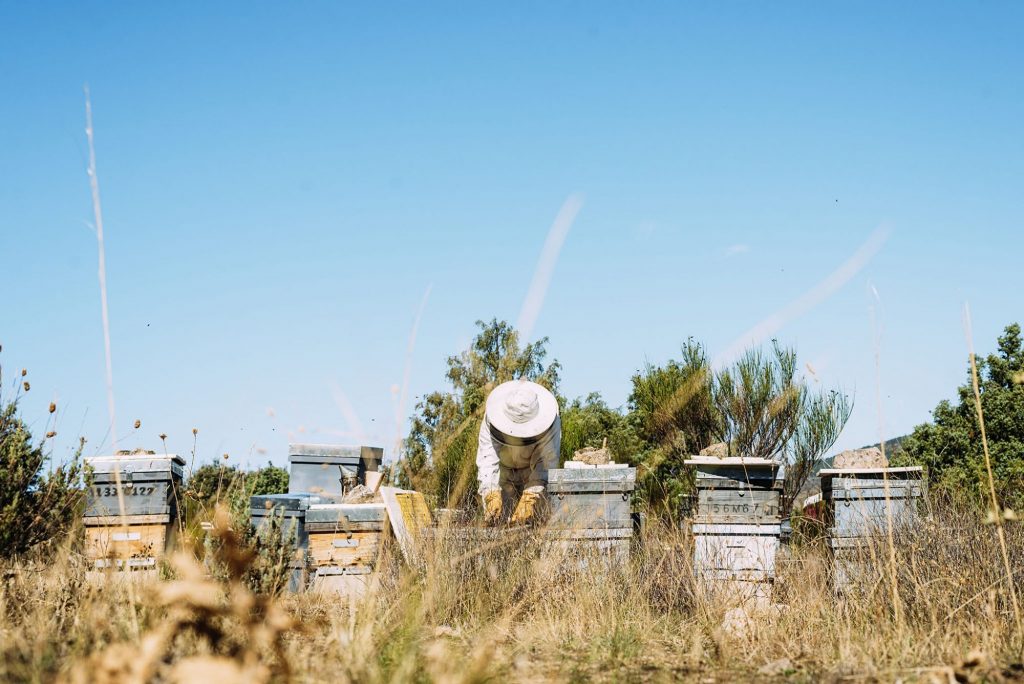
Blowing smoke across the frames of your beehive during an inspection is preferable to blow it directly and straight into the beehive. It introduces smoke more gently into the hive. Additionally, blowing across the frames helps you easily regulate the amount of smoke going into the beehive. Smoke is used in beehive inspections for its calming effect. Some beekeepers with large spaces carry out inspections without smoke. However, the bees get very aggravated. They may sting nearby individuals and animals. Beekeepers practising backyard beekeeping should always use smoke during hive inspection to avoid hurting neighbours.
Prepare your smoker well before getting to your beehive. Smokers generate smoke by smouldering fuel. Smoke masks alarm pheromones released by bees. Beekeepers have a variety of smokers to choose from in the beekeeping supplies market. The commercially available smokers have varying designs, and functionality and are made to be used with varying fuel types. Common smokers use fuels made from hessian, corrugated cardboard, pine needles, burlap and rotten wood. Herbs too may be used. Commercially sold fuels may be made from pulped paper or compressed cotton and packaged as smoker pellets.
Seeing Dead Bees During an Inspection
During a beehive inspection, noticing dead bees in the beehive can be very alarming to beekeepers. Bees die of both natural and unnatural causes. Upon seeing a dead bee during an inspection, you may investigate it for signs of diseases and Varroa mites. Bees die at a rate based on their age, activity, pests, diseases and availability of food. Busy bees die faster than less active bees.
In your observation and inspection of your beehive, note the average number of dead bees you see in the hive and around it. In winter, bees are less active and thus tend to live longer. Even then, some will still die due to the hive activities they carry out such as warming the beehive. Some predators such as giant hornets, wasps, and robber bees may cause a spike in the number of dead bees you see during a beehive inspection. These predators may enter a beehive and cause alarm in bees. In defending the beehive, your bees often surround the intruder and heat it up. Some bees may sting the intruder too.
If all the bees in a beehive are dead during a hive inspection, the investigation you carry out should be much more thorough. In winter, bees die in larger numbers than in warmer seasons. Starvation, condensation and cold are the typical bee killers during winter. To make sure that your bees survive winter, give them adequate food reserves. You may also try insulation to keep out excessive cold.
A dead or dying bee is taken out of the beehive. Beekeepers christen the bees tasked with clearing out the dead as undertaker bees. The undertaker bees fly dead bees some 20 or so feet away from the beehive. If you are lucky to see undertaker bees in action during a beehive inspection, you will notice that dying bees rarely put up a fight against undertaker bees.
Clear-view Panels for Quick Inspections
Some modern beehives are built with clear-view panels on the sides. These make hive inspection a little more friendly to bees since you do not have to open up the top of the hive. Popular clear-view beehive makers include the Flow Hive or the SummerHawk Ranch Backyard Beehive with Quick Check Super. Top bar hives with clear-view panels are also available to beekeepers. The inspection of beehives with clear-view panels still requires you to wear protective wear. It however goes faster and causes the least stress to your bees.
Conclusion
Taking notes is a great way of gradually increasing your inspecting speed. Over time, you will learn about your beehives and can inspect them much faster. With good note-taking and record-keeping, you are able to have a healthy colony of bees. Read up on the notes you take to freshen up your experience of beekeeping. Your beekeeping records should capture events and observations of what you see and do at the beehive during the inspection. A dedicated notebook comes in handy for taking notes and retrieving them easily.
What are your thoughts on this article? Leave a comment below and let us know.
DO NOT wait 4-6 weeks before inspections. Things can go h0rribley wrong. 2 weeks max between checks and for the LOVE OF GOD – monitor and treat for mites.
That 4-6 weeks are for hives that are well established. But I take your point.
even established hives – 2 weeks. Diseases, mites, Queen
etc
[…] have more equipment given their designs. These require space and it often takes much longer to inspect a WBC hive unlike any other. Bees when taken good care of, rarely have any issues with where or what they are […]
[…] have more equipment given their designs. These require space and it often takes much longer to inspect a WBC hive unlike any other. Bees when taken good care of, rarely have any issues with where or what they are […]
Great article. Especially if it’s been more than six weeks, and you’ve forgotten how. It’s hard to handle frames, and work the camera at the same time.
[…] honeybee diseases. When left untreated, the diseases can kill your entire honeybee colony. Timely beehive inspections and application of treatments when you notice diseases, is the best safeguard against beehive dead […]
[…] honeybee diseases. When left untreated, the diseases can kill your entire honeybee colony. Timely beehive inspections and application of treatments when you notice diseases, is the best safeguard against beehive dead […]
[…] it is your first time inspecting your beehive, then you can be puzzled when you come across some dark or black combs. As a matter of fact, some […]
[…] ailments. When left untreated, the ailments can kill your complete honeybee colony. Well timed beehive inspections and software of remedies if you discover ailments, is the perfect safeguard in opposition to […]
[…] able to engage with ease and enjoy the benefits of beekeeping. The beehives are close to you, so hive inspections and management are easy to plan and carry out. With apiaries that are located far from you, the free time you get […]
[…] your beehive inspection, look out for signs of wax moth infestation. This involves checking brood comb for wax moth larvae, […]
[…] This relates to the fact that beekeepers are discouraged from using strong scents during a routine inspection of beehives or while harvesting […]
[…] of years. Nonetheless, the beekeeper has to be wary of the existing conditions for various reasons. Hive inspection, bottling of honey, or making beeswax are activities that require perfect timing. These activities […]
[…] bees must have sufficient room for the honeybees to transport round, be obtainable for normal inspection or honey harvesting, and feature enough house for honeybee product […]
[…] bees ought to have sufficient room for the honeybees to maneuver round, be accessible for normal inspection or honey harvesting, and have enough area for honeybee product […]
[…] with the beekeeping tools, it is advisable think about when you have the required time to examine the beehives. On common, you’ll require half-hour per week to examine a single hive. Two or extra hives […]
[…] are tools that can be hung onto the side of the hive body or the honey super when the beekeeper is examining the colony or harvesting honey. They help to keep the frames off the ground and allow the beekeeper to keep […]
[…] addition to the beekeeping equipment, you need to consider if you have the required time to inspect the beehives. On average, you will require 30 minutes a week to check a single hive. Two or more hives will […]