
If you purchase an independently reviewed item through our site, we earn an affiliate commission. Read our affiliate disclosure.
Langstroth beehives are synonymous with modern beekeeping. From the invention of the beehive, it has gripped the beekeeping industry like a giant. The iconic beehive provides a great home for honey bee colonies when built well. It is divided into the lower section, beehive boxes and the upper section. Langstroth beehives have several components that are held in it including beehive frames. This article guides you on how to make Langstroth beehive frames. The frames are held in beehive boxes that make up a beehive stack. We will look at deep beehive box frames, medium and shallow beehive box frames. The frames you make can be used in both 8-frame and 10-frame Langstroth beehive setups.
About this Series
This post is part of a series on how to build a Langstroth beehive.
Sections
In this series you will learn how to build:
- Brood boxes
- Super boxes
- Beehive frames and wire them
- Queen excluder
- Bottom board
- Hive cover
- Entrance reducer
- Hive stand
About Langstroth Beehive Frames
Frames used in Langstroth beehives are today made using two materials: wood and plastic. Plastic beehive frames for Langstroth beehives are better off purchased from commercial suppliers. They are difficult to make using locally available materials. It is easy for beekeepers with some DIY skills to make wooden beehive frames.
Bees loves wooden parts and components in the beehive. Wood is more readily accepted by them than plastic. Langstroth beehive frames made using wood can be used without foundation. This is unlike plastic frames that come with plastic foundation on them. When you want foundation on the Langstroth beehive frames you make, you have to install it yourself. It may take a little practice to become great at installing foundation, so be patient and ready to make a few mistakes along the way.
Types of wood you can use
Different types of wood are used to make Langstroth beehives and their components. For beehive frames, you can use pine wood, cedar, spruce, fir or cypress. For best results, use cedar wood when making beehive frames. When you do not have any cedar wood, any of the other available types of wood will work just fine. Your location often determines the type of wood you can get with ease. Additionally, you might consider the cost implications of buying different types of wood and go with the one that fits into your budget.
Functions of Langstroth Beehive Frames
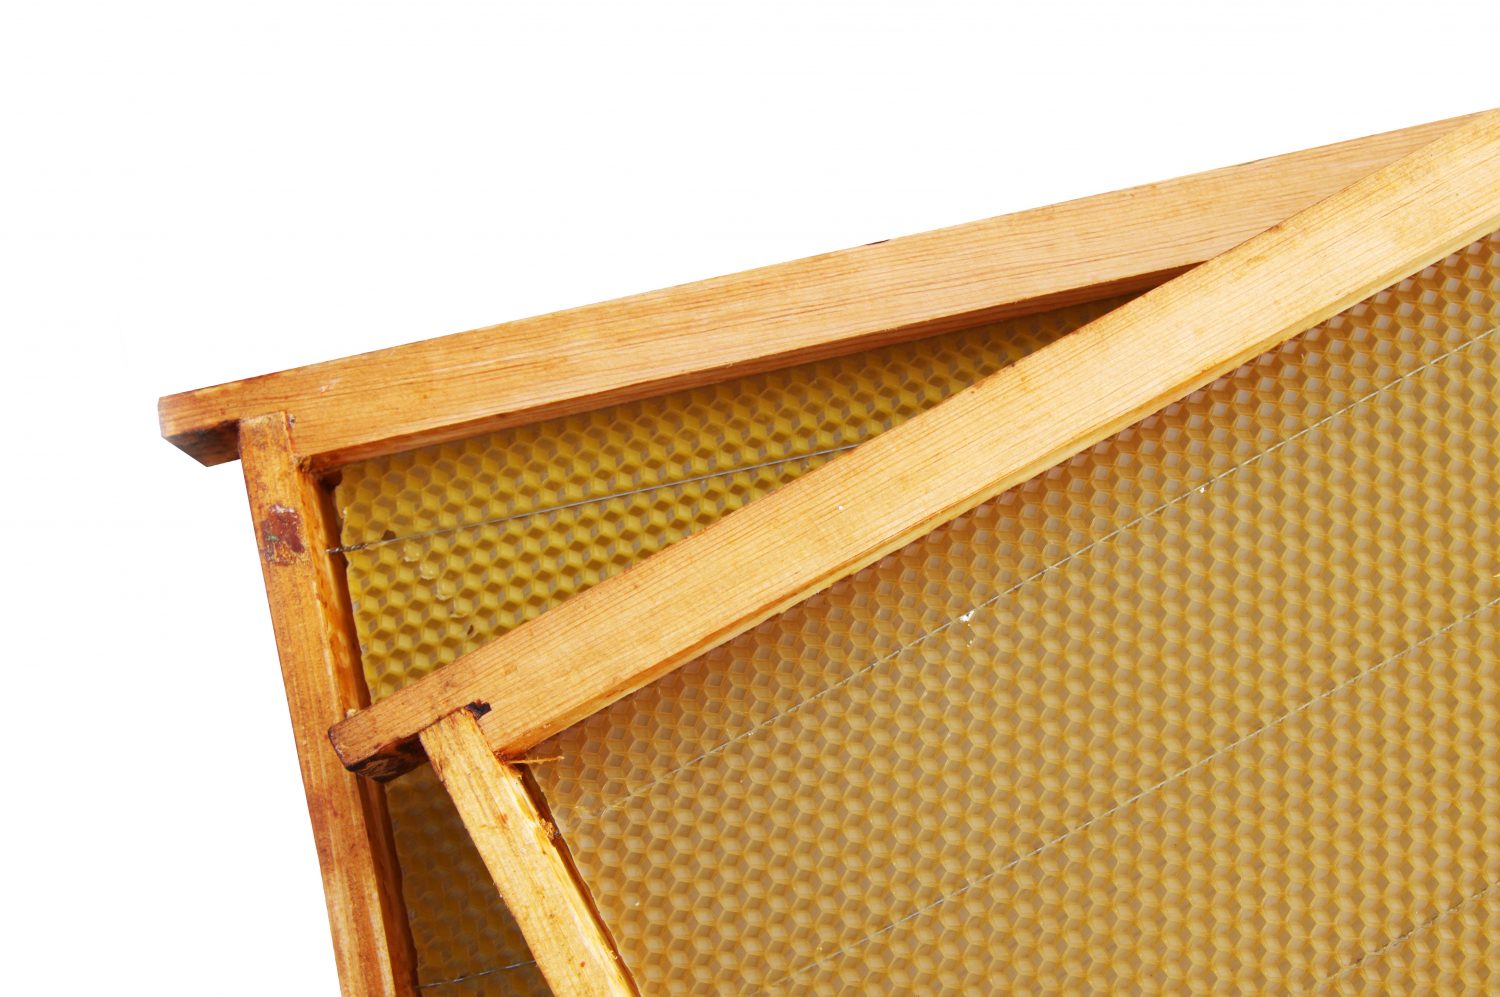
Beehive frames in Langstroth beehive are an important component. Honey bees make honeycomb on them for rearing of brood and storing honey. The frames are made better at holding honeycomb by embedding them with wires. When wired, they are less likely to get damaged during honey extraction. Frames used in brood boxes can be without wires since they are not subjected to extraction.
Standard Frame Dimensions
When you are making Langstroth beehive frames, there are standard measurements that you must follow. The measurements cover deep frames, medium frames and shallow frames. Each of these frames is suitable for use in a beehive box of its respective depth. Deep boxes and frames are for brood while the other two types of beehive boxes take frames for honey storage.
Beehive frames leave a space of 10 mm from the bottom of the beehive and the sides. This space is used by bees to access the frames and go up into the next beehive box.
All beehive frames for a Langstroth beehive have the same width of 35 mm and length of 480 mm. The frames you make can be used in both 8-frame and 10-frame Langstroth beehive setups.
Deep Beehive Boxes
For deep beehive boxes, the frames measure 35 mm wide, 480 mm long and are 230 mm deep.
Medium Beehive Boxes
Medium depth beehive frames also have a width of 35 mm and a length of 480 mm. Their depth is 160 mm.
Shallow Beehive Boxes
The measurements for shallow beehive frames are 35 mm wide, 480 mm long and 134 mm deep.
Making Langstroth Beehive Frames
Equipment and Materials Needed
- Lumber
- Hand or power driven sawing tool
- Hammer
- Wood glue
- Dremel, Router
- Sand paper
- Square
- Yard stick calibrated inches, if possible cm too.
Step 1 – Preparations
- Prepare your working area well before you start the actual process of making Langstroth beehive frames.
- Collect the materials and equipment you need so that they are all within reach.
- The process of making beehive frames involves cutting and sawing. Use a yardstick or measuring equipment to measure the lengths of wood you need. Wood that is 3.5 mm wide can be use on all sides of the frames.
Step 2 – Cutting the Wood
- Cut the wood using a saw to the appropriate sizes. You can group the pieces of wood so that they are easy to identify during assembly of the frames.
- The top bars of wood that make the upper length of the frame are longer then the bottom bars by 10 mm. This allows projection of 5 mm on each end that will sit on the rebates of your beehive boxes.
- It is best to make frames of one depth at a time. Making frames of different depths at the same time can result in wastage of wood if you make a mistake and say put a medium depth sidebar where the other sidebar is a deep sidebar.
- Langstroth beehive sidebars give the frames their depth. The bottom bars make the bottom length of the beehive. They are cut to a length of 470 mm for all types of beehive frames. Cut the top bars of the frames to 480 mm. The sidebars for Langstroth beehive frames measure 230 mm for deep beehive frames, 160 mm for medium depth beehive frames and 134 mm for shallow beehive frames.
- Joining the different beehive frames is done using wood glue and nails or screws.
Step 3 – Adding Holes into the Sidebars
- When making the frames, you may add holes to the sidebars for use when wiring.
Step 4 – Adding Grooves
- Upper bars on the frames have grooves and leading edges of various types.
- If you are using foundation in your beekeeping, make grooves to hold the foundation in the top bars and bottom bars.
- If you will not be using foundation of the frames, you can leave the wood without a groove. However you should cut a line into the wood to help bees get better grip on the frames when they start making comb.
Step 5 – Adding Notches
- On your beehive frame sidebars, prepare notches that will hold the top and bottom bars. These notches should be of a depth that is equal to the thickness of the wood you are using. They give the frame better strength and ensure exact sizes of the beehive frames are maintained.
- Additionally, Langstroth beehive frame sidebars taper down. Make sure these tapers early on so that you do not need to work on the sidebars after assembly.
Step 6 – Gluing the Pieces Together
- Use some glue on the upper groove of the side bar for one beehive frame. This is the groove on the side bar’s thicker section. As you get used to assembling frames, you will get good at applying just the right amount of glue.
- Take one top bar and fit it into the side bar groove where you applied some wood glue. Make sure to push down the top bar into the groove tightly. The wedge cleat groove on the top bar should be on the inside when you are fitting the top bar into the side bar.
- Glue the top bar and the second side bar together in the same way you did the first side bar. Turn the 3-sided partially assembled frame upside down and apply some glue to the grooves on the bottom side. This is the narrower section of the side bars.
- Take one bottom bar and fit it into the grooves on your two side bars. The groove on the bottom bar should be in the inside. Make sure the bottom bar fits snugly into the grooves on the side bars.
- Using a paper towel or clean waste cloth, wipe off any excess glue that may have leaked out of the joints on your partially assembled beehive frame.
Step 7 – Nailing the Frame Together
- It is now time to nail the frame together. You should not wait for the glue to dry before you have nailed together all the frame’s wooden pieces. A single beehive frame takes not less than 10 nails for best strength of the joints. Four nails are used on the bottom, four on the top, and one nail into each side of the beehive frame.
- Hammer a single nail into each bottom ends of your frame so it goes through the bottom board and into the respective side bar. Check if the frame joints are square after nailing in each nail. If the frame is not square, gently muscle the joints into place until they are square.
- Hammer an additional nail into each of the ends in the bottom bar of the frame. This brings the total number of nails hammered into the bottom bars to 4.
- Flip the partially nailed frame over and hammer a nail into each end of the top bars. The nails should go through the top bar and into the respective side bar.
- Check for square 900 angles in the top joints and muscle them gently into place if necessary. If the joints are square, hammer in an additional nail into each end of the top bar.
- Beehive frame top bars have a thick and narrow edge on their inner part. Hammer a nail into your side bar near the top. The nail should go through the side bar and into the thick section of the top bar. This is done on both side bars. The nail helps your beehive frame last longer without the side and top bars separating.
Foundation and Types of Foundation
Foundation in beekeeping is used as a guide for bees on where to build comb. It keeps the comb straight. Using foundation helps bees get through drawing comb quickly. There are two types of foundation used in Langstroth beehives: plastic and wax. Plastic foundation is stronger than wax foundation. It is long lasting and does not need embedding into frame wires. The foundation is however not readily accepted by bees. It needs coating with wax for bees to draw comb on plastic foundation.
Wax foundation needs embedding into frame wires to add strength to it and keep it straight. Bees readily draw comb on wax foundation. The comb drawn on wax foundation is continuous with the foundation. It does not separate from the foundation in extremely cold weather as seen in plastic foundation. One problem with wax foundation is its capacity to introduce diseases, pests and parasites into the beehive. Make sure to get wax foundation from reliable suppliers so that you do not put your honey bees in harm’s way.
The Case Against Foundation
The use of foundation in beekeeping has some disadvantages that beekeepers should be aware of. Most important of these is that foundation causes bees of one uniform size to be bred when used in brood frames. Naturally, bees in a beehive have different sizes for workers, the queen bee and drones. With foundation, the size difference between these bee types is not realized. As a result, some pests and predators find it easier to attack bees or thrive in a honey bee colony. Foundation is also not very suitable for beekeepers who aim to harvest wax as one of their beehive products. With foundation, harvesting the wax is either not feasible or results in small blocks of wax instead of large sheets.
Beekeepers that are naturalists or aiming to sell off package bees have to go foundationless. Additionally, experience levels of individual beekeepers play a major role in the adoption of foundation in apiaries. Beekeepers who are experienced can harvest honey from foundationless beehive frames without breaking the honeycomb. They do not need foundation for its ability to help keep honeycomb intact during honey harvesting.
How to Install Wax Foundation in Frames
Wax foundation and plastic foundation have their similarities, advantages, differences and disadvantages. The use of wax foundation allows beekeepers to be fully natural in their beekeeping operations. However, wax foundation has higher probability of breaking when subjected to the centrifugal forces in honey extraction. Wax foundation also requires embedding which is not required for plastic foundation.
Installing wax foundation requires extra steps in the preparation of beehive frames. Wax foundation is weaker than plastic foundation and so needs additional strengthening. This starts with wiring the frame. You will need the following:
- A hammer
- Frame wire
- Assembled frame
- Eyelets
- Eyelet punch
- A needle nose or crimper or lineman’s pliers
- A number of 5/8-inch nails
Be sure to lay out the tools in a manner that leaves them easy to see, reach, grip and use.
Step 1
- Nail the eyelets into the sides of the frame using an eyelet punch. They prevent your frame wire from digging into the frame wood. A deep frame should end up with 4 eyelets on each side of the frame.
- You may make holes using a suitably sized nail or small size drill bit for the eyelets. Make sure the eyelets are in the general middle or centerline of the side bar.
Step 2
- Partially hammer one 5/8-inch nail into the top bar near the other nails used to join the top bar and the side bar.
- Next, on the same side, partially hammer another nail into the bottom bar near the nails used to hold the frame bottom and side bars together.
Step 3
- Pass your frame wire through the eyelets in the side bars of the frame. Start by passing the wire through one upper eyelet in the side where you partially hammered in the nails.
- The wire should run across the frame to the eyelet on the opposite side bar, down that side bar and through the next eyelet. It then moves to the first side bar and down that side bar to the next eyelet.
- Repeat this until the wire is through all eyelets.
Step 4
- Loop the wire round the nail a few times on one end of the beehive frame and hammer in the nail completely. The loop should rest securely against or in the side of the frame.
- Break any excess wire at the hammered-in nail by moving it back and forth.
Step 5
- Pull the wire using your crimping tool or pliers and pull it tight. Loop it tightly around the second nail so it stays in place. You may cut off excess wire.
- Turn the nail in a circle so it tightens the wire further. A properly tightened frame wire makes a pinging sound when you pluck it.
- When sufficiently tight, hammer in the second nail fully into the frame.
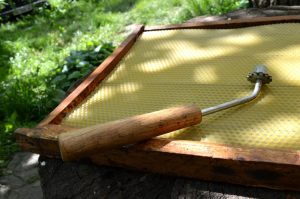
Step 6 – Embedding Wax Foundation
- After wiring your frame, you only need to lay wax foundation onto it and embed it. Wax foundation is rather fragile and can break easily. If you pass the foundation between the wires of your frame, be gentle. The foundation comes in sheets of wax already formed into honeycomb cells pattern. Bees build the comb following the already established pattern and size of the cells.
- Embedders can be used, or you can heat the wire and gently press the foundation into the wire. Wire embedders may be hot or cold. Popular embedders loved by beekeepers are spur embedders. They feature wheels with a groove and heating that makes the job easy and fast. Spur embedders are built in the style of a soldering iron. Internally heated embedders that you plug into a power outlet are great for the job.
- To embed wire using a spur embedder, run the embedder along the frame wire while pressing the wire into the wax.
- Heating frame wire directly for embedding purposes is possible. Beekeepers use gadgets that output 12 Volts or 24 Volts. The 12 Volts power output gives gradual heating while 24 Volts results in fast heating. Electric embedders are fast and may run on DC or AC power.
- It is best to embed wire into wax foundation in a heated room. Take care not to overheat the embedding tools or frame wire until they melt your wax foundation. The foundation should run from the bottom bar to the top bar. Grooves in the top and bottom bars of beehive frames guide you on how deep into the frame the foundation should be. For wax foundation, you may use the top bar wedge cleat or not. The cleat holds foundation in place on the top bar.
Cleaning and Reusing Frames
It is necessary to periodically clean beehive frames. Old wax is removed from the frames so that it does not hold chemicals and disease causing spores in the beehive. Old dark comb removed from the frames is used to make wax products such as candles and wax soap. Clean beehive frames from your Langstroth beehive using water and Clorox. The frames are boiled and propolis scraped off. Once dried, the frames are ready for use in the beehive again.
Beehive frames can be cleaned in any season of the year. It is however easier to clean frames in winter. Beekeepers love carrying out this activity in the mornings of winter when bees are not flying. The process of cleaning frames can start at the apiary or at a selected location such as your backyard or garden shed. Cleaning frames often involves the use of heat and chemicals. This helps remove wax from the frames. It also kills pests, parasites and microorganisms in their various life stages on the frames.
Do Not Paint Beehive Frames
It is common to prime and paint Langstroth beehives. This is usually done on the exterior of the beehive. Beehive frames do not need priming and painting. If you do so, the honey bees may not draw comb on the frames.
Benefits of Making Langstroth Beehive Frames
Making Langstroth beehive frames to use in beekeeping has a number of benefits. You are assured of the quality of the frames since you have made them yourself. The frames are sure to last long and you will be happy working with the frames. Making your own frames is often cheaper that buying frames that are sold by beekeeping equipment manufacturers. Even when you buy frames, you might need to assemble the pieces yourself.
Beehive frame assembly is a simple process with adequate preparation. Sound knowledge about assembling beehive frames enables the beekeeper to build strong and durable frames. Complete beehive frames have foundation on them for beekeepers that use foundation frames.
Conclusion
Use this guide to make great beehive frames that you will be proud of and which will work great for your honey bee colony.
What are your thoughts on this DIY guide? Leave a comment below and let us know.
This is wonderful.
I’m interested to be a bee keeper.
Thank you. You can download our ebooks and learn about beekeeping at your own pace.
https://beekeepclub.com/how-to-get-started-in-beekeeping-ebook/
The article was fine, good info, but would have liked to see some more info on using/building foundation-less frames. You can use foundation-less frames just fine in a hive. Plastic or wax foundation will have chemicals still in them, which could kill the bees. Otherwise, good article.
Without illustrations I’m unable to figure this out.