
If you purchase an independently reviewed item through our site, we earn an affiliate commission. Read our affiliate disclosure.
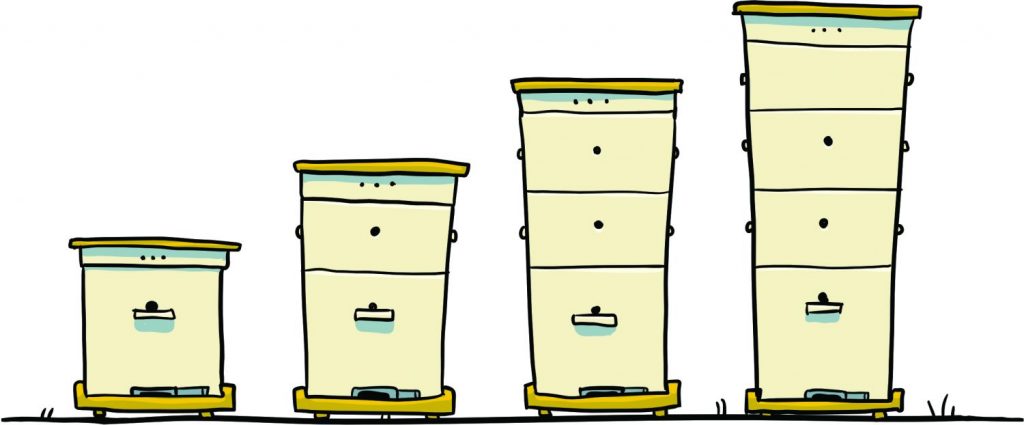
Langstroth beehives make use of boxes stacked on top of each other. This feature gives the Langstroth beehive superior expandability by making use of available vertical space. There are two sizes of Langstroth beehives: 10-frame and 8-frame. Beekeepers can choose to purchase or make their own Langstroth beehive boxes. The boxes come in handy when you need to add space for your bees to use as brood chambers or for honey storage. This article details how to build a Langstroth beehive box. It covers shallow, medium and deep boxes for both 8-frame and 10-frame sizes of Langstroth beehives.
About this Series
This post is part of a series on how to build a Langstroth beehive.
Sections
In this series you will learn how to build:
- Brood boxes
- Super boxes
- Beehive frames and wire them
- Queen excluder
- Bottom board
- Hive cover
- Entrance reducer
- Hive stand
General Points to Consider When Building a Langstroth Beehive Box
There are general points to consider when building a beehive box. These points cut across all boxes of a Langstroth beehive and will help you have a general idea of what you are doing.
A Langstroth beehive has a bottom board. This makes the lower cover of the beehive. The top cover and inner cover provide the upper seal or surface of the beehive. Between these two covers, a Langstroth beehive is one large continuous space broken only by beehive frames. This means that a beehive box does not have a top or bottom surface. Making a beehive box is only about making the sides of the box.
Beehive frames rest on the upper part of the beehive box. This upper part is best grooved to allow the frames to fit in perfectly while providing a more continuous outer surface to the Langstroth beehive stack. Frames in a beehive box do not project all the way to the outside of the box.
Materials
Wood
Wood is the best material for making Langstroth beehive boxes. Pine, cedar and cypress are common wood types favored for use in building Langstroth beehive boxes. Other types of wood including plywood, cardboard, block-boards and fiberboard are not very suitable for use in building a beehive box.
The wood you use to make beehive boxes must be carefully selected. It should have a thickness of not less than ¾ inches. This allows you to make a 3/8 inches wide seating groove for beehive frames. The depth of the seating groove should be 5/8 inches. When buying wood for the beehive box, you will come across many different cross-section measurements. On average, 6 x 1 (inches) wooden planks are best for building beehive boxes. They only need minor splitting to suit different beehive box depths.
Nails
Nails are going to be needed to join together the pieces of the beehive box. They are more suited to the job than wood staples. You can however use power tools in making a beehive box. Some wood glue will also come in handy to add strength to the joints.
For maximum strength, small metal pieces can be used in some corners of the Langstroth beehive boxes. The metal pieces should be shaped to ensure they fit perfectly into the corners. You can also try using grooves with the metal pieces so they do not introduce spacing between the beehive boxes.
Box Joints
Box joints (also called finger joints) are used in all Langstroth beehive boxes. They give superior strength to the boxes and ensure the box is durable. The right angle joints are made by cutting complementary locking profiles in adjacent pieces of wood. You can then use glue and filler for strong bonds in the entire box.
Hammer and Other Tools
A hammer is best used to drive nails into the wooden pieces of the beehive box, so make sure to have one with you. Other items you will need in spite of what size of beehive box you are building are a chisel and sanding equipment. A saw too will be needed to cut wood to proper measurements of length. Of course, you will need to have a measuring tool such as tape measure or rule. A pencil to mark measurements is also great to bring to your working area.
Power Tools
Power tools can be used to make beehive boxes. They help you get through the job faster. Without power tools, you can take up to one full weekend making a single beehive box. With power tools, a day is enough for preparation and assembly of a single box. Common power tools for use in making a beehive box are a sawing tool and a drill that can double up as a screw-driving power tool.
Langstroth 10-Frame Beehive Box
10-frame Langstroth beehives can be built using medium, deep or shallow boxes. Beekeepers are better equipped to enjoy the benefits of their beehive when they know how to make all sizes of 10-frame beehive boxes. It is useful that beekeepers know the exact dimensions for each.
10-Frame Shallow Beehive Box
Shallow beehive boxes are useful as honey supers. They are not too heavy to lift off the beehive when they are full of honey. A shallow beehive box is also useful for covering feeders in a 10-frame Langstroth beehive.
Dimensions
- Depth: 5 and 11/16 inches (144 mm)
- Interior length: 18 and 3/8 inches (470 mm)
- Interior width: 14 and ¾ inches (370 mm)
- Capacity/Volume: 1541.49 cubic inches (25.26 liters)
10-Frame Medium Beehive Box
A Langstroth beehive medium sized box is a preferred choice of box for many beekeepers. It can be used for brood and for honey storage. This is unlike shallow and deep boxes that have very specific functions and are not suitable for other uses.
Dimensions
- Depth: 6 and 5/8 inches (170 mm)
- Interior length: 18 and 3/8 inches (470 mm)
- Interior width: 14 and ¾ inches (370 mm)
- Capacity/Volume: 1795.58 cubic inches (29.42 liters)
10-Frame Deep Beehive Box
Deep boxes are great for the rearing of brood. They require little lifting and moving. This makes them easy to work with in a Langstroth beehive even when they get heavy with brood. Additionally, 10-frame boxes allow wintering of bees to be smooth. The honey bee cluster can expand and contract around the brood area without the bees being separated by a horizontal plane. This ensures better success rates for wintering bees.
Dimensions
- Depth: 9 and 5/8 inches (240 mm)
- Interior length: 18 and 3/8 inches (470 mm)
- Interior width: 14 and ¾ inches (370 mm)
- Capacity/Volume: 2608.68 cubic inches (42.75 liters)
Langstroth 8-Frame Beehive Box
8-frame Langstroth beehives are smaller than their 10-frame counterparts. They have their advantages over 10-frames however, especially when it comes to ease of working with the beehive and wintering honey bees.
8-frame hive boxes are of 3 types. This is consistent with the categorization of Langstroth beehive boxes based on depth. In this categorization, there are deep, medium and shallow beehive boxes. Beekeepers using an 8-frame Langstroth beehive setup in their apiary will find use for all 3 boxes at one time in beekeeping. It is therefore important that you know the dimensions for all the boxes for when you need to build one.
8-Frame Shallow Beehive Box Dimensions
- Depth: 5 and 11/16 inches (144 mm)
- Interior length: 18 and 3/8 inches (470 mm)
- Interior width: 12 and ¼ inches (310 mm)
- Capacity/Volume: 1280.22 cubic inches (20.98 liters)
8-Frame Medium Beehive Box Dimensions
This box can be used for both brooding and honey storage as a super box.
- Depth: 6 and 5/8 inches (170 mm)
- Interior length: 18 and 3/8 inches (470 mm)
- Interior width: 12 and ¼ inches (310 mm)
- Capacity/Volume: 1491.25 cubic inches (24.22 liters)
8-Frame Deep Beehive Box Dimensions
- Depth: 9 and 5/8 inches (240 mm)
- Interior length: 18 and 3/8 inches (470 mm)
- Interior width: 12 and ¼ inches (310 mm)
- Capacity/Volume: 2166.53 cubic inches (35.53 liters)
Understanding Langstroth Beehive Boxes
Standardization is a hallmark of Langstroth beehives and their construction. The boxes of a Langstroth beehive can appear to have confusing measurements due to their variance in both horizontal and vertical measurements. Here is a guide that simplifies the measurements and helps you understand them better. The guide is great for both beginner and experienced beekeepers building Langstroth beehive boxes.
Break down Langstroth beehive construction dimensions both vertically and horizontally in the following criteria:
Vertically
Vertically, a Langstroth beehive box with minimal depth is a shallow box. The same box with medium depth is a medium box. This same box with maximum depth is called a deep box. The depth measurements for a shallow box are 5 and 11/16 inches, while the depth of a medium box is 6 and 5/8 inches. For the deep box, the depth is 9 and 5/8 inches. These same measurements in metric units are; 144 mm for shallow boxes, 170 mm for medium boxes and 240 mm for deep boxes.
Horizontally
Horizontally, your Langstroth beehive can make use of 8 frame or 10 frame boxes. This means that the box can hold either 8 beehive frames or 10 beehive frames for it to be full, but not both. The difference is based on the width of the box. 8 frame Langstroth beehive boxes have an interior width of 310 mm or 12 and ¼ inches. For 10 frame beehive boxes, the interior width increases to 370 mm or 14 and ¾ inches.
Length
Having looked at the depth and width of Langstroth beehive boxes, it is necessary to describe the length. All Langstroth beehives and the boxes that make the stack have an internal length of 470 mm or 18 and 3/8 inches.
No Interchangeability between 8 and 10-Frame Setups
You should note that a Langstroth beehive uses boxes of the same width in a single stack. You cannot have a Langstroth beehive stack that makes use of both 8-frame and 10-frame boxes. However, it is possible to have 10-frame and 8-frame Langstroth beehive stacks in the same apiary. The only problem you will encounter with such a mixed setup is when you want to interchange parts between beehives.
The parts for 8-frame beehives can only be used on fellow 8-frame beehives. This also applies to 10 frame beehives. The parts such as hive covers, bottom board and frames will not work in an 8-frame beehive. It is therefore advisable that beekeepers with beekeeping operations of more than one beehive in their apiaries, make use of one size of beehive and stick to it.
How to Build a Langstroth Brood Box
A brood box in Langstroth beehives is usually a deep box. It has the deepest sides of all Langstroth beehive boxes. The deep brood box has a depth of 9 and 5/8 inches.
Step 1 – Arranging your Work Area
Be sure to arrange your working area well. When you are making many boxes, have a checklist of all parts that you need to prepare. You can then arrange them in orderly stacks with all the pieces of a box together. Once all the parts for all the boxes you need are ready, you can proceed to joinery. With ready parts for a box, you quickly bring together the whole beehive box.
Step 2 – Collecting Materials and Equipment
Collect all the materials and equipment you need during the process and have them nearby or within reach. For power tools, make sure they are ready to go and all bits are available. Have a receptacle for leftover pieces of wood. You can use them to build more beehive boxes if you so desire.
The important materials and equipment you need is in 3 broad categories: lumber, hardware and fasteners. The hardware includes tools, paint, preservatives and wood glue. Fasteners include nails, screws and corner strengtheners. For most types of lumber, ½ inch lath screws, 2 inch galvanized nails and deck screws measuring 1 and 3/8 inches are adequate fasteners.
Step 3 – Preparing the Wood
Prepare the wood for your beehive box in advance. Plane the wood early before starting building your deep beehive box. Avoid knots in the wood as much as possible. If possible, it is better to have the knots in the middle of the wood pieces than at the edges. Nails may split the wood if knots are too close to the edge of pieces of wood. Working on the wood to make grooves and notches could also cause the wood pieces to be unusable.
Some beekeepers use thick plywood to make their beehives. The plywood is easy to work with and lasts long with the right treatment and handling.
Step 4 – Cutting the Wooden Planks
Using 6-inch wide wooden planks, you need to cut some pieces to 3 and 5/8 inches to make the total depth to standard dimensions. You can alternate the less wide planks between the upper and bottom side of the box through the four sides. That would have the less wide pieces at the top along the length of the box, and at the bottom of the box along the width in one configuration. You can also have them at the bottom along the length, and at the top along the width in another configuration.
Cut the pieces of lumber or plywood into suitable sizes. For deep beehive boxes, the depth, interior length and interior width should not be wrong. You need four pieces of wood for the box. Two make the length of the box. The other two pieces make the width of it. Some length should be added to the pieces since they overlap. To the interior length and width of a deep beehive box, the thickness of your lumber pieces should be added. Using wood that is 1-inch thick, add 1 inch to each end of your lumber pieces.
Sometimes it is not easy to find blocks of wood that are deep enough for a brood box. You can make this up using additional planks of wood cut to respective lengths. The number of planks you need to add to make up the depth of your brood box varies. Make your box to a depth of 9 and 5/8 inches. Wide planks require you to have fewer planks in each side of the deep box.
8-Frame
The pieces for an 8-frame deep beehive box differ from those required for the 10 frame beehive box. For an 8-frame beehive box, cut two planks of wood to a length of 19 and 3/8 inches when building with 1-inch thick material. The planks for the width with the same uniformly thick material should be cut to 13 ¼ inches. These measurements for the wood allow you to have a box joint in all four corners of the box.
10-Frame
When building a 10-frame beehive box, cut the planks of lumber to make the length of the box at 19 and 3/8 inches. This is when you have 1-inch thick planks. The planks for the width should be cut to 15 ¾ inches. Length planks for both 8-frame and 10-frame planks are similar in length when cutting. This is because they make the static sides of the beehive box.
Step 5 – Making the Grooves and Notches
With your planks of lumber cut to size, it is time to make grooves and notches on them. First, decide the arrangement of your cut wood planks so you know which ones go to the top side. Along the width plank, cut grooves for seating beehive frames. The notch should be 3/8 inches wide and 5/8 inches deep. It is cut in the inside of the wooden planks. After cutting the grooves, embark on baking box joint notches to the ends of the wooden planks. Each notch should be 1 inch long and 1 inch wide. It should be a distance of 1 inch from the next notch.
If you are going to use grooved grips on the wood, it is best you make them before joining the wood. Some beekeepers prefer to use handles they purchase from supplies shops. These can be added later after joining up the wood planks to form your beehive box. If you are cutting grooves for handling of the box, cut them into the width planks of the beehive box on the outer surfaces. You may also use pieces of wood nailed onto the outer surfaces of the box to give you better grip on the boxes when handling them.
Step 6 – Joining the Width and Length Planks
Join one length plank and one width plank of your box. Wood glue and filler can be used for better strength. Check for right angles at the joint and make any necessary adjustments. Nail the joint you have glued together and check again for right angles. If the depth of the box requires you to use more than one plank of wood per side of the box, add them at this point. One length and one width of the beehive box should be entirely made up before proceeding to the next step.
Step 7 – Nailing the Pieces Together
Nailing the wood pieces together should be done with 2 inch nails. You may also use screws for this step in the process. The nail or screw goes in through the box joint section that was not cut from the individual piece of wood. It then reaches the section of the other piece of wood that was cut to allow the box joint to form up. Some beekeepers use 2-3 diagonally nailed nails on each corner of the box for additional strength.
Step 8 – Adding Second Length Piece
Add the lumber pieces for the second length of the beehive box. Make sure the box joints come together nicely and accurately. Wood glue and filler should be used. Use a few nails on the freshly added pieces of lumber and check for right angles. If necessary, make adjustments until you have a right angle at the joints.
Step 9 – Adding Second Width Piece
Add the final pieces of lumber that make the second width of the deep beehive box. Again, use wood glue and filler for stronger joints. You should be checking the corner joint for right angles upon addition of each plank of lumber. Do not rush to nail up the joint and the entire box before you are sure you have all the corners with proper right angles. A box without right angled corners will not seat properly with other boxes in a Langstroth beehive stack.
Step 10 – Finishing Touches
Nail up the box once you are sure you have right angles on all the joints and corners. If you are going to use metal pieces on the joints for extra strength, add them now. Once everything is together, you should have a box without a bottom or top cover. Along the width of the box should be grooves for seating beehive frames. Allow the box time for wood glue to dry before putting it to use. Moving it around or placing weight on it before the wood glue is fully dried might cause it to lose right angles at the corners.
How to Build a Langstroth Honey Super
The process of building a honey super closely follows that of building a deep brood box. We assume that you are using pieces of wood that are 1 inch thick and 6 inches long. Collect all the materials you need to build your honey super box. These include wood, nails, wood glue, power tools, measuring instruments, and filler among others.
Step 1 – Getting the Right Box
Begin by making sure your wood or lumber pieces are smoothened by planing and cut them to size. Langstroth beehives are easier to use and friendly to bees when the surfaces are smooth.
There are two types of boxes you can use for honey super purposes. These are the shallow and medium depth boxes. The boxes can be 8 frame or 10 frame beehive boxes. For 8 frame boxes, cut the pieces of lumber at 19 and 3/8 inches and 13 ¼ inches when using wood that is 1 inch thick. For 10 frame super boxes, cut one set of the wood planks to 19 and 3/8 inches and the other set to 15 ¾ inches.
Step 2 – Trimming the Box to Size
The depth of shallow boxes used as honey supers should be made up to 5 and 11/16 inches and that of medium boxes made up to 6 and 5/8 inches. The width of your lumber pieces determines how many you might need for each side of a medium or shallow box. You need to trim some excess depth from the box if you are making a shallow box. This is notwithstanding whether the box is an 8 frame or 10 frame box.
Step 3 – Making the Grooves and Notches
After cutting the pieces of wood, make grooves and notches required on the beehive box. These are the grip notches, frame seating grooves on the insides of the box and box joint notches. Great accuracy must be achieved when making box joint notches and cuts for strong joints that fit well together.
Step 4 – Joining the Pieces Together
Join pieces of wood for the sides of the beehive box in sequence. At every fresh joint, use wood glue and filler. Check for right angles after every application of glue before nailing the box. You should also check for right angles after putting in a few nails to the joint.
Once you are satisfied that the box is at right angles, you can proceed to adding more nails that will hold your pieces of lumber in their final fixed positions. You can join up the box with wood glue and a few nails in each box joint. Once you are satisfied with the box and sure that it has right angles on all the 4 corners, you may then add more nails or screws.
Step 5 – Finishing Touches
When joining up the pieces of wood for your honey super box, make sure the grooves for seating beehive frames are at the top end of the box. You can have them at the bottom and then flip the box over once you are done constructing it. The worst case scenario is if you end up with the grooves on opposite sides of the box. This would require you to dissemble the whole box and putting back together.
Honey super boxes have less volume than the deep brood boxes of Langstroth beehives. They are however handles more often than deep boxes. Super boxes are also moved about more often than deep boxes. These two factors in their use require super boxes to be very strong for their durability. Metal joint fasteners can be used on the outside of these boxes so that they never lose their perfect rectangular shape.
Wood Preservatives and Paints for Langstroth Beehive Boxes
Wood preservatives can be used on the wood that you use for building beehive boxes. You may apply the preservative before joining up the box, or afterwards. Paints of various types are used by beekeepers. Often, the paint is applied to the outside of the beehive boxes. Make sure to use wood preservatives and paints that do not agitate or repel honey bees. You should also allow the preservative and paint enough time to dry before putting the beehive box to use.
Conclusion
It is common practice for beekeepers to keep a few ready pieces of beehive boxes on standby. When the beekeeper needs a new box, all they have to do is pick the ready beehive box pieces and assemble them. Langstroth beehive boxes are not expensive to buy, but they are even cheaper when you assemble them yourself. Use this detailed guide on how to build a Langstroth beehive box to make your own boxes for your apiary.
What are your thoughts on this DIY guide? Leave a comment below and let us know.