
If you purchase an independently reviewed item through our site, we earn an affiliate commission. Read our affiliate disclosure.
Top bar hives are single-story beehives that can be used in both hobbyist and commercial beekeeping. In a top bar hive, the comb hangs downwards from removable bars. These bars form the roof of the beehive. A top bar hive has one rectangular box only. It is wide and allows for beekeeping methods that have little interference with the honey bee colony. Top bar hives generally have very high beeswax yields but less honey yields. Other types of types of popular beehives are the Langstroth and the Warré hives (check out our article on the comparison of these beehives). Read on as we discuss top bar beekeeping for beginners.
History of Top Bar Hives
The design of the original top bar beehive owe its invention to J.D. Tredwell and P. Paterson in 1965. That decade saw the emergence of long top-bar hives. Some minor improvements were done on the beehive in the 1970s. There are 2 major variants: the Kenyan Top Bar Hive (KTBH) and the Tanzanian top bar hive.
Tanzanian Top Bar Hive
The Tanzanian top bar hive has straight sides. It was developed in Tanzania as a result of government efforts to move farmers away from log hives. Harvesting honey in the original Tanzanian log hives resulted in brood comb getting destroyed. The Tanzanian top bar hive helped beekeepers avoid damaging brood comb by allowing minor inspection before honey harvesting.
Kenyan Top Bar Hive
The Kenyan top bar hive (KTBH) was developed after extensive research in a project that was done in Kenya by the University of Canada. The researchers Maurice Smith and Gordon Townsend from the University of Guelph, were sponsored by the Canadian International Development Agency (CIDA) in the four-year project. Their work was extensively described by a Kenyan student at the University of Guelph, Dr. Isaac Kirea Kigatiira. This happened in the 1970s.
Modern Top Bar Hives
Modern top bar hives are made in the design of the Kenyan top bar hive. It is generally considered to be better than the Tanzanian top bar hive. Variations do exist however, such as the South African Jackson hive. Some of these variations use bigger dimensions than those of the Kenyan top bar hive. As long as the top bars are kept uniform in width, a top bar hive can be made to any size and shape.
The slope of the sides of the top bar hive is recommended to be 30 degrees. The total width of one top bar is the width of the honeycomb thickness plus one bee space (3/8 inch). This makes sure that honey bees build only one honeycomb on each top bar.
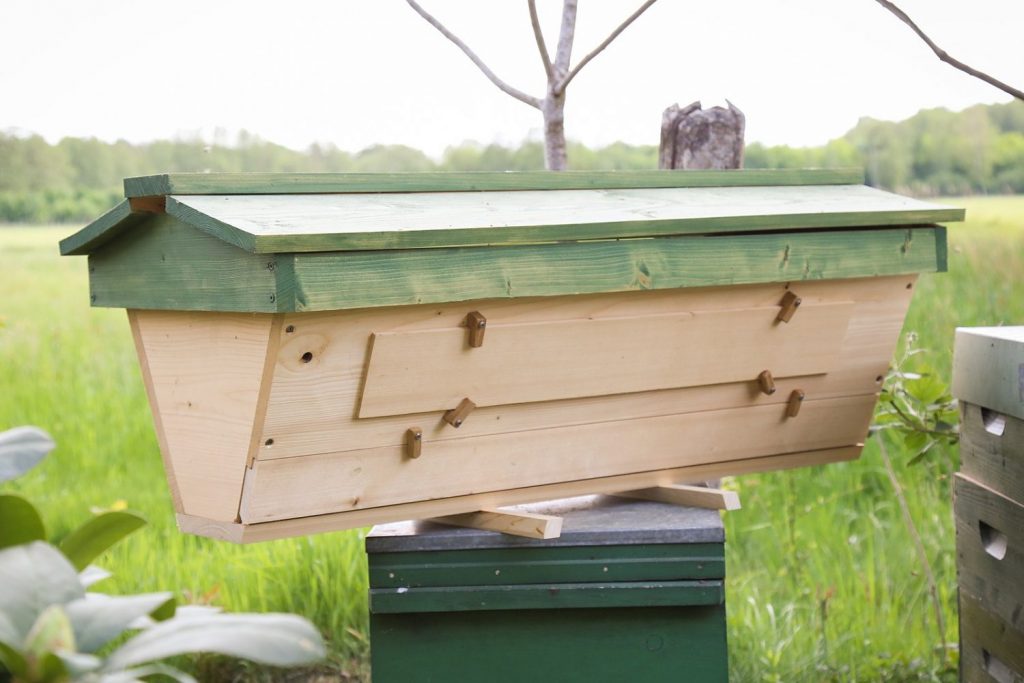
Hive Stand
Top bar hives were originally made for hanging from trees and poles. Changes in the way beekeepers wanted to access their beehives led to development of stands for top bar hives. Hanging a beehive some distance from the ground protects it from ants, beetles and animals. Today, it is better to have your top bar hive on a stand than hanging. A top bar hive on a stand is easier to access for beehive management than when it is hanging suspended using wires from a tree or pole.
In many countries, beekeepers have their top bar hives mounted on legs that lift it to a height that is comfortable. In many places, the height of the hive is determined by the local predators of honey bees.
Components of a Top Bar Hive
Top bar hives have seen some use in beekeeping in the 21st century. They are horizontal hives that have seen some refinement in the 1960s through the 1970s. A top bar hive has bars sitting across the top of the hive for bees to draw comb. Top bar hives mimic the natural homes bees use in trees. The beehive rests can either rest on a stand or is suspended from a tree or pole using wires. They should be placed at a height that makes them difficult to access for predators of bees.
A top bar hive has several parts or components that make up the complete hive. With each components of a top bar hive, variations can be found. These components can be classified as either major or minor. Beekeeping with top bar hives may also put to use special components that can be found in one hive but not in the other. These are components such as a queen excluder and the use of foundation. The use of these special top bar hive components is a decision made by individual beekeepers.
Hive Body
There is a hive body which holds top bars and has the entrances to the beehive. The hive body can have more than one entrance, can have the entrance to the side, and can even have observation windows.
Ventilated Roof
Covering the hive body and other components of the beehive is a ventilated roof. It can be hinged or be removable from the beehive.
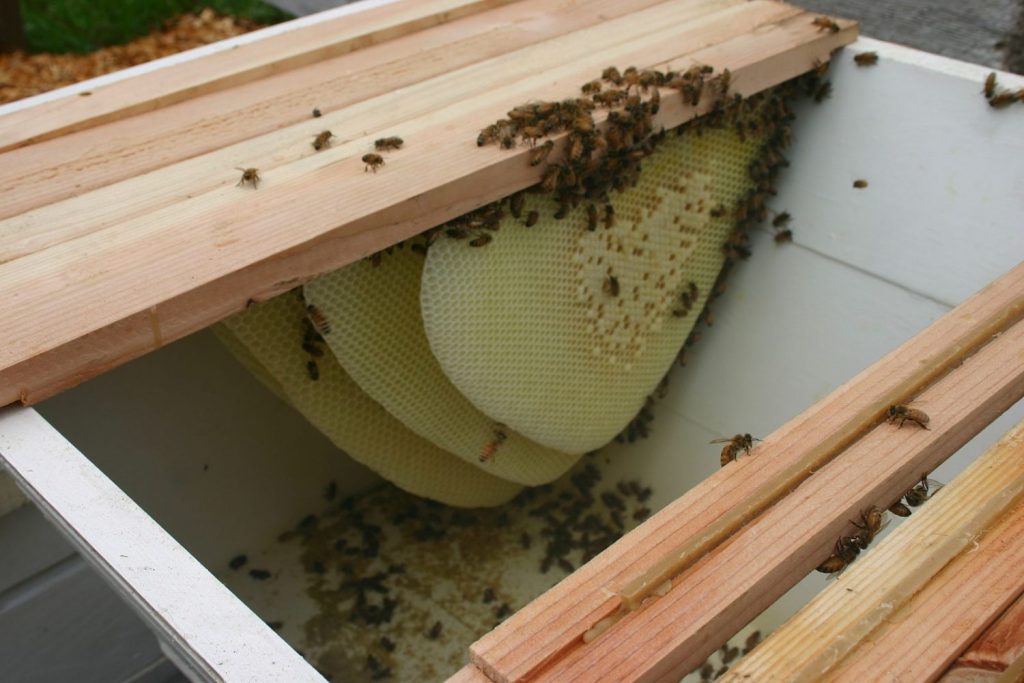
Top Bars (Hive Frames)
A beehive needs surfaces onto which honeybees will attach and draw comb. The comb is a series of hexagonal cells built back to back. In a top bar hive, bars of wood are used to provide a surface on which honeybees will draw comb. These top bars are similar in function to the beehive frames of a Langstroth beehive. Top bars in this beehive can be shaped and grooved to make drawing comb easier for honeybees. They can also be used with foundation or without.
The top bars rest side by side along the edge of the beehive. Standard top bar hives have 28 bars. Each top bar is 1.5 inches wide. The top bars can be made from any plain wood with a thickness of at least ¾ inches. This thickness is strong enough to hold the weight of honeycomb under it without breaking or bending. The length of the top bars depends on the length of the body of your top bar hive.
To get bees started with building comb on top bars, a V-shaped bottom surface of the top bar is made. It can either be one with the top bar, or added onto the top bar. Other beekeepers using top bar hives use a rectangular spline. The spline gives increased comb-to-wood surface area for contact. If you are not using a spline on your top bars, cut two grooves using a table saw along the length of the bar. A little wax can be applied onto the top bar. These additions and features on the bottom surface of a top bar give bees a place to hold onto as they build comb.
Foundation
Foundation used in top bar hives has a number of advantages. It makes it easy for bees to build straight comb and not bulge it. Additionally, it helps bees to build comb more quickly once they are introduced into a beehive, or when fresh top bars are added. The presence of foundation on a top bar hive bars informs bees not to bulge the honeycomb.
Top bar hive foundation comes in form of strips that are attached to the center of the top bars. Strips of foundation lie along the length of the wooden top bar. These strips of foundation can be made of plastic or wax. The minimum size of strip you should use is 2 inches. Smaller strips on the top bars may not be very effective at guiding bees to build straight comb.
The strips should not touch the sides of the top bar hive, and this is so that the honey bees are not encouraged to bind honeycomb onto the sides. A gap of 1.5 inches from the edges of the foundation strips to the sides of the beehive is enough space to discourage the bees.
Queen Excluder
Queen excluders are not a typical component of top bar hives, as natural queen exclusion happens due to the structure of top bar hives. The setup of the beehive closely mimics the hollows bees use in trees in the wild. Top bar hives cause bees to store honey in one section of the available space. Naturally, bees want brood in one area too. The presence of brood among honey storage comb is an indication that the colony wants to get bigger or needs more drone bees.
Sometimes however, it becomes necessary to use a queen excluder in a top bar hive. Your decision must be made based on your own objectives and the products you want to harvest from the beehive.
A queen excluder in a top bar hive is shaped like a beehive frame. It features wood to make a frame that sits on the sides of the beehive so that the queen cannot go under it. The middle of the frame has a screen that allows bees to go through it but not the queen bee. Its top is made using a standard top bar. Such a queen excluder can be made by the individual beekeeper or purchased.
Observation Window
Beekeepers can modify top bar hives to include an observation window. Such a modification makes inspections of the top bar hive easier for the beekeeper. It allows you to look into the beehive without having to open up the beehive. Once you remove the top cover of a top bar hive, it is easy to access the bars of and extract them. You also get high yields of wax with a top bar hive. This is because they do not make use of foundation. The entire comb on a bar is removed during honey extraction. The yield of honey from a top bar hive is however low due to space limitations.
Pros and Cons of a Top Bar Hive
Let us look at the pros and cons of top bar hives.
Pros
- Top bar hives are friendly to bees and their natural life cycles. The layout of the top bar hive mimics hollows that bees find in trees. Honeybees move horizontally to access all areas of the beehive. This is easier movement for bees than vertical movement required in box hives.
- A properly constructed top bar hive is not heavy. Working with the beehive is easy for beekeepers. They are spared having to lift boxes that may be heavy when full of honey or bee brood.
- The design of a top bar hive and its management saves the beekeeper the cost of buying honey extractors and other equipment such as embedders, which are generally made for use with box hive frames.
- Bees in a top bar hive remain calm during beehive inspections and harvesting. This is because you only open a small section of the beehive, removing only one top bar at a time.
Cons
- A top bar hive is not very suitable for wintering bees. Its design does not conserve heat well. This results in a lot of bees dying. An entire colony can be lost with a top bar hive or reach spring in a much weakened state. The amount of honey needed to get bees through winter is a large percent of the honey yield you may have got when harvesting.
- The space available in a top bar hive is limited. This keeps the yields of honey and wax from a top bar hive low. It is wasteful of the vertical space above the hive which would be put to use in a box hive such as the Langstroth beehive. Using a queen excluder further reduces the space available to bees for brood rearing.
- Newly installed bees in a top bar hive require a lot of monitoring. This is to ascertain the bees are following the lines of the top bars in drawing their comb. Frequent opening of the beehive is disruptive to the bees and may take too much of the beekeeper’s time.
- A colony in a top bar hive is smaller than can fit in a box hive. This reduces the foraging power of the colony as a whole. It also makes honeybee colonies in top bar hives more likely to be wiped out in the event of a disease, parasite or insect predator attack.
- Harvesting honey in a top bar hive can be cumbersome and difficult for beekeepers. Honeybees in a top bar hive tend to extend honeycomb to the sides of the beehive. This requires you to detach the comb from the sides before you can pull out a top bar. Even experienced beekeepers have a tough time doing this successfully. You end up spending too much time pulling out the top bars or damaging comb.
Top Bar Hive Management
Managing a honey bee colony in a top bar hive is easy and not very stressful to bees. It can be done by both beginner and experienced beekeepers. With the right equipment, vigilance and information access, a beekeeper should keep a healthy colony of honey bees using a top bar hive and have substantial beehive products. In managing honeybees, it is alright to trust the bees to do what is right for them. The less interventionist you are, the better. In a top bar hive, allow bees time to do their work. Be ready to help them in emergency situations you identify by giving them food, brood boosters, adequate sunlight or sometimes ventilation.
Orientation
The orientation of a top bar hive is best if the entrance faces the morning sun. The beehive can be in the sun during the entire morning. As the day progresses, it is best if it is in a shade. This makes bees get active early in the day. Shade in the midday helps with cooling the hive. Make sure that your top bar hive is not in the shade all day long. Make sure that there is no foot traffic or animal traffic in the pathway of the honey bees coming or going out of the beehive.
Entrance
Entrances to a top bar hive can be made in two ways. One is many small entrances, or a few large entrances. Large entrances must be reducible for wintering the honey bees. Small entrances make entrance reduction easy and reduce the ease with which some harmful insects and animals can enter your top bar hive. In a top bar hive, honey bees will store honey in one or two frames near the entrance and then they will have the brood area. After the brood area, they have more honey stored in the back of the beehive. This arrangement is suitable for easy honey harvesting without disturbing the brood area. It is suited by entrances being located to one side of the beehive only.
Inspecting a Top Bar Hive
Beehive inspection is a major activity in beekeeping. You must check on the honey bees every once in a while to see if everything is going well. It is best to visit beehives when many of the honeybees are out foraging. This is usually in the middle of the day. A warm sunny and windless day is ideal. The warmth makes conditions ideal for honeybee activity.
Beehive inspections of a top bar hive are disruptive. They cause some stress in the honey bee colony and ruin the temperature control efforts of the honey bees. Work quickly through the beehive and move procedurally. Take maximum care not to squish bees in the process. Smoke or sugar water on warm days calms the bees and slows them so they do not get too aggressive. If honey bees sting your beekeeping suit, it is useful to smoke yourself so that the smell of ‘alarm’ pheromones is masked. In the event that the beehive gets too aggressive, walk away from the beehive for 5 minutes before returning.
Frequency of Inspections
Visit your top bar hive for inspection every 7-10 days during spring. Monitor potential for swarming and population growth in this period. Once spring is past, the hive can be inspected every 3-4 weeks. Bees bringing pollen into the beehive mean there is brood to feed. Freshly installed honey bee colonies in a top bar hive need inspection every 10-14 days. This goes on until they build comb and start rearing brood. It allows you to identify cross comb early and correct it.
How to Inspect a Top Bar Hive
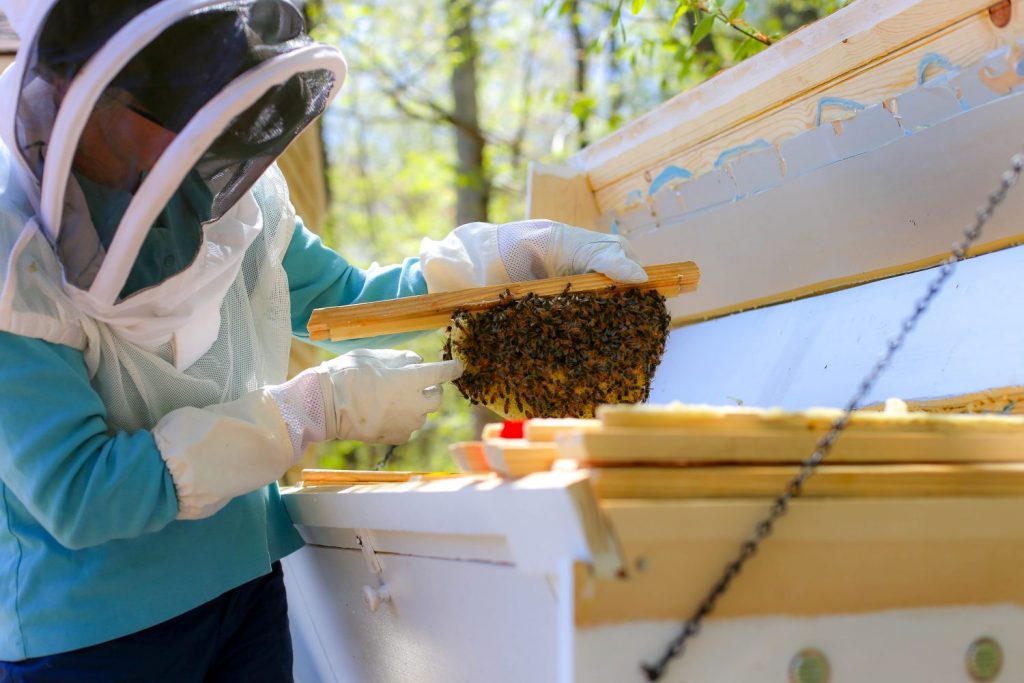
- A top bar hive allows for opening up of the beehive in small sections. 3-4 bars are removed at a time during the beehive inspection. Use a hive tool to loosen top bars before removing them.
- Lift the top bars straight and out of the beehive for inspection.
- Hold the top bars in a perpendicular position. The comb is fragile and can break off easily. The depth of top bar hives is kept to a max of 12 inches for this exact reason. Deeper beehives result in comb getting too heavy and falling right off the top bar. A top bar with comb on it can be turned around and sideways as long as they remain in a perpendicular position.
- Look out for laid eggs and brood presence in the top bar hive.
- Comb production is also important to check and make sure the honeybees are building it straight.
- In spring, take steps to prevent swarming or control it.
- In fall, harvest honey and combine weak colonies if needed to.
- Prepare for winter by leaving enough food stores in the beehive for bees. Dry sugar or concentrated sugar syrup is used for winter feeding.
Essential Equipment for Top Bar Hive Management
- A beekeeping suit, gloves and boots. The suit must have a veil to protect your face.
- A hive tool. The longer hive tools are best. Anything between 14 and 17 inches is fine. If you cannot buy one immediately, a long strong knife will work.
- A bee smoker and fuel for it.
- Sting remedies in case you get stung.
- A bee brush.
- A spray bottle for when you use sugar water instead of smoke to calm bees.
Honey Production in a Top Bar Hive
Honey production using a top bar hive gives great returns on your investment. It is the sum effect of your beehive management including pests, parasites and disease control. To measure top bar hive honey production, you need to take weight measurements of your hives. These are the weight of the empty box without bees, the weight of the beehive with bees before honey flow season, and the weight of the beehive after honey flow season before you harvest honey.
Typically, you need to harvest honey from the top bar hive several times during honey flow season. Reduction in the amount of stored honey encourages bees to work hard at making more honey. The yield of honey and beeswax from each top bar hive is recorded so that the total is calculated at the end of the honey flow season.
In large beekeeping operations using top bar hives, it is prudent to alternate entrances where beehives are placed side by side. It prevents drifting which defined in beekeeping as a honeybee entering the wrong hive when they return from foraging.
Harvesting Honey
Before harvesting honey from a top bar hive, inspect it to ascertain that the honeybee colony has made surplus honey. Memorize the location of the top bars with honey stored on their honeycomb. The honey stored above brood on a comb is not for harvesting. The comb from which honey can be harvested is often found furthest from the entrance in a top bar hive.
Make sure the comb from which you harvest honey is all capped. Uncapped cells contain honey that is not ready and has high moisture content. Harvesting that honey will lower the quality of your overall yield. Honeycomb with honey is heavy. Remove top bars by lifting them straight up from the hive. Brush off any bee that may be on the honeycomb.
If possible, harvest honey on cold days to minimize the chances of honeycomb detaching from top bars. Place top bars with honey into a container that can be sealed shut. Transport the honey in comb away from your apiary where bees cannot find you and extract it by crushing and straining it. You can also use a honey press to get honey from the honeycomb of top bar hives.
How much Honey can you get from a Top Bar Hive?
Honey yields in a beehive are an important measure of your success as a beekeeper. High yields of honey make sure your beekeeping operation is profitable. Remember that the preparedness of a honey bee colony when flowers are in plenty determines the amount of honey they can make.
In a honey bee colony that has been properly installed in a top bar hive early in the year, you can expect up to 27 kg of honey. This also applies to honey bee colonies that are established and have been in the hive for more than a year. Honey bee colonies that are highly prepared for flowering season can give honey yields of between 35 and 40 kg in a year.
Installing Foundation Strips
Proper attachment of foundation strips is important. Melted beeswax is best for attaching them onto the top bars. Make sure that there is a line of beeswax that you have melted running down the top bar’s groove. This should melt some of the foundation so it attaches well onto the bar and does not fall off later.
Melt wax for use in installing foundation onto top bars in a double boiler. It minimizes the risk of beeswax catching fire. Doing the work outdoors away from children and animals is recommended. Cut the foundation sheets you have into strips using a guide to cut straight. You may warm your cutting implement a little to make it better at slicing through the wax foundation. However, do not heat the knife too much since it will excessively melt the wax on the foundation strips. A sloping working surface helps with running melted wax down the groove on your top bars.
Insert the strips of foundation you have cut into the respective grooves on the top bars. Place the top bars facing up on your sloping surface. Align the strips of foundation to one side of the groove so that they leave some small space for wax in the groove and then pour hot wax onto the grooves of the top bars. Normally, the wax flows through the groove with the foundation on one side of the groove. Next, pour some wax down the other side of the foundation so that you attach it to the top bar.
You can have more than one piece of foundation in a single top bar. Make sure each piece is well aligned and do not have a space between them. Be careful with foundation strips and do not break them. If some of the foundation breaks, put that top bar between top bars with unbroken foundation strips.
Introducing Bees to a Top Bar Hive

A new top bar hive needs a honeybee colony installed in it. The colony can be from a split hive, a captured swarm, or package bees. Be ready with all the required equipment and materials before starting installation of a honey bee colony in the beehive. Feeding is important for newly installed honeybee colonies. A mix of honey from other colonies and sugar syrup is used to help the bees settle in faster.
As a minimum, you need a top bar hive ready with all its components and cover. The top bars should have foundation on them if you want the honeybees to start drawing comb quickly. Have a follower or divider board to keep some sections of the beehive off limits to bees at first. A large feeder and 1:1 sugar syrup should also be ready. Honey in comb from other colonies is given to bees to use as food resource before they build comb and make their own honey. Only use honey from healthy colonies that you are sure will not bring disease to your new top bar hive.
Install package bees into the top bar hive as soon as possible. This also applies to bees caught in a swarm trap or from a split hive. The late afternoon is a great time to install bees into a top bar hive. It lessens the impact of drifting honeybees. Use a smoker if necessary to calm the bees. If it is warm, use 1:1 sugar syrup to keep the bees fed and not flying out of the beehive.
Steps
- Pry open the cover of the top bar hive and remove 5-6 top bars to create space for the bees. Position your divider board on the top bar hive where you want it to be; usually as the 11th bar from the hive entrance. Place your feeder with syrup in it into the beehive. You should also bring in top bars with honey on them into the hive. The front of the beehive near the entrance is a good place to have the bars with honey.
- For bees caught in a swarm trap, pour them into the top bar hive or brush them down into the beehive. Sometimes, bumping the swarm trap against the sides of the top bar hive does the job. Use a brush to spread the bees along the bottom of the top bar hive and replace the top bars that you had taken out of the hive. Cover the beehive and weigh down the lid or use a fastening method of your choice to prevent the cover from flying off the beehive.
- With package bees and split hives where you know where the queen is, you first work with the queen bee. After opening the top bar hive and removing 5-6 top bars, position your divider board. Allow new honeybee colonies access to about 10 top bars of the hive. You should also put in place top bars with honeycomb and honey in them before bringing in the bees.
- Next, take the queen cage you are using and attach it to one top bar of the beehive. The best is to have the queen 3-4 bars from the beehive entrance. Use a thumb tack or paper clip to attach the queen cage to the top bar of choice. Make sure the queen cage is at the center of the top bar since honeybees will start drawing comb near the queen. Take care not to hurt the queen bee. Remove the cork in the candy end of the queen cage.
- On either side of the top bar holding the queen cage, have your bars of comb with honey in it. Pour the bees from the package or split hive into the beehive. Leave the package in front of the beehive until nightfall. It helps bees that did not pour out of the package to find their way into the beehive. Take care not to squish honeybees as you are installing them in your top bar hive. You should look for a few honeybees clustering around the queen. That is a good sign that they accept the queen. Next, replace the top bars you had removed and cover the beehive. Fasten the cover to the beehive or weigh it down.
Post Installation
- After installing honey bees in a top bar hive, wait for about 3 hours and confirm they are clustering around the queen. If they are not, look for another queen bee that might be within the colony. Remove or kill her away from the beehive. Use this visit to put a feeder in the beehive or just outside it if that is your preference. Close up the beehive and leave it undisturbed for 3 days. During this time, bees will take orientation flights and might be aggressive.
- After 3 days, visit the beehive and look for comb being drawn, bees bringing in pollen, and eggs laid in complete cells. You should also check that the queen has been freed from her cage. If she has not, you can let her free by opening the cork at the non-candy end of the queen cage. If the queen has been freed from the cage, remove the cage from the beehive. Keep feeding the bees until they have at least 10 top bars with honeycomb drawn on them.
Alternative Method
An alternative method of installing package bees in a top bar hive is to attach the queen cage to a top bar and then put the top bar in the package. Bees will cluster around the queen on the top bar. Gently remove the top bar from the package after about an hour and put place it onto your top bar hive. You can then shake or pour the rest of the bees into the beehive.
When you do not want to shake or pour package bees into a top bar hive, make them walk up to the beehive. Place a board running from your package or nucleus to the top bar hive entrance. The board should be at least 30 cm wide. Tip the bees onto the slope and let them walk up the board to the queen in the top bar hive.
Conclusion
Modern beekeeping can be done using various hives. Among these is the top bar beehive. Its high beeswax yields make it great for when the beekeeper is aiming for wax as a major beehive product. Top bar beekeeping for beginners is great. It enables the beginner beekeeper to learn a lot about honeybees, and do it quickly. Beginner beekeepers using the top bar hive in their beekeeping operation can have queen excluders or not.
Interesting, though contradictory in several places. Also your ‘cons” against Top Bars seem overly prejudicial, as if written by someone who hasn’t had much success with them.
[…] It also allows for easy management of honeybee colonies. Other popular types of beehives are the Top-bar hive and the Warré hive (check out our article on the comparison of these beehives). This beginner’s […]
When somebody gives feedback and it isn’t attacking, always always consider their points to see if any of it is valid, agree to THOSE points even if you alude to agree, and steer them to the point of the document which in this case was…on Langstroth and not top bar. You both “win” and you don’t alienate people like me reading this tit-for-tat when the original question was just a comment not a criticism. personally, I liked the article and would just ignore any part I didn’t like.
You have some very valid points and I thank you for sharing those points. Excellent work. Very thorough. And appreciated.