
If you purchase an independently reviewed item through our site, we earn an affiliate commission. Read our affiliate disclosure.
Good hygiene is a key factor in beekeeping. In a beehive, the frames are one of the important items you should clean. Both experienced and beginner beekeepers need to know how to clean beehive frames. They can then reuse the frames in their beehives with little risk of spreading diseases and sure that they are controlling pests of honeybees. Some beehive frames are best destroyed by fire and other destruction methods. These are the frames that have contagious diseases of bee colonies such as foulbrood.
It is especially important to clean beehive frames when moving them between honeybee colonies. Some colonies that appear healthy at first, may in fact harbor disease-causing organisms that can infect a weak colony. Do not put off cleaning beehive frames for any reason, especially if you plan to use them in another colony. It is great if you schedule and carry out beehive frame cleaning soon after harvesting honey. This gives your frames ample time to dry properly before the next use. You are also able to repair any damaged frames and replace those that cannot be reused; all this done in time before honey flow season.
Beehive frames can be cleaned in any season of the year. It is however easier to clean frames in winter. It is good to carry out this activity in the mornings of winter when bees are not flying. The process of cleaning beehive frames can start at the apiary or at a selected location such as your backyard or garden shed. Cleaning often involves the use of heat and chemicals. This helps remove wax from the frames. It also kills pests, parasites and micro-organisms in their various life stages.
Different types of materials have varying capabilities to withstand different cleaning agents. As a result, the material used to make the beehive frame determines the best method to clean it. Hot water and washing soda are common in use by beekeepers cleaning beehive frames. Be sure to wear protective clothing. These include eye and hand protection, boots and a waterproof apron. It is also advisable to wear old clothes when cleaning the frames so your best attires do not get damaged. For the various solutions and chemicals you may use to clean beehive frames, be sure to read the instructions on manufacturers’ labels.
How to Clean Wooden Beehive Frames
Wooden beehive frames are the most used by beekeepers. They are easy to assemble and affordable. Wooden frames can be used repeatedly in beehives and withstand harsh treatment during cleaning and drying. Wooden frames are easily cleaned by boiling in hot water. Chemicals may be added to the water to achieve specific cleaning objectives that the beekeeper is aiming at.
After removing wooden frames from the beehive to harvest honey, cut out any comb containing honey. If there is honey on the frames, you may give it to the bees. Once this is done, you may then clean the frames.
Steps
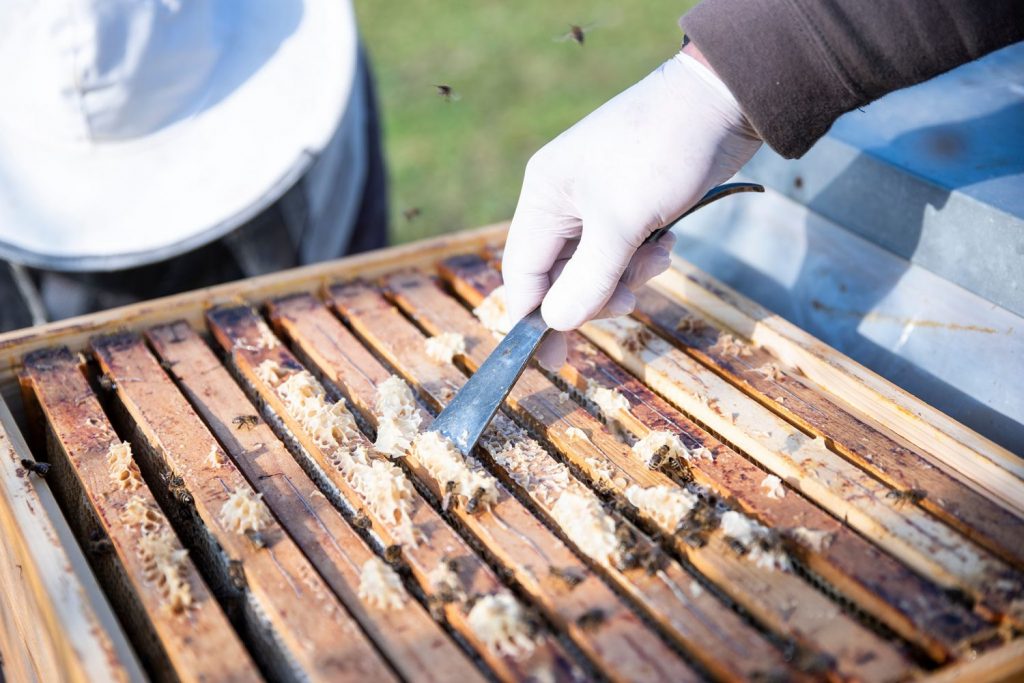
- Cleaning wooden beehive frames starts with scraping off propolis. Do this using a hive tool. Pay more attention to the joints while at the same time taking care not to pry the joints loose.
- Some beekeepers remove wire from the frames before cleaning. This is up to the individual beekeeper. Wired frames keep their shape even with cleaning in hot water. Additionally, slackened frame wires can be tightened once the frame is dry.
- Dip the wooden beehive frames into hot boiling water for about 2 minutes. This removes the bees wax and kills most disease causing organisms. If your boiler is not large enough, you can boil one half of the frame and then the second half. Large beekeeping operations where frame cleaning involves hundreds of frames have large boilers that can take many frames at once. You may add washing soda to the water in which you boil the beehive frames. It softens the water and gives better quality wax.
- Once the wooden beehive frame has been in the boiler for 2 minutes, lift it out and shake excess wax and water back into the boiler. You should then place it in a place it can dry quickly. Wooden frames do not generally get distorted after this treatment.
For every 100 wooden frames that you clean using this boiling method, you are sure to harvest up to a kilo of beeswax.
How to Clean Plastic Beehive Frames
Plastic beehive frames are durable and can be used for very long periods of time. They do not get damaged easily and have fewer maintenance requirements when compared to wooden frames. Beekeepers using plastic frames should know how to clean them so as to get the best life and performance. This cleaning is done periodically to remove excess wax, propolis and to ensure proper hive hygiene. One of the benefits of cleaning frames in the beehive is the control of pests, parasites and diseases. By cleaning your plastic frames, you give your honey bee colony better chances of survival. It also allows you to harvest bees wax.
Cleaning plastic beehive frames is done in three major ways:
Method 1 – A Warm Place with Wax Moths
- The first common method beekeepers use to clean plastic beehive frames is by placing them in a warm place. You can put the frames in a box and let wax moths go through the frames from spring to autumn. The moths do not damage the frames but eat up most of the wax. This however takes time, so you will need to have purchased spare frames to use during this period.
- After the wax moths have eaten the wax from the frames, remove the sticky webbing they leave behind on the plastic beehive frames and wash them with water. You may add some small amount of washing soda to the water you use.
- Leaving plastic beehive frames out in a warm place for periods of time also helps remove wax from the frames. The wax gets soft due to the heat and melts off the frames. You may collect the wax if you so desire. When using this method to clean plastic beehive frames, watch the temperature that the frames are exposed to. They may warp and lose their shape if the temperature gets too high. Once the wax has melted from the plastic frames, they are ready for reuse.
Method 2 – Water Blasting
- Water blasting is the second most popular and effective method to clean plastic beehive frames. The frames are subjected to a blast of water at high pressure for a few minutes on each side. Blasting with water is effective in cleaning without regard to the temperature of the water used. Both warm and cold water give great results. You should not use hot water since it will melt the plastic.
Method 3 – Freezing
- Freezing plastic beehive frames is a method of cleaning that beekeepers should increasingly explore. Cold frozen wax tends to flake off plastic. It falls of easily since the chemical makeup of plastic and wax does not allow for formation of strong bonds. Leaving your frames out during winter or placing them in the freezer should get the job done well. All you need to take watch out for is the frames touching each other and freezing onto each other.
- After the frames have defrosted, you may then wash it with water with some small amount of washing soda.
How to Clean Honey Super Frames
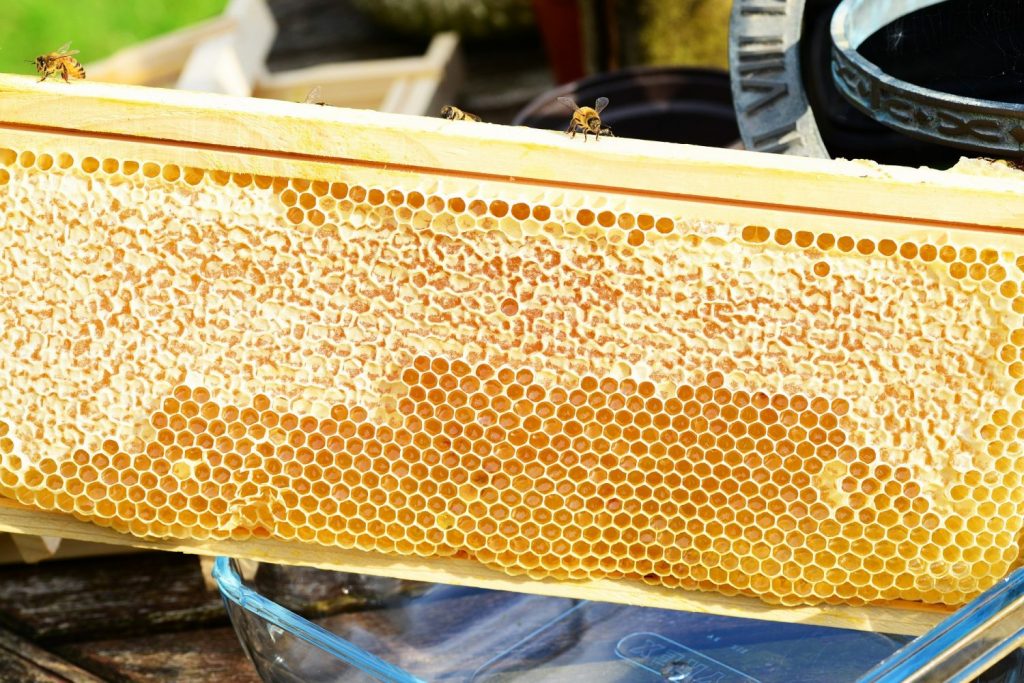
Beehive honey super frames do not need all too frequent cleaning. They do not accumulate a lot of debris. Pollen is the biggest problem when cleaning honey super boxes. It may accumulate on foundation frames. It requires water to remove the pollen. Removing old wax from the honey super frames allows you to harvest beeswax as a beehive product. Honey super frames require you to also look at additional areas of cleanliness including propolis. A hive cleaning tool is required to remove propolis. Both beginner and experienced beekeepers with an interest in DIY can make use of a hive tool.
Scraping the sides of honey super frames helps remove unwanted accumulations from the frames. Beekeepers using Langstroth beehives practice precision beekeeping. Frames attaching to each other or to the beehive body is not desired. Propolis on the frames should be removed frequently from the sides of beehive frames.
Steam Cleaning Beehive Frames
Steam cleaning beehive frames is a method used by beekeepers to keep wooden frames clean. It can also be tried on some strong plastic frames. Cleaning beehive frames using steam requires the beekeeper to have an empty beehive box with a cover. A hole is made in the cover through which steam will be delivered into the box. Additionally, the box to be used should have an opening at the bottom through which you will harvest wax into a bucket. Indeed, steam cleaning frames helps beekeepers harvest wax easily.
Steps
- Place the frames to be steamed in the empty beehive box and connect the steam delivery pipe.
- Switch on your steamer and steam the frames for about 30 minutes. It takes a few minutes for steam to build up in the box and start melting wax on your frames.
- Leave the steamer on in readiness to steam your next batch of frames.
- Steamed beehive frames are then placed in a container with a soda solution. Soda helps disinfect the frames and dissolves propolis. A strong-bristled plastic brush can be used to lightly scrub the frames in the soda solution. It removes stubborn dirt from the beehive frames.
- After steaming all your beehive frames, clean the beehive box and other equipment you used in the process. Remember to also switch off the steamer machine you are using.
Experienced beekeepers steaming their frames have devised a way to work through the process quickly. They use a top that they place on successive beehive boxes of frames. That way, they end up steaming all their frames and boxes during cleaning. The frames are steamed in their boxes and then replaced after they have been washed in soda solution.
Take Caution
Cleaning beehive frames using steam has some risk of the beekeeper getting scalded. Use protective gear such as heavy duty gloves to avoid getting scalded. Additionally, handle hot frames cautiously. Steamed frames may not be completely clean. Use a hive tool to remove excess wax from grooves and hidden areas of the frames such as the joints between the side bars and the top bar.
Boiling Beehive Frames
Boiling is a common method of cleaning beehive frames. Beekeepers love it since it allows them to collect wax and sterilize the frames at the same time. It is also inexpensive and can be used to quickly clean hundreds of frames. Boilers suitable for use with beehive frames come in a variety of sizes and use different fuels. The best are those that can take more than 8 frames at a time. Boiling beehive frames has some risk of injury to beekeepers. It is best done in a well ventilated area in winter when bees are not flying around. Wear strong boots and protective clothing in case you get splashed with hot wax.
Steps
- To boil beehive frames, prepare a washing soda solution and half-fill the boiler with the solution. The mixing ratio for the soda solution is recommended to be 1 kg of soda crystals for every 5 liters of water you use. Remember to not fill your boiler since water rises when you add frames to the boiling solution. Boiling frames in soda solution destroys most hive pathogens and pests while dissolving propolis. It is not recommended for frames with notifiable diseases. Such frames should be destroyed by burning.
- Dunk one half of the frame into the boiling soda solution if the boiler you have cannot take the whole frame. After 3-4 minutes, the frame is clean. Boiling at 1000 C removes any wax, propolis and sterilizes the frame. You do not need to dissemble the frame for boiling. If a frame is not clean after 4 minutes in the boiler, a little sloshing around or light scrubbing does the job.
- Boiled beehive frames are removed from the boiler and shaken over the boiler to remove excess wax and water. They are then best placed in a box or hung so they can drip-dry for up to 24 hours. The frames are then dried in a hot place where all the moisture will leave the wood. In winter, a utility room or other heated space gets the job done. Once dry, check the frames for warping and loose frame wires. If any of the frames are warped, discard them. Tighten loose frame wires so the frames are ready for use.
- Seal the cleaned beehive frames in a beehive box or other suitable place until they are needed for use in a beehive stack.
- After you are done boiling frames, let the boiler cool down. Leaving the water in the boiler overnight is recommended. Be sure to drain off the cold water from the boiler. The block of wax that will have formed at the top of the water is easy to remove. It shrinks and separates from the walls of the boiler easily. You may cut up the wax block or store it as it is. Remember to wash the boiler later. Pay attention to the sides and insides of the boiler. You should make sure that no wax is left on the sides or in the boiler container.
Wooden frames are the only frames cleaned by boiling. Plastic frames are often not strong enough to withstand the heat. They warp, lose their shape and are rendered useless for further use in beekeeping.
Cleaning Pierco Beehive Frames
Pierco frames are one-piece plastic frames. This means that the plastic frame is continuous with the plastic foundation. The frames are very popular with beekeepers and are made in the USA. Both beginner and experienced beekeepers find pierce frames easy to use. The frames mostly come waxed.
Cleaning Pierco frames is easy. A combination of scraping and water blasting methods of frame cleaning are used. They apply to all sizes of Pierco frames. A hive tool is used to scrape off wax from the frames. Remainder wax on the frames is removed by water blasting. Pierco frames can also be cleaned using hot water at a temperature that does not cause the frames to lose their shape.
How do you Remove Wax from a Beehive Frame?
Wax removal from beehive frames is important for a number of reasons. Firstly, it enables the beekeeper to harvest beeswax for use or sale. Additionally, it helps control burr comb and prevents frames getting joined with beeswax. In some cases, beekeepers remove wax from comb so that bees can build fresh comb. Too old comb on beehive frames is more likely to attract wax moths and also harbor disease-causing pathogens in the beehive. Removing wax from a beehive can be done in a number of ways depending on the type of material used to make the frame, and the purposes for which the beekeeper is removing the wax from the frame.
Method 1 – Scraping
- Scraping wax off the beehive frame is a mechanical method of removing wax from frames. A hive tool is best used for scraping. One frame is handled at a time. Scraping gives you large chunks of wax from the frames. The wax may need subsequent melting and shaping. For plastic frames, the beekeeper should be careful not to apply too much pressure with the hive tool and damage the frame. This also applies to plastic foundation used on beehive frames. Scraped frames may still have wax on them. This remainder wax can be water blasted off the frames or cleaned off by bees.
Method 2 – Using Heat
Placing frames in a hot room or out in the sun is another method of removing wax from the frames. In heat, wax melts and drips off the frames. This leaves the frames clean and the wax can be collected for use by the beekeeper. Melting wax off the frames using the sun requires you to leave the frames outdoors for some time. This method of removing wax from frames is time-consuming and may not do the job very well. Even after most of the wax has melted off, there will be some wax on the frames. The frames are also messy with wax buildup on some parts of the frame.
Method 3 – Using Cold
Beekeepers may use cold to remove wax from frames. Plastic frames and foundation are especially suited for this. Wax is a hydrocarbon that does not form strong bonds with plastic. When cooled, wax contracts and hardens. It then has even weaker bonds with plastic. Freezing frames or leaving them out in the cold of winter is used by beekeepers removing wax from beehive frames. The wax is easily tapped off the frames and collected for sale or use by the beekeeper.
Method 4 – Boiling
Boil beehive frames in soda solution to remove wax and sterilize the frames. Hot water melts wax off beehive frames. This method of removing wax from beehive frames can also be used to wax plastic foundation. Plastic frames should be briefly immersed in hot water and then removed immediately. Some wax sticks to the side of the frames in an even layer that is great for plastic foundation.
Method 5 – Steaming
Steaming frames is another way to remove wax from frames. A box with an outlet at the bottom and a steam inlet at the top is used. The frames to be steamed are arranged in the box and then steam is allowed into the box through the inlet at the top. It sterilizes the frames and melts wax from the frames. The wax flows to the bottom of the box where it is collected through the outlet at the bottom. A bucket or other suitable container is used to collect the hot flowing wax.
How to Clean Plastic Foundation
Foundation is used by beekeepers for various reasons including the production of preferred sizes of bees and getting high yields of honey per unit space. Plastic foundation is used with a layer of wax to get the bees started in building honeycomb on the foundation. Over time, foundation gets littered with remnants of cocoons left behind when adult bees emerge. Cleaning plastic foundation helps to remove these cocoons from the foundation and keeping the beehive generally clean.
Method 1 – Scraping
- Scraping wax and propolis off the plastic foundation is the first method you can use to clean the foundation. Your hive tool comes in handy here. Use the side that is flattened. A little pressure does the job without damaging the foundation. With experience, you can scrape off the wax and not need a second cleaning process to give you the results you desire.
Method 2 – Wax Moths
- As destructive as they can be, wax moths are a natural method of cleaning beehives. Their larvae feed on beeswax and then leave once there is no more wax to feed on. Leaving your frames with plastic foundation on them to attract wax moths is one way to clean the foundation. The larvae of the wax moths will eat up everything on the foundation and leave it clean. They cannot damage the foundation since they are not capable of burrowing through plastic.
- Using exposure to wax moths is natural but time consuming. Additionally, it may not be worth the risk of infesting your beehive with wax moths. Eggs may be present on frames after exposure to wax moths. Once these frames are put in a beehive box, the eggs hatch and can cause a wax moth infestation in your honeybee colony. If you are going to leave your plastic foundation exposed to wax moths for cleaning, use a secondary method to ensure the foundation is free of wax moth eggs before using it in a beehive.
Method 3 – Using High Pressure Water
- Water can be used to clean your plastic foundation. Under high pressure, water removes wax from plastic foundation. The water does not have to be cold or hot – the pressure does the job. Cocoons in the comb are flushed out together with chunks or flakes of wax. It is necessary to wear waterproof clothes when cleaning plastic foundation using water. You will inevitably get wet.
Method 4 – Using Hot Water
- Another way to use water in cleaning plastic foundation is by heating it in a wide container and using it to melt wax off the foundation. When starting the process, heat the water to around 1950 F and maintain that temperature during the entire cleaning process. Add a layer of 1 inch on top of the hot water and let it melt. To clean your plastic foundation, dip it into and out of the water. Take care not to have the foundation in the hot water for too long since it may warp. As the foundation goes into the water, wax melts off and takes with it any debris that may be on it. As the frame comes out of the water, it gets coated with a fresh layer of wax. This saves you from having to wax the plastic foundation later. Using hot water with a layer of wax to clean plastic foundation gives excellent results. It is easy, fast and effective.
Mistakes to Avoid
Endeavors of beekeepers to clean plastic foundation have given some great methods and ways on how to go about the important task. At the same time, there are some mistakes that you should not have to make. Boiling plastic foundation or frames with plastic foundation on them should never be done. The plastic foundation warps and is rendered useless in beekeeping. A second thing to avoid is attempting to clean plastic foundation in your dishwasher or laundry machine. The results you get are bad at best, and the mixture of propolis and wax may ruin the machine or later stain other items placed in the machine.
Cleaning Plasticell Foundation
Plasticell foundation is one of the popular plastic foundations used in beekeeping. It comes lightly coated with beeswax in your initial purchase. Plasticell foundation is sized to be used in both hive body and super boxes. Cleaning Plasticell foundation is important after use. It is done more often on foundation used in brood boxes than on the foundation used in honey super boxes. Cleaning Plasticell foundation largely aims at removing the debris left over from honeybee brooding.
The best way to clean Plasticell foundation is by scraping wax off the foundation. Your beekeeping hive tool is best for the job. Plasticell foundation is strong and does not get damaged if you are gentle with the scraping. The wax on Plasticell comes off in big chunks. You can get the job done in a few minutes. Any beeswax left on the foundation is cleaned off by honeybees before they start drawing fresh comb on the foundation.
You may try using one of the various methods outlined for cleaning plastic foundation with Plasticell foundation. Freezing the foundation or waiting to clean Plasticell foundation in winter is an easy and effective way to clean the foundation. Frozen wax comes off the plastic easily to give you excellent cleaning results. Use a plastic brush with stiff bristles on frozen Plasticell. It reduces the risk of damaging the upper Plasticell cell walls.
Cleaning Rite-Cell Foundation
Rite-Cell foundation is plastic foundation that is made with a durable and strong core. It requires no reinforcement and is impervious to damage by wax moths. Rite-Cell foundation is made by Mann Lake using food grade plastic and is available without a layer of wax on it. The foundation has sharp cell edges and a textured interior in the foundation cells. Cleaning Rite-Cell foundation is necessary after use by brood and in honey super boxes. You should consider that the foundation is plastic when choosing the cleaning method to use.
Scraping off Rite-Cell foundation is easy with a hive tool. It leaves the foundation largely clean with little wax. You can then let bees clean off the little wax that remains on the frame or water blast it. Alternatively, you could let the Rite-Cell foundation freeze in winter or in your freezer and tap off the wax.
Conclusion
Beehive hygiene is important for sustainable beekeeping and production of safe beehive products. Cleaning beehive frames is one step towards good beehive hygiene. Use this guide on how to clean beehive frames of various types to ensure the health of your hive. You will have easy time managing pests and diseases of bees as well as produce high quality beehive products such as honey and beeswax. The job of cleaning beehive frames can be long and tedious. Arranging for some assistance when you are cleaning is a great way to get through the job quickly. You should also be ready to lend help when other beekeepers ask you.
What are your thoughts article? Leave a comment below and let us know.
[…] https://beekeepclub.com/how-to-clean-beehive-frames-and-foundation/ […]
[…] https://beekeepclub.com/how-to-clean-beehive-frames-and-foundation/ […]
The rest of the world generally uses a 1 part bleach to 4 parts water bath. Soak scraped frames and woodenware for 20 minutes, rinse and sun-dry. That takes care of everything, including AFB spores. Easy, cheap, effective.