
If you purchase an independently reviewed item through our site, we earn an affiliate commission. Read our affiliate disclosure.
Some of the challenges that are on top of the list when you ask any beekeeper what cripples their business include varroa mites, low honey production, colony deaths, and reliance on chemicals. These in addition to a myriad of other problems that beekeepers face, make it almost impossible for them to raise successful colonies. Fortunately, scientists and beekeepers have been focused on coming up with solutions to the problems they face. And thanks to their effort we now have the Thermosolar Hive. This is a one-of-a-kind hive that helps beekeepers raise successful colonies without the need to use chemicals to eliminate the deadly varroa mites.
How Temperature Affects Honeybees and Mites
Just like honeybees, varroa mites are highly sensitive to changes in temperature. This is the idea behind the Thermosolar hive. It utilizes temperature as a tool to counter invasive varroa mites.
Varroa mites prefer temperatures that are between 26°C to 33°C (79°F to 91°F). Female varroa mites will be highly productive when under temperatures between 32.5°C to 33.4°C (90.5°F to 92.12°F). The mites are able to withstand intermittent hikes in temperatures of up to 40°C (105°F) but only when hitchhiking on flying bees and only for a shorter period.
Exposure to higher temperature levels for a longer period will kill the mites. Exposure to temperatures of 40°C (105°F) for more than 2 hours will exterminate 100% of the existing mites in a brood. A few of the mites that remain will lose their mobility and will die within 12 hours.
The honeybees appear to be more resistant to higher temperatures, with adult bees exhibiting the ability to withstand short-term exposure to temperatures of up to 44°C (110°F). The center of the cluster in the beehive is the warmest and it gets cooler as you move away from the cluster. Temperatures can go as high as 35°C (95°F) inside the cluster, 21.6°C (71°F) immediately outside the cluster, and 11.1°C (52°F) on other parts of the beehive.
Low temperatures can devastate honeybee colonies. The bees’ flight is impaired when temperatures go below 12.7°C (55°F). Clustering of the honeybees will occur when temperatures are about 17.7°C (64°F). They will do this in an effort to keep the queen, brood, and themselves warm. If temperatures fall further then the cluster becomes tighter with the exterior of the colony creating insulation around the clustered bees to prevent heat loss. The further decline will force the temperature-controlling bees to flap or vibrate their wings in an effort to generate more heat.
Honeybees have a higher degree of heat tolerance than other insects such as mites, hornets, yellow jackets, and others. They use a technique called “thermoballing” when attacking these invaders. This is where the hundreds of guard bees surround the invader and rapidly vibrate their muscles to generate heat of up to 45°C (113°F). This suffocates and burns the victim to death. It is this same technique that is employed in the Thermosolar Hive. The mites are unable to withstand the excessive heat generated by the hive. On the flip side, the adult bees, brood, and hive products are not affected by the Thermosolar Hive.
How the Thermosolar Hive Works
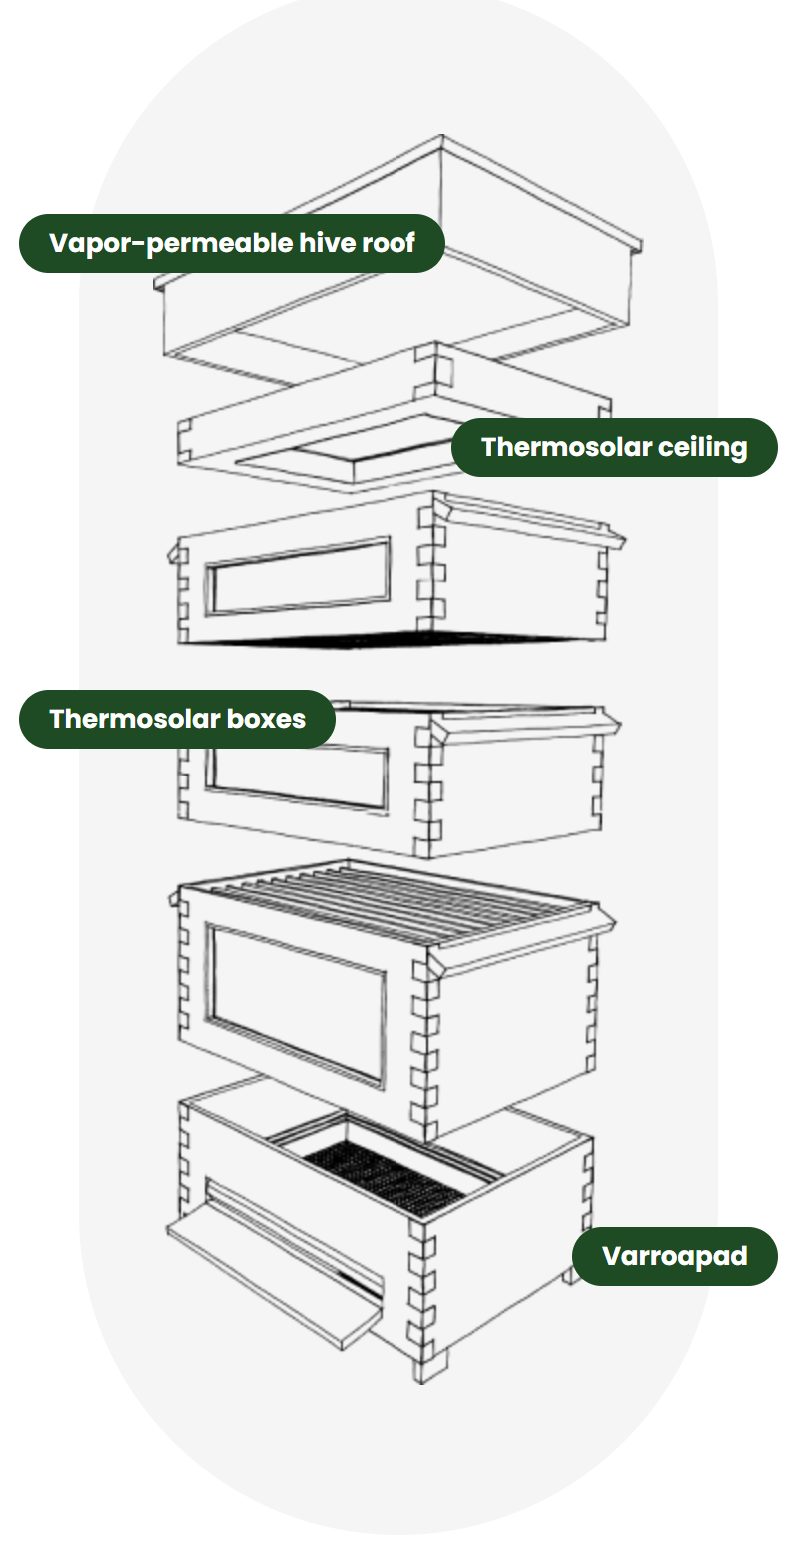
The Thermosolar Hive comes with an outer cover, varroa bottom, Thermosolar ceiling, and Thermosolar super. Each of these components has a crucial role to play.
The beekeeper will remove the outer cover so that the ceiling is exposed to the sun. This will warm the sealed brood in the brood chamber. Each of the boxes comes with a Thermosolar window at its front to facilitate heat absorption throughout the treatment.
The sunrays collected are transformed into heat waves that are transmitted into the brood chamber. This is absorbed by the brood, wax, and food reserves. The increasing temperature is monitored using the two in-built sensors situated in the wax of a comb at the brood chamber. The first sensor on the upper bar and the other on the bottom bar will help monitor the increasing temperature.
The beekeeper should stop the treatment process once the temperature rises to 46.6°C (116°F) at the upper portion of the bar. The outer cover should be re-installed once this level is attained. As for the thermally insulated supers and thermal bottom, these allow the temperatures to be maintained within the healing limits for up to 2 hours. This is sufficient time to allow for all the mites to be eliminated.
Any other mites that are left out will find their way back into the uncapped brood cells within 10 days. The treatment should therefore be repeated once more to ensure these remaining mites are subjected to the treatment. The Thermosolar Hive boosts the colony expansion during spring and helps save honey reserves throughout the winter and other seasons. It boosts honeybee flight activity and boosts honey production by up to 25% to 75%.
For short-term thermotherapy, it is best done during the summer months with the appropriate time being the end of July to early August. Proper positioning of the Thermosolar Hive is recommended with the hive facing South or South-East. The ideal time of the day for treatment is during bright days when it is 30% cloudy. Morning treatment is best recommended as afternoon temperatures would cause the upper part of the box to quickly overheat. The capped brood should be placed in the super and entries of all supers closed, the queen excluder removed, and hive entrance narrowed before the beginning of the thermotherapy.
The removal of the hive roof makes it possible for sunrays to hit the Thermosolar ceiling. The heat will then pick up gradually at the rate of 0.1°C (32.18°F) per minute. House bees tend to stick around the brood area during the thermotherapy, and that explains why the brood is never harmed throughout this therapy. Horizontal wiring would however be ideal since high-quality and pure wax melts when subjected to such a level of heating (60°C or 140°F). Additionally, the open entrance helps provide the required ventilation to ensure the queen and the adult bees are not exposed to the heat. They will move to the bottom box where temperatures remain unchanged or leave the hive.
Thermosolar Hive Review
The Thermosolar hive has been designed to counter one of the biggest threats to honeybees in the world – the varroa mites. These tiny mites have been linked to the common colony collapse disorder affecting honeybee colonies globally. The hive utilizes solar energy in eliminating these mites.
The varroa mites target adult bees and broods but prefer the pupa and the larvae. They affect the brood causing the brood to emerge with deformed limbs and wings. They also convey viruses and diseases to the honeybees causing more losses to apiaries. Identifying and removing the mites without the use of chemicals is usually complicated. Fortunately, the mites are sensitive to heat.
The Thermosolar hive is designed with the idea that heat can help eliminate varroa mites. These parasites will not survive when exposed to temperatures of 40°C to 46.6°C (104°F to 116°F) for at least 50 minutes. Exposing them to such conditions will completely eliminate the varroa mites.
The Thermosolar hive comes with special mechanisms that make use of solar energy. It is designed in such a way that the hive gradually heats up the honeybee colony and the honeycombs. The aim of the system is to raise the temperature level beyond what the varroa mites can tolerate. This technique does not harm adult bees, broods, or honeycombs.
The Thermosolar hive targets all mites that are inside the cells within a distance of 15.8 inches from the source of the heat. The system will exterminate at least 80% of the varroa mites within the first treatment. In some cases, a success rate of 90 to 95% has been reported within the first treatment.
Unfortunately, the mites that are latched onto adult bees outside the hive or those at the bottom of the hive will be spared since they are not within the scope of the heat treatment. Therefore, subsequent treatments should be carried out within 7 to 14 days later since the mites that were left out will invade uncapped cells within five days of being away, in an effort to procreate.
It is also worth mentioning that some mites can survive the winter and these are usually late re-invasions that can happen if the beekeeper did not treat the hive. They may also be available if chemicals were used and did not kill the mites. Fortunately, Thermosolar technology will help eliminate mites without the need to use harmful chemicals. The colonies can produce honey and wax that do not have pesticide residues. Additionally, these colonies have a higher survival rate even during the tough months.
Advantages of the Thermosolar Hive
Unlike conventional hives, this hive design has a number of advantages that include:
- Boosts colony heat to accelerate spring development. This subsequently saves on winter food reserves.
- The role of temperature controllers in the beehive is taken over by Thermosolar technology. The honeybees responsible for temperature control will therefore spare the energy for use in other important tasks in the hive. There will be no need to consume plenty of honey and end up weary through wing flapping in an effort to generate heat.
- The technology makes it possible for more bees to fly out for nectar and pollen even during bad weather since they are well-energized and are not required to generate heat for the brood. Consequently, colonies are able to accumulate sufficient food reserves.
- The overall health of the honeybees is improved. Honeybees that are well-fed and warm are healthier and are better positioned in defending their colony from pests, diseases, and invaders.
- Ensures thermal stabilization in case additional beehive boxes are introduced since the device regulates the temperatures inside the hive.
- The number of frost hours during winter is significantly reduced. That way, the colony is able to minimize the consumption of its food reserves.
- Premature brood rearing is eliminated since the Thermosolar hive does not keep the temperatures at a high all through. Instead, temperatures will cool down at night. Accordingly, the bees are not triggered to create premature brood.
- The time taken to treat varroa mites is significantly reduced.
- Safeguards honeybee colonies during long or severe winters, substantially boosting their survival rates.
- Improves the quality of honey.
- Makes it possible for colonies to raise early-season queens and drones even during short beekeeping seasons.
- It boosts honey production, with beekeepers reporting up to 25kgs of honey per honey super depending on the frame size.
- Helps eliminate the varroa mites from the honeybee colony in late summer.
- Thermotherapy effectively suppresses Nosema disease that is caused by Nosema parasites.
- Improves flight activity in honeybee colonies which in turn helps boost the colony flow potential.
- Thermosolar hives help eliminate varroa mites naturally from capped brood with an efficiency level of 100%. Not a single mite can be noted in the droppings after a few treatments. The hive will continually heal the hive.
- The use of solar heat is less laborious and is simple.
- It is safe for the honeybees and the beekeeper.
- Eliminates the need to employ chemical treatments for the varroa mite problem.
- It works exceptionally well even in situations where standard hives are struggling to put in honey. The honey production will increase by up to 40% on average.
- Thermosolar hives are made of good quality wood and will guarantee good service for a long time.
How to use the Thermosolar Hive
The beekeeper should adhere to below recommendations while using the Thermosolar beehive:
- The hive should be placed on a horizontal base and should be well-sheltered from strong winds.
- The hive exterior should be covered with an appropriate coating such as a water-soluble glaze coat to keep the wood secure from the elements. If possible two coatings should be applied to guarantee maximum protection.
- Disinfection is not recommended for the Thermosolar interior since it is protected with metal. Nonetheless, if it is deemed necessary it should be cleaned using a damp cloth. An ideal non-caustic disinfectant may be used.
Introducing Bees
Installing bees into a Thermosolar hive is done the same way as for standard beehives. The beekeeper can install both an older colony and splits. The insulating frames should be put correctly into place prior to installing the bees.
The other important task to complete before installing a colony is to insert the thermometer sensors into the brood nest. It is necessary to do it before you can begin any thermal treatment. The sensors measure the wax temperatures and should therefore be inserted into the frames that have capped brood. Its main purpose is not to collect the air temperature but rather the wax temperature. One sensor goes into the middle of the comb and the other above the bar within the same frame. Each of the sensors should be properly marked for easy identification.
As for situations when honey supers are not mounted, the temperature sensors are placed in the frame which is at the uppermost super that lies next to the Thermosolar ceiling.
How to Build a DIY Thermosolar Hive
The Thermosolar beehive is different from an ordinary hive in the sense that it uses solar energy to raise the hive’s internal temperatures to a level that will kill varroa mites. It is designed with the aim of allowing the beekeeper to breed honeybees year-round. The hive comes in all frame sizes of standard and combined types of hives. Each of the super of a Thermosolar hive is made for 10 frames with honeycombs, in addition to an insulating frame. The Thermosolar hive can thus accommodate up to 11 frames in each super.
The hive comprises the following: 2 thermo sensors, an outer cover, Thermosolar ceiling/roof, Thermosolar super, varroa bottom, feeder bottle extensions, feeder shelter, bottom board, enclosure with vents, a building barrier, entrance reducer, varroa bottom board, and varroa grid.
The Hive Roof
This is vapor permeable and is placed permanently on the beehive save when carrying out thermotherapy. It is similar to a common hive roof and comes with a solid insulating material in addition to a fibrous vapor-permeable material that allows water vapor to easily evaporate.
On the sides of the roof are vents that should never be covered. The perforated material on the bottom side of the roof is in direct contact with bee colonies and is prone to be covered with propolis. This should be cleaned regularly to keep the holes uncovered.
The Insulated Varroa Bottom Board
The Thermosolar hive comes with an insulated varroa board that is a permanent part of the hive. It features an entrance at its front part that can be closed and is split into two horizontal sections with the help of a grid. Its lower section cannot be accessed by the honeybees and is where the varroa pad is inserted for monitoring the mites that fall out of the beehive. The upper section of the bottom board allows the bees to hang out when temperatures are high inside the brood nest.
Two access points are provided on the sides of the bottom board for the beekeeper to easily access each section of the board without coming into contact with bees. Optional features such as 2 jars with percolating lids for feeding may be provided.
Varroa Grid
The varroa grid that splits the bottom board into two sectors helps keep the bees at the top and restricts their access to the bottom sector underneath the grid. This can be removed for cleaning. The grid provides a pathway for free fall for the mites to the bottom of the hive.
The varroa grid is a permanent part of the hive and it is recommended that the beekeeper keeps an extractable material at the bottom of the board to allow for monitoring varroa mite fallout.
The Entrance Reducer
This is required for keeping the entrance narrow or wide, just as the case is with standard beehives. The entrance is kept narrow prior to winter.
Wooden Barrier
This is the wooden barrier that is a part of the bottom board. It is placed on the upper section of the bottom, just above the grid to help prevent the bees from moving into the available space on the bottom board to build honeycombs. The building barrier should be kept in its place permanently.
Bottom Enclosure with Vents
At the lower section of the bottom is the enclosure with four vents that are used for closing the lower section of the bottom board, underneath the varroa grid, the part where the varroa pad is placed by the beekeeper.
The enclosure is fitted with 4 vents that provide ventilation during thermotherapy when the entry is closed. The lower section of the bottom board is kept shut permanently and will only be opened when checking for varroa fallout.
Feeder Bottle Extensions
A Thermosolar with an external feeder has this part included. The circular cutouts provided on the feeder extensions will fit into the feeding jars. These can be used to provide syrup and water to the honeybee colony.
Feeder Shelter
The Thermosolar hive with an external feeder will have this part for mounting over the jars when feeding. This comes with metal straps that keep the jars secured and stable. The shelter will be mounted into the feeder hole when not feeding to keep moisture off the hive.
Other Parts
- Temperature sensors – these are important for monitoring hive temperatures. The batteries are replaceable.
- Thermometers – these can be replaced.
Conclusion
The Thermosolar beehive might be a bit different from the commonly used beehives in terms of design and features but requires the same maintenance as an ordinary hive. Maintenance of the Thermosolar hive can be carried out just as the beekeeper does with an ordinary hive. Normal interventions aimed at boosting breeding bees can be undertaken without affecting the efficiency of thermotherapy. It is however advisable that the beekeeper refers to the provided manufacturer’s manual if they are uncertain about which beekeeping practices to integrate with this beekeeping technology.