
If you purchase an independently reviewed item through our site, we earn an affiliate commission. Read our affiliate disclosure.
Queen rearing in beekeeping helps ensure colony continuity and introduces desirable traits in the honeybee colony. In this introduction to queen rearing, we describe this process in detail and guide you on how to rear queen bees for your beekeeping operation. Rearing queen bees is about breeding honeybees and is part of colony management. It is easy to do with the right equipment and techniques. There are many manufacturers and sellers of queen rearing equipment. Both beginner and experienced beekeepers can practice queen rearing for their uses and for commercial purposes too. Queen bee sales are a great way to diversify the products you can sell from your beekeeping operation.
Queenright Colonies
A honeybee colony with a queen bee is called ‘Queenright’. The colony without a queen bee is called ‘Queenless’. A colony that is queenless has many risks and can easily die out. It may try to raise a queen bee with varying degrees of success. In natural situations in the beehive, new queen bees come about when the colony wants to replace an old queen bee that is failing. The colony can also raise a new queen bee when it wants to split and swarm. In swarming, the old queen bee leaves the beehive before a new queen bee emerges and takes half or more of the honeybees in the colony with her.
Which is the Best Honeybee Colony for Queen Rearing?
To rear a queen bee, you can use a queenright or queenless honeybee colony. It is a process that takes about 15 days. Resulting queen bees help your honeybee colony to thrive in the geographic and climatic conditions of your location, as well as ensure the continuity of honeybee colonies. In the process, you graft a female larva to a natural or artificial queen cell. Nurse bees then feed the larvae with special feed until she emerges as a new queen bee. From grafting to emergence, the larva takes approximately 12 days.
Can a Honeybee Colony Have More Than One Queen Bee?
In the event that several new queen bees are being raised in a beehive, only one survives to reign in the colony. The queen bee that emerges first goes around the beehive stinging other developing queen bees to their death. It ensures that there will be no competition between living queen bees in the beehive.
Can Beekeepers Control Natural Queen Bee Emergence?
Honeybees raise queen bees in special cells. These cells are larger than other cells. Usually, the queen cells lie on the surface of the honeycomb. If you spot these large special queen cells, you should take steps to support the emergence of the new queen bee or prevent it, depending on your preferences.
Benefits of Queen Rearing
Beekeepers carry out queen rearing for its benefit. If it was not beneficial to honeybees and beekeeping operations, beekeepers would not practice it. The benefits of queen rearing are the multiplication of colony numbers, providing a source of income, reducing swarming, maintaining colony strength, replacing old failing queen bees, bettering pest and disease management and control, and breeding desired colony characteristics.
1. Improving Colony Numbers
Queen rearing helps improve the number of bees in your honeybee colony. This is largely through laying a large number of eggs in the beehive. Additionally, the eggs laid by the new queen bee have higher chances of hatching. These factors cause the number of bees in the beehive to increase. Worker bees are especially important in the beehive because they do all the work. They collect resources, and build and feed young ones. Worker bees also clean the beehive in addition to other functions.
Typically, a colony of honeybees should have 40,000 to 60,000 bees. Any drop below this average number is disastrous for the colony. It results in the lowered ability of the colony to defend itself against aggressors, lower foraging power, and reduced chances of surviving winter and other harsh weather seasons. Ultimately, the foraging power of the colony impacts the productivity of the colony in commercial beekeeping. A colony with great foraging power can produce more beehive products than a colony with low foraging power.
2. Source of Income
Beekeeping operations are always seeking new ways to get income. They monetize all the viable avenues that they can. Queen bee virility is a large contributor to the health and strength of a honeybee colony. Rearing queen bees ensures that beekeepers have queen bees that are prolific. The queen bee that you get after a successful queen rearing process contributes to raising the chances of better production in the honeybee colony.
You can also monetize the queen rearing process by selling the queen bees that you rear. Selling off the queen bees to beekeepers gives you income for the beekeeping operation and diversifies your revenue streams. Beekeepers buy the queen bees for their colonies to get genetic diversity in their colonies, to get desired traits in their colonies, and to simply replace queen bees that are dead or failing.
3. Reducing Swarming by Queen Rearing
Honeybees form new colonies in a process called swarming. It is the secondary reproductive process of colonies after egg-laying. A colony splits and forms two or more colonies in the swarming process. During swarming, there is a build-up of resources in the hive, as well as the raising of a new queen. After swarming, the colony that is left behind has a low population of bees. It, therefore, has reduced capability to collect resources for use in the beehive. The colony is also prone to attacks by beehive intruders. It may lack the numbers to successfully defend itself against such attacks.
Managing the queen rearing process helps you to control and reduce swarming. You are able to determine when to split honeybee colonies and can prevent swarming by removing the developing queen bees. Without a new queen bee, the colony does not form a swarm. In the event that you prevent swarming in a colony that was ready to form a split colony, take measures to reduce the amount of reserve resources in the beehive, as well as tweak other factors that contribute to swarming.
4. Maintaining Colony Strength
Controlling and managing the queen rearing process in your beekeeping operation helps you maintain colony strength at its best. This comes about as a result of various factors that you impact by queen rearing. Firstly, queen rearing helps with increasing the number of bees in the honeybee colony. It promotes colony strength since there are more bees to perform various functions and carry out the different tasks in the beehive. Secondly, queen rearing is a means to prevent swarming. By keeping the colony in one piece, queen rearing ensures that the colony can survive the winter season among other harsh weather conditions.
A strong honeybee colony is necessary for colony continuity and optimal production. It can collect resources at the best rates and defend itself against intruders. In the event of a disease infection or pest infestation, the strong colony has better chance of survival. Weak honeybee colonies are a cause of concern for the involved beekeeper. They are prone to dying out and becoming a loss of any resources that you spent on the colonies.
5. Replacing Old Failing Queens
Age impacts all living creatures, including honeybees. In the beehive, worker bees and drone bees are replaced on a regular basis. The queen bee, on the other hand, has the longest lifespan of all types of bees. She can remain in the beehive for a period of up to 6 years from birth to the time of her natural death. In her last year or so, the capabilities of the queen bee will be low. She cannot produce eggs in large numbers and may fail to produce enough pheromones to keep the colony together. The old queen bee can quickly lead to colony collapse.
To avoid the problems that an old queen bee causes in a honeybee colony, beekeepers rear queens to introduce into affected colonies. By choosing when the colony gets a new queen bee, you are able to influence the health of the honeybee colony. Averagely, a queen bee should be in a honeybee colony for 3-4 years. This is the optimum period of time for which she gives the best productivity. After 4 years, she will be a potential problem to your beekeeping operation. Rearing queen bees gives you the ability to promptly replace ageing queen bees with those that are optimal for the honeybee colony.
6. Better Pest and Disease Management
The ability to control the genetics of bees in a colony conferred to you by queen rearing influences the colony’s capacity to handle pests and diseases. Genetics plays the biggest role in this. They influence behavior and susceptibility to diseases. Major genetic results of queen rearing and management are behavior that makes the spread of pests difficult and resistance to diseases.
Some bees have better resistance to infestations by pests. The honeybees may chase down and kill the infesting pest before it has time to procreate in the beehive. Additionally, honeybees can seal in eggs of pests so that the hatched larva cannot leave the sealed space and cause problems in the beehive. Grooming behavior in the colony helps remove parasites that are on the bodies of the bees.
Using a queen bee, you can introduce disease resistance in a honeybee colony. This is easy to achieve by raising a queen from a colony that has resistance to the target disease and then introducing the queen bee into the colony that does not have resistance to the disease.
7. Breeding Desired Colony Characteristics
Colony characteristics and behavior are important considerations in beekeeping. Queen rearing helps beekeepers to control these factors. You can control the behavior and other features of a honeybee colony by bringing in a queen that will result in offspring that has the desired characteristics. Some of the things you can impact in this way are aggression, productivity, and foraging behavior. These are in addition to other features of honeybee colonies such as hygiene and resistance to diseases.
Beekeepers want honeybee colonies that are easy to work with. Excessively aggressive colonies are troublesome and pose health risks to people and animals. Less aggression in honeybees is therefore desired by beekeepers. It is especially important when the beekeeping operation has many honeybee colonies in an apiary.
The ability to collect large amounts of beehive resources and use them is a desirable characteristic in honeybee colonies. You also want the colony to produce high amounts of beehive products such as honey. These characteristics influence the profitability of your beekeeping operation.
When to Start Queen Rearing
In nature, honeybee colonies start rearing new queen bees when various conditions are met. Firstly, the colony must be strong in terms of population. The number of honeybees in the colony has to be high so that the colony can handle the results of having a new queen bee. This is especially important if the colony is going to swarm after the emergence of the new queen bee.
Crowding of the available beehive space is a potent trigger for the natural rearing of a queen bee by honeybees. Secondly, there needs to be abundant food resources in the area where the colony lives. This often happens in late spring except where special circumstances occur.
There are few times in the year when the factors that influence colony swarming and raising of new queen bees are at their optimum. In late spring, the colony has usually grown to a large size after weathering the winter season. Late spring is also a time of abundant resources with many flowers blooming on different plants. This makes late spring an optimal time for honeybees to rear queen bees and swarm. Swarming can thus occur through summer and possibly in early autumn too.
For best queen rearing results, carry out your queen rearing in late spring. Due to the natural tendency of the honeybee colony to raise a new queen bee, you are likely to have an easy time carrying out the process. Work with a honeybee colony that is strong and is likely to swarm. You can carry out the process from early spring, through to late autumn if you want to, and if beehive conditions permit it. Older colonies withstand the disruptions you cause during queen rearing better than younger honeybee colonies.
Grafting Queen Bees
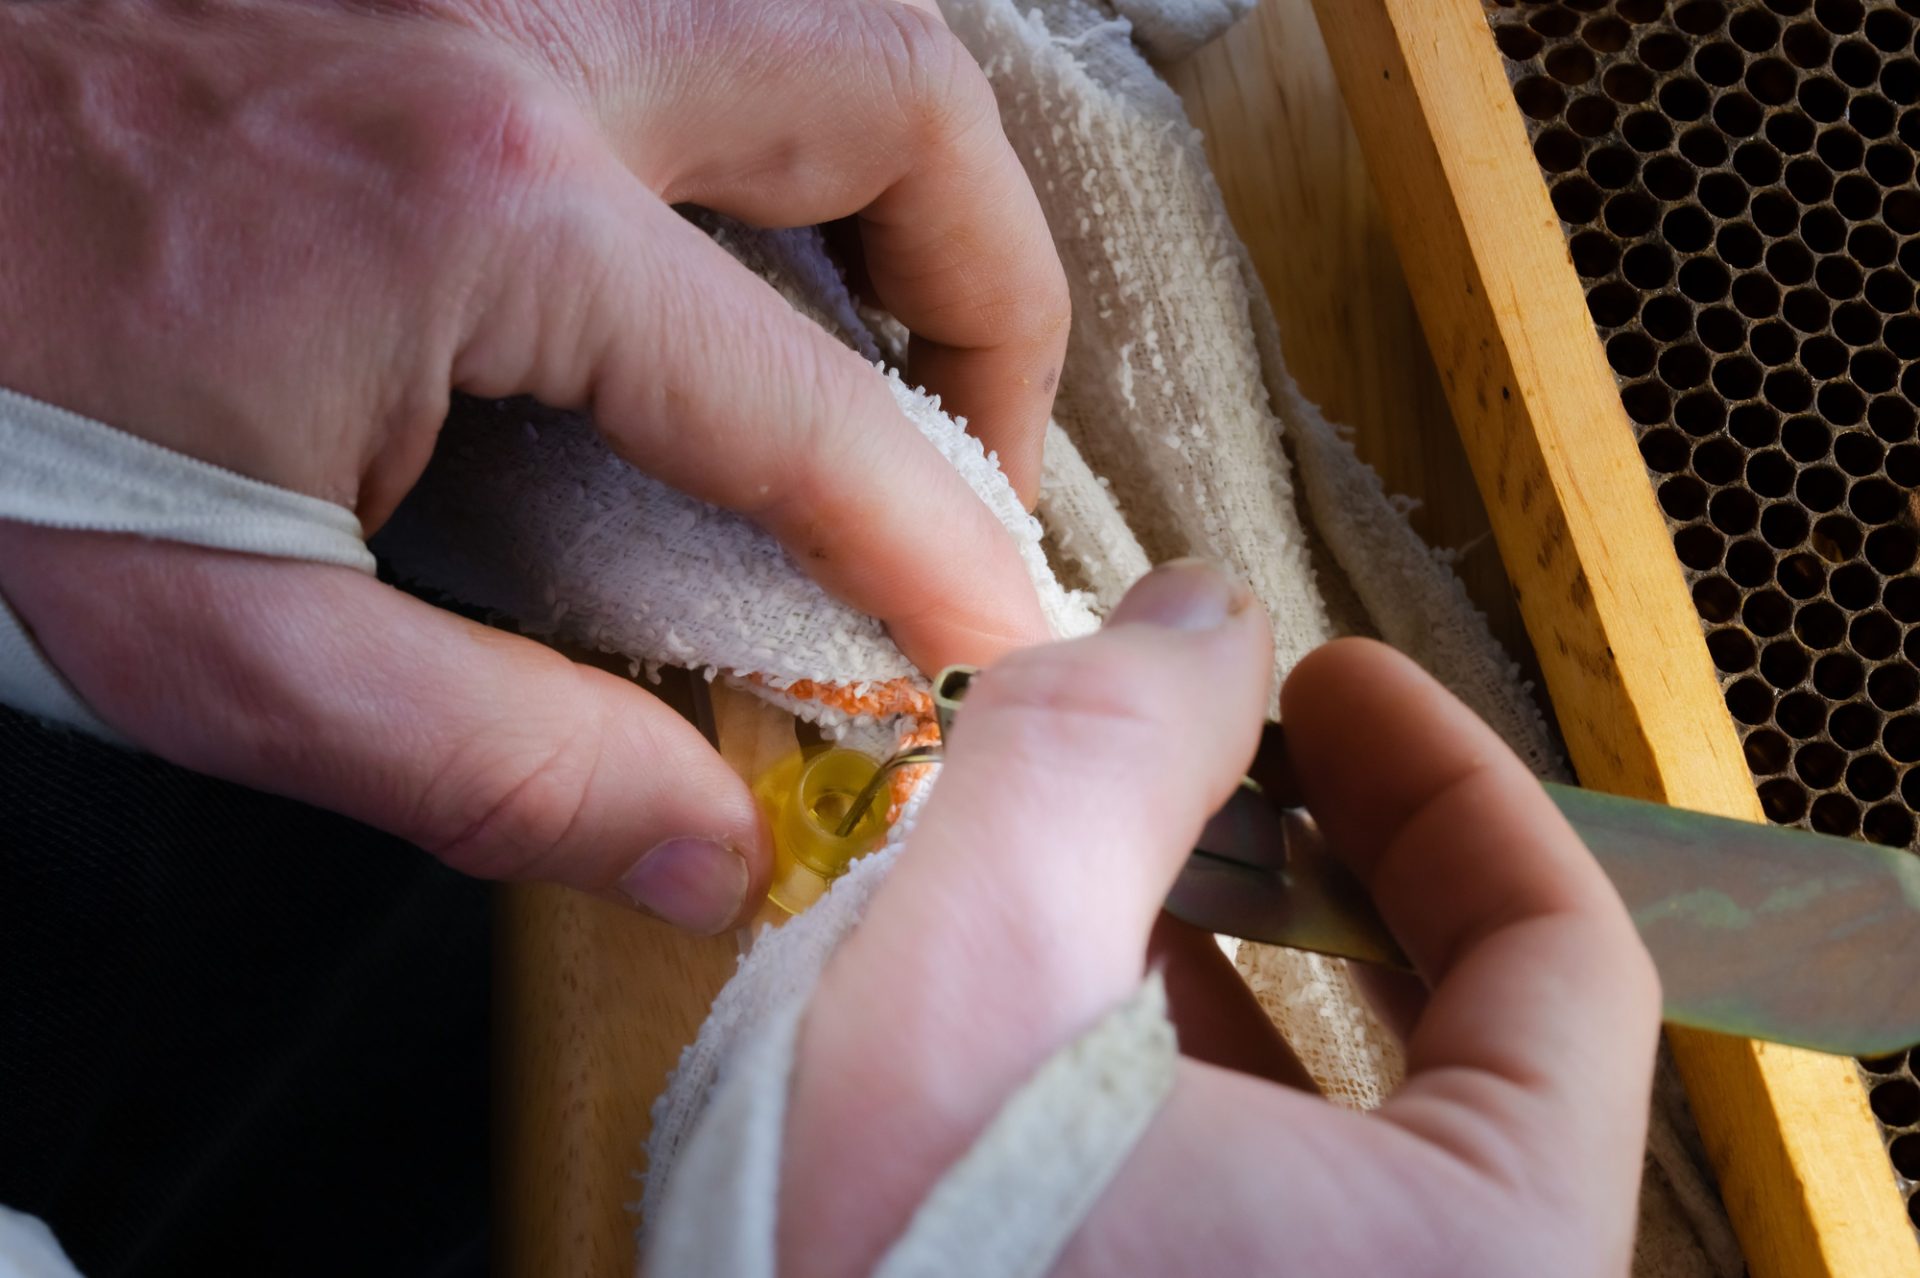
Grafting queen bees is a process in which you transfer a larva from a worker cell in a breeder hive and put it in a queen cell. The queen cell can be artificial or natural. Often, the queen cell is artificial because the beekeeper initiates the queen rearing process. The queen cell that receives a larva can be natural if the honeybee colony was preparing to raise a queen bee and you noted it on time. You can remove the larva they chose, and bring in a larva from another beehive whose honeybees have desired characteristics. The shape and size of the queen cell trigger worker bees to feed the larva a special diet that causes it to develop into a queen bee.
Queen grafting has specialized equipment that you need. You can also fashion some of the tools and equipment from locally available materials. Basically, you will need a grafting tool, some honey or royal jelly, lighting, a queen cell cup, and a magnifying lamp if you have poor eyesight. Your grafting tool can be a specialized one that you buy or you can make one from a bent piece of wire.
Using a Queen Grafting Tool
During the actual grafting, you slip your grafting tool under the selected worker larva and pull it out of its cell. The larva should be one that is newly hatched. It should not be older than 24 hours since it was hatched. Using the grafting tool, place the larva onto the bottom of a queen cell cup. Use a drop of honey or royal jelly to prime the queen cell cup. It makes it easy to float the larva off of the grafting tool. Take care not to flip the larva. You may brace your hand against the honeycomb during the process to increase its steadiness.
Good lighting is necessary for successful queen grafting. Use sunlight if possible or a source of light such as a bright headlamp. If you have poor eyesight, consider using a magnifying lamp during the process so that you do not make mistakes.
Can All Beekeepers Graft Queen Bees?
Some beekeepers are great queen bee grafters from the first time they try it. Other beekeepers may get poor results until they have tried grafting several times and gained experience. A large number of beekeepers do not rear their own queens because of the challenges that come with the grafting stage.
While the process is delicate, you can get good at it with a little practice. Try it and enjoy the benefits of rearing queen bees that meet your desired requirements. Queen rearing for your beekeeping operation is always better than buying queen bees from other beekeepers or sellers.
How to Graft Queen Bees in Queen Rearing
To successfully graft queen bees, you need the following;
- A strong colony that has a healthy brood and which can produce enough amounts of royal jelly.
- An apiary with a high population of drone bees to mate with the queen bees that you will raise. You may have mating nucleus colonies of 3,000 – 4,000 young honeybees.
- Plentiful pollen supply and honey for the nurse bees to use and for the nucleus colonies to feed on.
- Larvae that are between 1 to 24 hours of age for grafting. This requires you to be quick in confining the selected larvae in the beehive housing your starter colony.
- Sugar syrup to feed to the honeybee colonies after each manipulation.
1. Selecting Breeder Colonies and Brood Stock
Select your colonies and decide which will be the broodstock, and which will be the breeder colony. Go for a broodstock colony that is well-defined, indigenous if possible resistant to diseases and pests, and has good honey yield.
The breeder colony you choose should be healthy, strong, and with a large population of honeybees. Having a large number of honeybees ensures that the colony will be able to provide an abundant supply of larvae for grafting.
Ensure that your selected brood and breeder colonies are free of diseases and pests before carrying out grafting. It is especially important to ensure that you do not use colonies that have Varroa mite infestations. Use the available and appropriate method such as the sugar-shake method to test the colonies for Varroa mites.
2. Developing Starter Colonies for Grafting Queen Bees
Create starter colonies and prepare colonies well for the manipulations you will be carrying out. It is best to have one hive on top of another. The upper hive becomes the starter colony and the hive at the bottom is the established colony. This setup eases the transfer of brood frames and grafted larvae. Prepare the starter colony for a new queen bee by giving it some beehive frames with brood, and others with honey, from the established bottom colony.
Your starter colony is the one that holds newly grafted cells and larvae for a day or two. It does not have a queen bee. You should. Therefore, prepare it for the absence of a queen and the work it will do of rearing new queen bees. Provide it with ample supplies of pollen and honey. Nurse bees use the pollen and honey to feed the queen bee larvae and emerging brood. This ensures that there are high chances of the larvae you graft becoming accepted in the colony.
3. Producing Queen Cells in Queen Rearing
Provide a beehive frame or top bar with up to 30 queen cell cups. The cups work best when they are made using beeswax. Each cup’s rim should measure 8-9 millimeters in diameter. When the honeybee larvae are 12-24 hours old, transfer them to the queen cell cups using a grafting needle.
Nurse bees will then use wax to create queen cells. Typical queen cells are the size of a peanut shell. They are made by honeybees over your artificial queen cups. In the queen cell, nurse bees will rear the queen bees by feeding them.
4. Transferring Queen Cells to a Finisher Colony
Your finisher colony is the colony to which you transfer developing queen bee larvae in their cells. Carry out the transfer of the queen cells and the larvae they hold in them to the finisher colony 24 hours after grafting the larvae. The finisher colony is for nourishing the queen bee larvae in the cells until you need to transfer them again. A finisher colony should be queenless.
5. Introduce Queen Cells to a Mating Nucleus Colony
Worker bees seal queen cells on the 4th or 5th day. The larvae then proceed to pupate in the sealed cells and emerge as adult queen bees. On the 9th or 10th day of the larvae’s life, separate the developing queen bees in their cells and put them into a mating nucleus hive.
A mating nucleus colony or hive is a small setup of 3-5 frames. It typically contains sealed brood, pollen, and honey. Prepare the mating nucleus colonies on the 8th day of this process and put enough honeybees in the colony. The bees should be of different ages to keep the queen cells warm and tended to. Nurse bees in the nucleus hive honeybee population take care of the emerged queen bees including feeding the queen bees.
Queen Bee Fertilization
When the new queen bee emerges from her cell, it requires fertilization. The process involves her flying with drones and getting mated in flight. It is called a nuptial flight. When she returns after the flight, she can lay fertilized eggs in the beehive. By laying fertilized eggs, the queen bee ensures the continuity of the honeybee colony. Unfertilized eggs give rise to drone bees while fertilized eggs give rise to worker bees or queen bees.
Beekeepers can allow for natural fertilization of the queen to occur or carry out artificial insemination. Natural insemination occurs when the queen bee is allowed to go on a nuptial flight with drones. She mates with several drones in the drone congregation area. Artificial or instrumental insemination is also possible using semen collected from drones. It is best if you carry out instrumental insemination of the queen bee in a laboratory setting.
Rearing Drones
Rearing drone bees is an important, yet difficult process in queen rearing. It allows you to ensure the queen bee is adequately mated. You also contribute drone bees to the general pool of male bees in your area. They can benefit other beekeepers if they mate queen bees in the area.
Under normal circumstances, there are very few drone bees in the beehive. Just before winter, drone bees are expelled from the beehive and die in the cold weather of winter. New drone bees are reared from spring to early autumn. The eggs that lead to the production of drones are unfertilized eggs, and the cells of drone bees are larger than those of worker bees.
By rearing drones, you ensure that your queen bees do not mate with genetically weak drones. To ensure this, start raising drone bees 2 weeks before you start the queen grafting process. When you do this, you are sure that the drones are mature and producing semen by the time your queen bees emerge from their cells. Use a mother with desired characteristics to rear your drones.
Instrumental Insemination in Queen Rearing
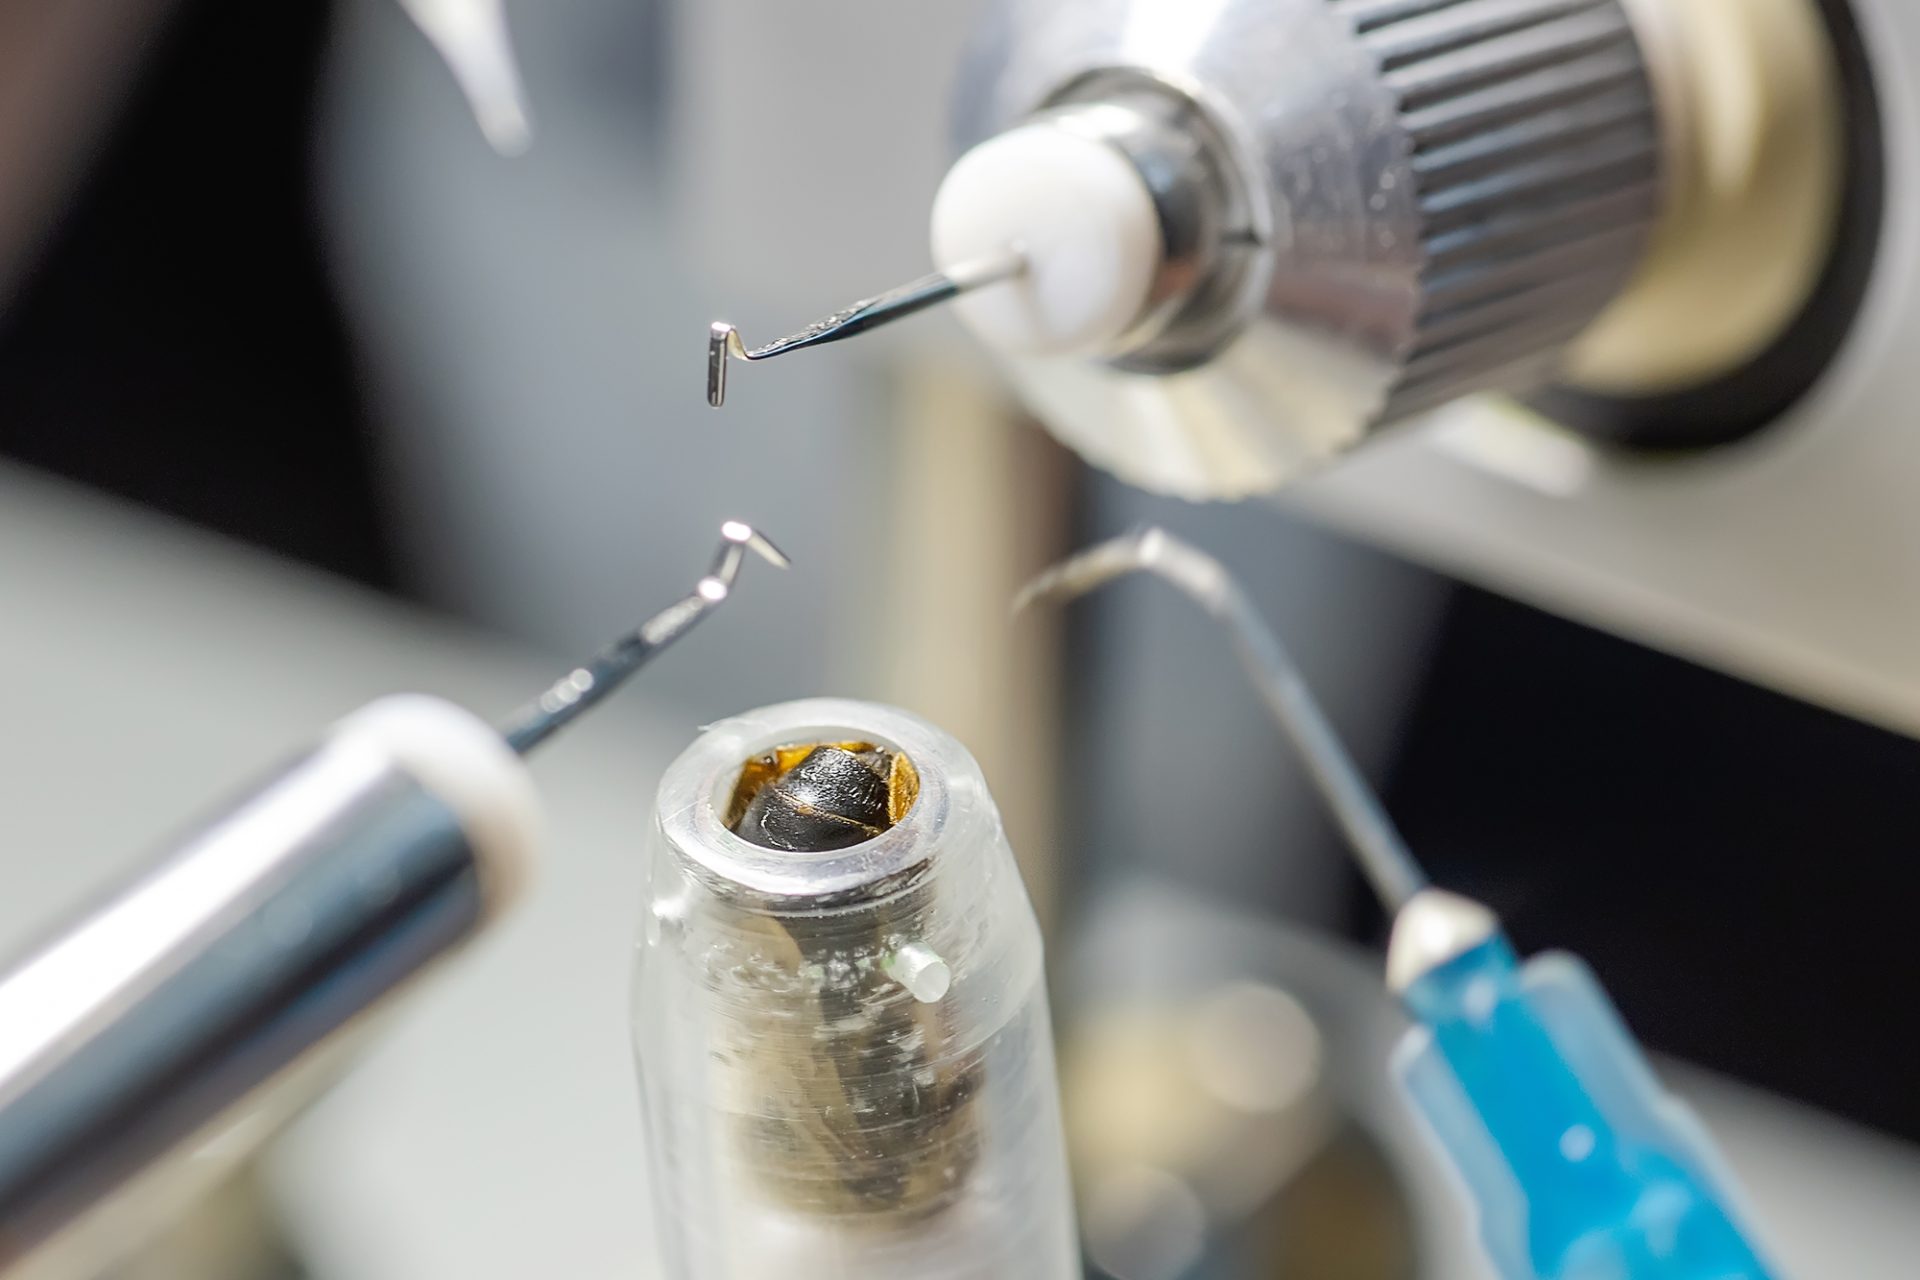
In comparison to natural fertilization, artificial instrumental insemination of queen bees is better. It is more successful and gives you sure information that the queen bee is fertilized. Additionally, instrumental insemination gives you better control over the process of insemination and the genetic stock you inseminate the queen bee with. It helps you maintain the desired stock over several generations of honeybees. This process is scientific and requires special equipment.
Instrumental insemination is a 5-step process with 3 major steps:
- Collect semen from mature male drone bees.
- Anaesthetizing and immobilizing the queen bee. This ensures that you have an easy time working with the queen bee. Put her in a holding cage once she is immobile.
- Delivering collected semen to the vaginal cavity of the queen bee. Ten microliters of semen are enough to fertilize the queen. During the delivery process, ensure that you do not touch the capillary of the inner walls of the vaginal cavity.
The other steps in the process are removing the queen bee from the holding cage and putting her in a queen cage. She revives after 10-15 minutes. You should then reintroduce her to the nucleus colony with the queen cage plugged with a candy plug which is best made from a mixture of honey and icing sugar. Nurse bees chew through the candy plug to free the queen bee. During that time, the queen bee releases pheromones to the beehive that make her re-accepted in the colony. Odors from your contact with the queen bee dissipate and thus reduce the likelihood of her being rejected by the colony.
When Does the Fertilized Queen Bee Start Laying Eggs?
Provide empty honeycombs for egg-laying in the beehive once your queen is fertilized, whether naturally or through artificial insemination. The queen bee starts laying eggs 4 days after insemination. Thereafter, check the laying pattern of the queen bee and monitor her progress. You can now sell off the nucleus colony or transfer it to a complete beehive as a starter colony.
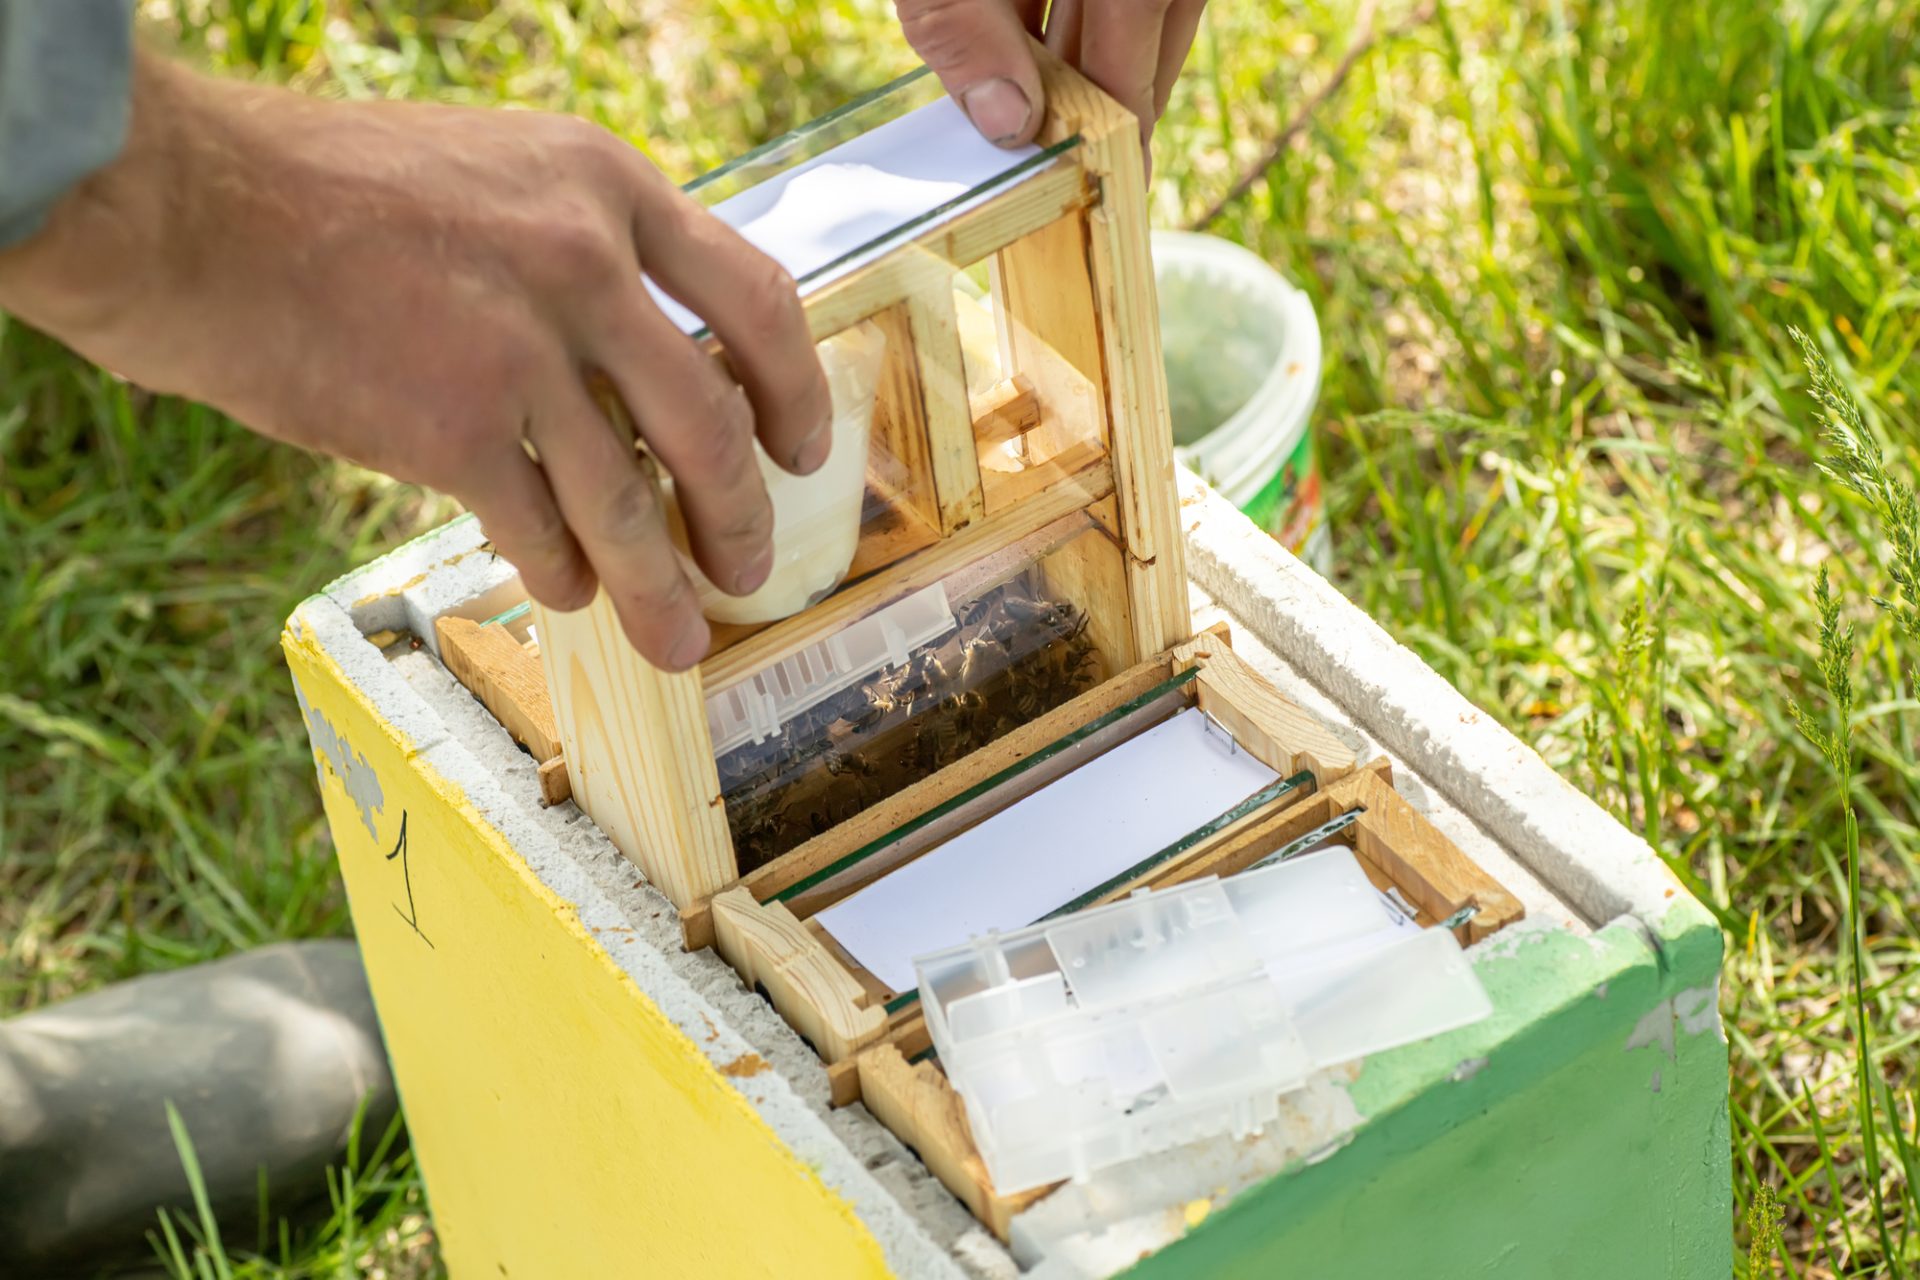
Queen Rearing Kits
Queen rearing kits are commercially produced and sold sets of items for use in queen rearing. The kits feature queen cell cups, frames, queen cell cup holders, and frame bars among other items. Usually, you will find the kits advertised as needing no grafting. This is because the use of the kits allows the queen bee of a hive to lay eggs directly onto queen cell cups. Eggs in the cups then hatch and are raised to be queen bees by nurse bees in the hive.
There are two main types of queen rearing kits. Each of the kits is suited for a distinct system of rearing queen bees. The systems, or methods, of rearing queen bees with commercially available kits are the Nicot system and the Cupularve method. With these systems, the beekeeper is sure of the age of eggs and larvae. All components of the kits are reusable except the brown cell fixtures. You may adopt some or all components of the kits for use in other queen rearing methods.
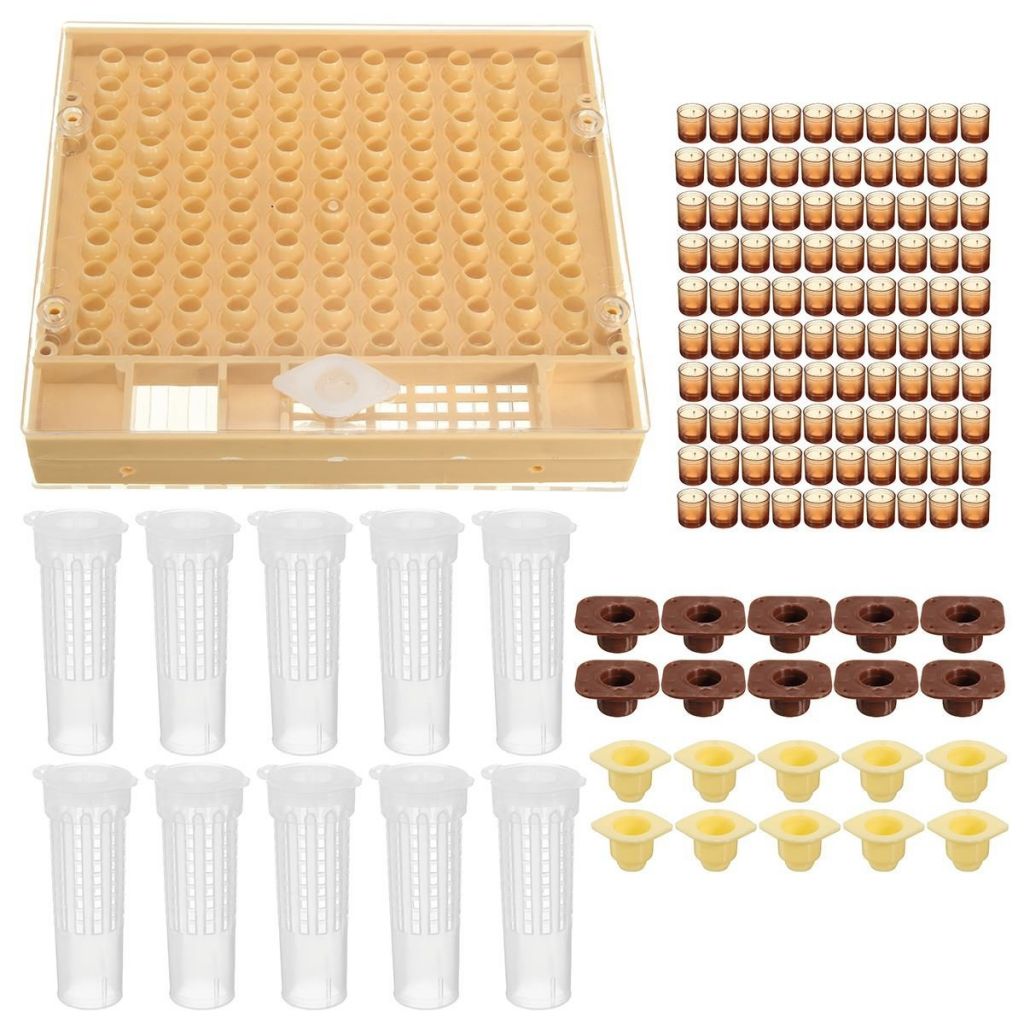
1. Nicot Queen Rearing Kit
The Nicot queen rearing kit is distinguishable by its ability to help you rear up to 110 queen bees over time. It is one of the queen rearing systems that eliminate the process of grafting in queen rearing.
A complete Nicot kit comes with a cell grid, brown cell cups, hair roller queen cages, brown cell fixtures, yellow cell cup holders, and candy cups. The number of items in the kit may vary depending on how many pieces of an item are included in the kit.
Typically, there is a single cell grid in the Nicot kit and 110 brown cell cups. Other items may be in sets of 10 pieces or more for the long life of the kit before you need to buy replacement parts.
2. Cupularve Queen Rearing Kit
Cupularve queen rearing kit comes in form of bars for assembling a frame, and queen bee cell components. There are 3 bottom bars, 1 top bar, 2 sidebars, brown cell fixtures, yellow cell cup holders, and nails in a typical Cupularve queen rearing kit.
Using the Cupularve queen rearing kit starts with the assembly of a frame that has 2 bottom bars. Slots on the bottom bars hold the brown queen cell fixtures of the kit. The brown fixtures, in turn, hold the yellow cup holders. With this method of rearing queen bees, you can raise up to 20 queen bees at a time.
Tips for Using Queen Rearing Kits
When using a queen rearing kit, take into account the following tips and information:
- Use strong colonies for the queen rearing process. Go for colonies with at least 2 brood chambers with brood in 8 frames or more. The brood should be in various stages of development.
- Feed honeybee colonies just before starting the queen rearing process for at least 3 days and during the egg-laying period with sugar syrup.
- Spread some honey or sugar syrup on new queen rearing kits and their components and then place them in a beehive. Allow bees a day or two to clean them out. The kit and components get bee odors and become easier to accept during the queen rearing process.
- Colonies headed by an older queen bee are best for building queen bee cells and feeding queen bee larvae.
- Use bees and brood from colonies with no diseases or pests.
- Handle queen bee cells gently and do not leave them lying on their sides for more than a few minutes at a time. Additionally, do not expose the cells to cold or winds.
- Wash the queen rearing kits using hot water, not boiling water. Better still, spray the kit and its components with sugar water and let honeybees clean them out.
Miller Method of Queen Rearing
The Miller method of queen rearing is a simple alternative in queen rearing that does not involve handling larvae. In this method, one honeybee colony is used to get eggs and larvae, while another is used to make queen cells and feed larvae into queen bees. This method of queen rearing requires you, therefore, to have a breeder colony, a queen cell building colony, brood frames, and several mating hives.
The breeder colony you choose is the source of eggs and larvae that will develop into new queen bees. It should be a colony with characteristics that you want in the other colonies into which you will introduce the new queen bees you get.
Miller’s method of queen rearing has two main challenges: poor information and weather-related issues. However, once you overcome the challenges, it is simple and successful. Note that queen cells in the Miller method of queen rearing are effectively emergency queen cells. The timing of their emergence is, therefore, not accurate. Even then, the queen bees you get from the Miller method are good quality queen bees. It is best to use this method of queen rearing when you are not on a strict timetable to raise new queen bees.
Advantages of the Miller method of queen rearing include its ease of carrying out, the use of equipment that the beekeeper already has in most cases, and little or no cost for the beekeeper. There are no additional techniques that the beekeeper needs to learn to use the Miller method of queen rearing in their beekeeping operation.
Conclusion
Honeybee colonies are a central requirement in beekeeping. The health of the colony you have determines its usefulness in the beekeeping operation. It also affects the ability of the honeybee colony to continue into the future. Queen rearing ensures that you get a healthy honeybee colony that has good chances of continuity. It also helps you introduce and maintain desirable characteristics in the honeybee colony. Such characteristics include docility, production abilities, and foraging power among others. There are many providers of queen rearing equipment, so you can successfully carry out the process with your beekeeping equipment. You can monitor your queen rearing activities with the use of a queen rearing calendar.
Use these methods, tips, and techniques in this introduction to queen rearing to improve your honeybee colonies.
[…] rearing efforts. It also explains the queen rearing calendar while exploring major concepts in the queen rearing process. Beekeeping operations require healthy queen bees in their honeybee colonies for optimum […]