
If you purchase an independently reviewed item through our site, we earn an affiliate commission. Read our affiliate disclosure.
The process of harvesting mason bee cocoons is an important one. Harvesting in this case does not mean honey harvesting. Mason bees are kept for purposes other than honey. They are beneficial solitary bees that are used for pollination purposes. As a matter of fact, mason bees are more efficient pollinators when compared to the honey bee and other types of bees. This species of the bee is easy to keep and is usually active in early spring, a time when other pollinators are not.
For more information on harvesting mason bee cocoons, be sure to check out Crown Bees, a highly reputed company specializing in mason and wild bees in the United States.
The Mason Bee vs Honey Bee
The mason bee is generally a name that collectively describes the kind of bees, that use mud to build nests in chambers within small crevices or holes. They do not dig their own holes but rather occupy pre-existing holes and crevices. They are choosy and that may describe why they easily accept the housing provided by the beekeeper. Mason bees are non-aggressive and easy to keep within modern settings. Any backyard gardener or bee hobbyists can raise the mason bee without any worries. They have a short life cycle that runs from March to May or Mid-June. Male mason bees have a shorter active period when compared to the female mason bee.
The mason bee is quite different when compared to the honey bee or the bumble bee. It is unique in both its behavior and appearance. The mason bee is shiny, dark-blue to green in appearance. The male mason bee is smaller in size but the female mason bee is bigger, about the same size as the honey bee. In terms of appearance, male mason bees tend to have light-colored hair on the face and their antennae have a segment that is longer when compared to the females.
The mason bee unlike the honey bee, is a solitary bee. This means it lives alone, though in close proximity to other mason bees. They do not establish colonies as the honey bees do. They also do not produce or store honey and will only sting when they feel threatened, for instance, when handled roughly or when trapped under clothing.
Life Cycle of the Mason Bee
The mason bee has one generation to live through each year. The adult mason bee will begin to chew its way out of the cocoon mud walls during early spring, when temperatures are between 50 degrees Fahrenheit to 55 degrees Fahrenheit. This will however vary depending on your region, mostly from February through March in most regions.
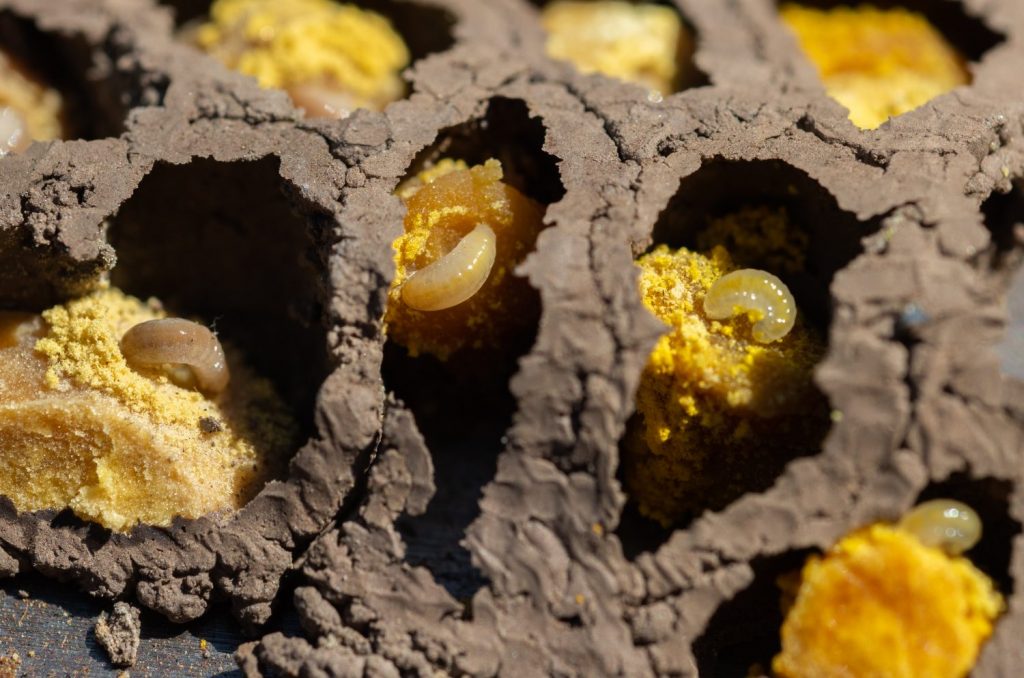
The first to emerge out of the mason bee cocoons are males, who will then wait for the females to emerge for them to mate in about 2 to 5 days. After mating, the female mason bee will hunt for an ideal nesting site before it begins foraging. It will collect pollen and nectar while foraging, which in the process helps pollinate the flowers. The pollen and nectar collected is carried to the nesting hole where it is used to make a rough ball. This is where the mason bee egg will be laid. A single ball will keep one egg. This is then sealed with mud and kept in a chamber.
The process of collecting pollen and nectar then laying the egg is then repeated. The mason bee will do this until there are about 5 to 8 egg chambers in every nesting hole. The process continues until the end of the season or when she dies.
The female mason bee takes full charge of its offspring. It determines what becomes male or female. When it lays unfertilized eggs, these hatch to become males. If it lays fertilized eggs, these become females. The male eggs are usually laid close to the hole capping, about 3 inches from the exit. The female eggs on the other hand, are laid deeper inside the tube, about 3 inches toward the end of the nesting hole. Therefore when drilling holes for the mason bee, ensure they are at least 6 inches deep.
The mason bee egg will take about a week or more, before a legless larvae that looks cream in color emerges. It then feeds on the nectar-pollen ball then begins spinning a cocoon around itself. It then forms a pupa during fall and eventually transforms into a fully developed adult mason bee. The adult bee remains dormant during winter and will eventually emerge when released. This cycle will begin all over again when temperature rises in spring.
Harvesting Mason Bee Cocoons
It is important to harvest mason bee cocoons for a number of reasons. When the mason bees goes out foraging, pollen mites and other invasive pests and predators may stick to its body and are carried back to the nest. These pests then land on the mason bee cells when the female bee is making the nectar-pollen ball used for sealing off the mason bee egg.
Pests such as pollen mites and others, then multiply rapidly and become hundreds within a very short time. The mason bee egg within the cocoon is then killed. Uninfected cocoons will grow normally and once it emerges, it will carry along the mites when leaving its cocoon. These are carried into the blossoms where it will stick to other mason bees that come foraging also. These will be carried along to other nesting holes and the process continues.
In the case of wasps, the female will use its ovipositor to deposit its egg into the pollen-nectar hole. This then grows quickly and eats up the mason bee larvae. It then proceeds to feed on the nectar and pollen, overwinters within the cocoon and eventually emerges as an adult wasp. Others can crawl over to neighboring cocoons and eat other larvae. If this happens you end up with empty cocoons at end of the season.
Why it is Important to Harvest Mason Bee Cocoons
There are several reasons why it is important to harvest mason bee cocoons. They are as follows:
- Harvesting mason bee cocoons helps to remove the mites that build up within the tubes. The emerging bees will thus crawl out without carrying along these harmful mites. This then means the resulting mason bee generations become more healthy and stronger. This also helps curtail the mite cycle that is usually perpetuated by the mason bee themselves through their movement from one flower to the other.
- Harvesting will help increase the mason bee population. Healthy mason bees have higher chances for survival. They will also produce healthy offspring which means more future pollinators.
- Harvesting helps the mason beekeeper track the total number of cocoons each year. It makes it possible to plan for additional mason bee hotels if required. It also becomes easier to track the male to female ratio in the mason bee hotels.
- Mason bee harvesting makes it possible to have increased flower and fruit pollination since the number of pollinators is increased each season. Mason bees are kept basically for pollination services and therefore harvesting helps achieve this goal.
- Harvesting helps keep the cocoons in hibernation as you prepare for the next season. This will help avoid untimely release which could be fatal for your mason bees. The newly emerged mason bees, if released at the wrong time, can die due to lack of bloom. Lack of nectar and pollen will certainly result in mason bee death. It is also important to release mason bees at the right time so as to avoid an invasion from predators and pests. They tend to be opportunistic and will strike when the mason bees are vulnerable.
- The process of mason bee harvesting is an exciting one and an opportunity for young ones to learn about these exciting insects. Involve them in what you do and you will be raising a bee-conscious generation in the family. This will help keep the work going for years to come.
- You can be a commercial mason beekeeper if you understand how to keep and rear mason bees. Harvesting allows you to resale the mason bees to others especially when you can produce more than you need.
- By harvesting the mason bees you play a crucial role within the flora and fauna. You participate in conservation efforts and can even train your neighbors to do the same.
Steps to Take in Harvesting Mason Bee Cocoons
When harvesting the mason bee cocoons, below are the steps to follow:
1. Remove Tubes
The ideal time to remove the mason bee tubes, is when the bee tunnels are completely sealed up to the end of the tubes. This then means the mason bee season is over and the cocoons are ready for harvesting. The tubes should then be removed from the mason bee nesting and placed in a well-aerated bag, then stored in a warm place.
The filled tubes can also be left behind for the rest of summer but this is not safe. The mason bee predators will take advantage of that and invade the growing bees. Some of the culprits include parasites, diseases, and fungal infections. Tube harvesting will help eliminate these invaders.
2. Removing Cocoons
What follows is the removal of the cocoons. This is done at fall when temperatures are below 50 degrees. The tubes are opened and cocoons removed. If paper tubes are used, then pull these out and expose the cocoons. In some cases you may use a scissor to tear apart the paper inserts since it becomes clogged with dried mud that is hard to separate with bare hands.
Cocoons are opened in a cool area. Remember the hibernating bees are mature adults and therefore any exposure to warm temperatures, will warm them up and lead to unplanned flights. You should then sort the cocoons from debris and mud.
3. Cleaning
Cocoons are then cleaned in a mixture of water and bleach. The right ratio to mix the two is one gallon of water against ¼ of bleach. You need to do this so as to decimate any fungal spores. The cocoons should be cleaned gently but thoroughly. Place the cocoons in the mixture for about 3 to 5 minutes. You can then stir the mixture for about two minutes or more then use a mesh sieve or slotted spoon to separate the cocoons from the mixture. Use fresh water to rinse the cocoons. Use a paper towel to dry the cocoons. You should avoid using warm water to clean cocoons since this will awake the hibernating mason bee thinking it is time to emerge and fly. Use cold water.
You can also use sand to clean cocoons. This method is easy to carry out. You will need a mesh screen that can allow sand to go through save the cocoons. These are usually available in any farm house. can get one in any farm house. You can then make your own sifting box.
Take the mesh and keep it flat over a bowl. Place the cocoons on the mesh and pour sand on the cocoons. As the sand flows over the cocoons into the bowl below, it takes with it dirt. It will also brush off mites in the process. Do this several times. Pouring more sand over the cocoons to make sure all parasitic mites are removed from the cocoons. Once done, throw away the used sand since it is full of parasitic mites.
Cleaning helps remove not only pollen mites but also other invaders such as wasps, fungal pathogens, and dermestid beetles. These feed on pollen and nectar. They also cannibalize the developing adult mason bee. Cleaning should be carried out gently since any rough handling will damage the growing mason bees.
4. Cocoon Selection
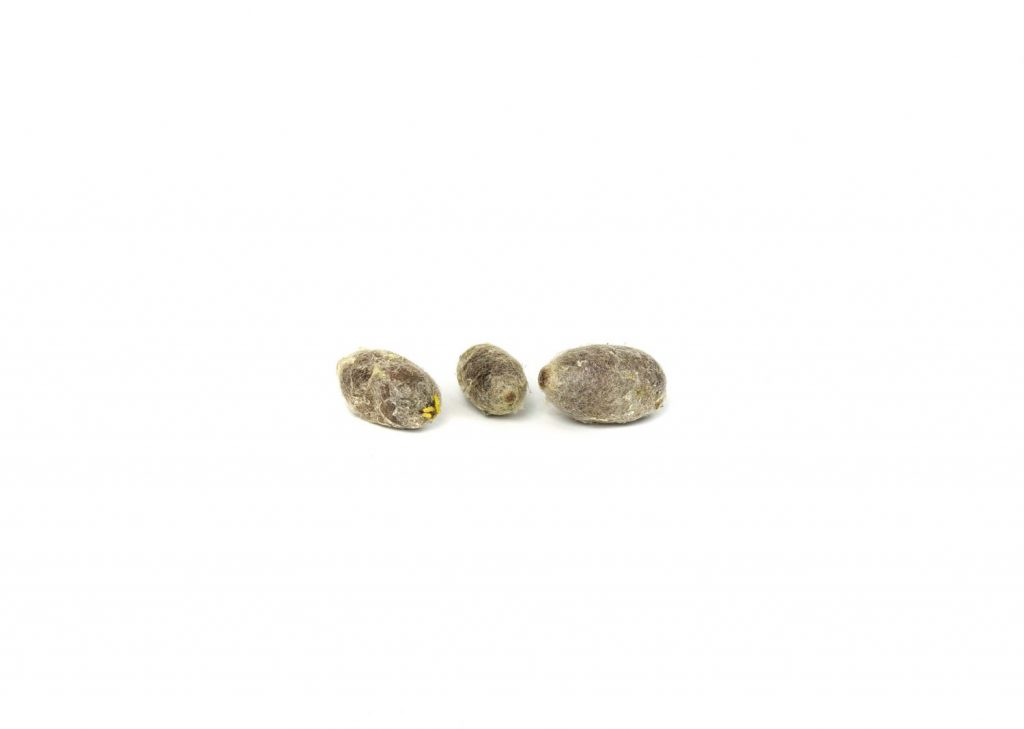
This is a crucial task in the cocoon harvesting process. Cocoons vary in sizes and quality and that means you have to choose the best of the best, if you want to raise a healthy mason bee population. Some of the cocoons to be eliminated include those that sink in a cool water bath. Cocoons that are also C shaped should be separated and disposed. This is a sign of chalkbrood infection. You might even find some cocoons with holes, a sure sign of parasitic wasp infestation. Take out these too and dispose of them. The unhealthy cocoons are also flimsy and pale in color. Healthy ones on the other hand, are firm and dark in color.
If you handle any cocoon that is infested with chalkbrood spores, you will have to be careful on how you dispose of it. Separate it and wash your hands thoroughly with soap thereafter so as to avoid spreading the infection to other cocoons. While sorting cocoons, you will see a variety of substances. Brown black substances are feces from the mason bee larvae. It should also be straight and not curly. Anything curly will indicate the presence of the pest stelis. In most cases, the pest cocoon will be similar to that of the mason bee. You might even find some yellow fluffy material, which will indicate mite infestation. You will also find empty cocoons, full of mud. Such cocoons should be separated and disposed. What should remain are healthy cocoons. These are the ones that will give birth to the future generation of mason bees.
5. Cocoon Refrigeration
The healthy cocoons, once separated should be stored in the refrigerator. The ideal temperature level for stored cocoons is between 30 – 40 ° Fahrenheit ( -1.1 – 4.4 ° Celsius). The humidity should be between 60 – 70 percent. You can use a sealable plastic container to keep the cocoons. However, remember to drill a few holes into the container so as to allow free movement of air. You will also need to take a small dampened sponge and put it next to the cocoons. This sponge needs to remain moist throughout. You will be checking this regularly and ensure it remains moist.
Cold storage helps guarantee the survival of the mason bees. It is prudent to keep exposing the stored cocoons to fluctuating temperatures. Modern frost-free refrigerators have moisture levels of about 20 – 30%. This may not pose a problem the first few weeks. However, it will dehydrate the cocoons if the dump sponge is not provided. Remember, the mason bees in cocoons may be dormant but are still alive. They require oxygen and energy in this dormant state. Since they are kept in cold temperatures, they will consume a little of their stored energy. When that is done we await the right season to release the just emerged mason bees.
Garage refrigerators with vegetables and fruits can pose a serious risk to mason bee cocoons. They usually produce ethylene gas which is harmful to mason bees. You should therefore open the refrigerator door occasionally. Regular checks will help ensure the mason bees stay healthy. Check out for humidity levels and presence of mold. If you notice any mold on the surfaces of the mason bee cocoons, then you will have to clean it. Make use of 1 tablespoon of bleach mixed with one cup of water. Use this to clean the cocoons then rinse it using cold water. You can then use a paper towel to dry the cocoons then place it back in the refrigerator.
You may also decide to store unopened mason bee cocoons in a shed or unheated garage, safe from predators. The cocoons should also be kept out of reach of birds. Place the cocoons in a plastic container as described earlier, and drill the holes for ventilation also. You should also put a dump sponge inside the container. This is a viable option but it can lead to premature emergence if the bees get exposed to warmth.
How to Harvest Mason Bee Cocoons from Bamboo
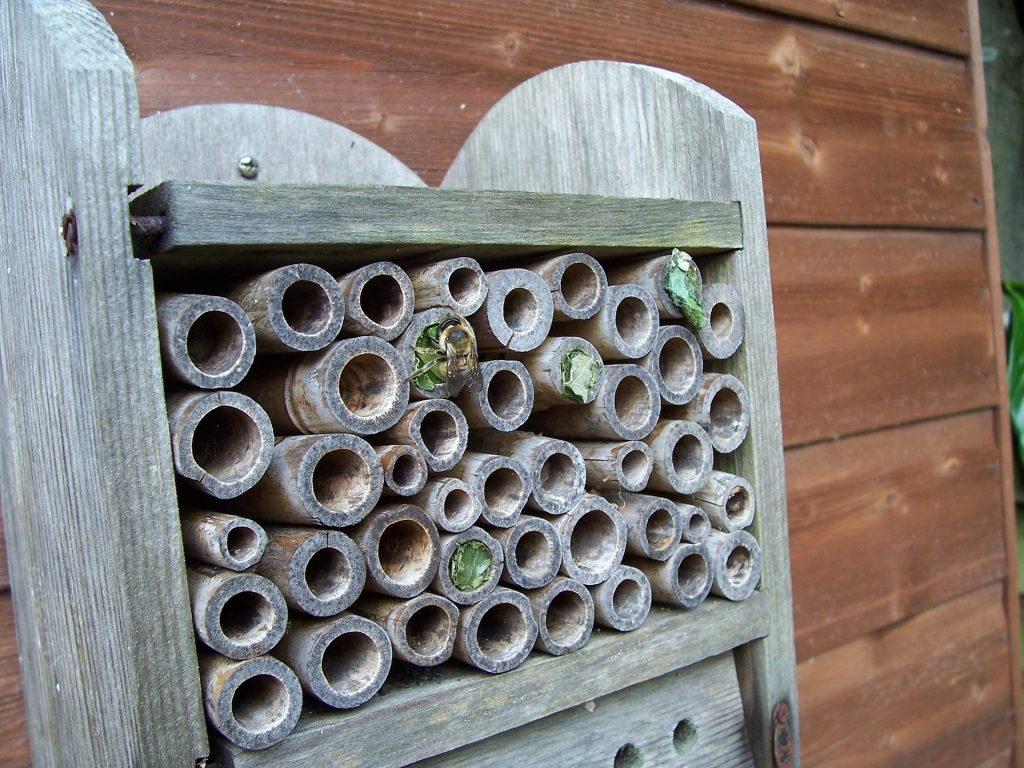
Bamboo is one of the best materials you can use to raise mason bees. It provides natural nesting material that mason bees accept easily. Additionally, bamboo provides the mason bees with a space that has a nice round shape. Bamboo tubes for mason bee rearing can come from your local sources or you can purchase them. When buying them, make sure to only purchase the tubes from reputable suppliers so that you get the best quality bamboo tubes for mason bee rearing.
Using bamboo tubes to raise mason bees is easy. Both beginner and experienced beekeepers can use them. After a successful season raising mason bees, you are able to harvest cocoons from the tubes with great ease. Unfortunately, bamboo tubes are not easily reusable in mason beekeeping operations.
1. Removing Bamboo Tubes
Remove the bamboo nesting tubes from your mason bee house and place them on a clean working area. The bamboo tubes may be partially filled with mason bee cocoons or half-full.
2. Getting Cocoons and Sorting Them
Press one end of the bamboo tube with your fingers until it splits into two or more parts. When pressing the tube, make sure not to crush the mason bee cocoon at the end of the tube. Pull on one split of the bamboo tube to split the tube into two pieces. You should be able to see the cocoons lined up in the cavity of the bamboo tube.
Using a cocoon comb, gently pry cocoons from the bamboo tube and drop them into a tub. They come off the tube with bits of mud. Some mud may be sticking onto the cocoons.
For this process, you need the following:
- Cocoon comb
- Tub or container for the cocoons
In your collecting tub, sort cocoons from the mud debris. Discard the mud debris so that you remain with mason bee cocoons only in your collecting tub.
3. Cleaning Mason Bee Cocoons
You should wash the collected mason bee cocoons after removing them from the bamboo nesting tubes. Use some water with bleach that you have prepared at a ratio of ¼ cup bleach in one gallon of water. Soak the cocoons in the bleach water for 2 minutes and then gently rub mud from the cocoons in your hand. The bleach in the water kills off fungi on the cocoons.
Once the cocoons are clean, place them on a mesh sieve and allow them to dry. You may also place them on absorbent paper for the drying process.
4. Cocoon Selection
Some mason bee cocoons you harvest and clean may not be viable. You should select the viable cocoons for further use. Healthy mason bee cocoons float in the bleach water that you use to clean them. Cocoons that are ovoid and full in shape are the best for propagating future generations of mason bees. Any C-shaped cocoons are unhealthy. You should discard them. Additionally, visual inspection of clean cocoons is important. Any holes you see on the cocoons are an indicator of unhealthy mason bee cocoons.
5. Cocoon Storage
Store mason bee cocoons until you need to place them in a mason bee house. You may refrigerate them or just place them in a clean aerated container. The cocoons should be at a humidity level of 60-70% during storage. Ideal temperatures for storing mason bee cocoons are between 30-40 degrees Fahrenheit. A small dampened sponge in the storage container is great for ensuring proper storage humidity for the cocoons. It should, however, not be in direct contact with any of the cocoons so that it does not wet the cocoons excessively.
How to Harvest Mason Bee Cocoons from Natural Reeds

Mason beekeepers may use natural reeds to raise mason bees. Natural reeds have a consistent diameter in their tubes. Mason bees have an easy time using the reeds as nesting material. The reeds are also easy to use for both beginner and experienced beekeepers. During harvesting, the reeds are split up. They are, therefore, not reusable to rear the next generation of mason bees. You may use mason bee nesting inserts with the reeds to avoid destroying the reeds during harvesting so that you can reuse them.
1. Removing Natural Reeds
Natural reads are easy to remove from the mason bee house. Just pull them from the house carefully and put them in a container. Take care not to crush or break the reeds.
2. Cocoon Extraction and Sorting
Extract mason bee cocoons from your natural reeds in a room with a clean working surface. If you used a nesting insert with the reeds, pull it with the cocoons it contains from the reed’s cavity. Tear the insert down its length to access the cocoons it holds. If you did not use a nesting insert, press one end of the reed between your fingers until it splits into two or more pieces. Pull one split part from the reed down its length to open up the reed and access the cocoons it holds.
Use a cocoon comb to pry the cocoons gently from the natural reed tube. Drop the cocoons into a collecting container or tub. Separate any mud debris from your cocoons and remove the mud from the collecting tub.
3. Cleaning Mason Bee Cocoons
Clean the mason bee cocoons you have removed from the natural reeds using a mixture of water and bleach. Prepare the water by adding ¼ cup of bleach to a gallon of clean water. Soak the cocoons in the water for 2 minutes with gentle stirring or agitation. Rub the soft mud from the cocoons using your fingers.
Place clean mason bee cocoons on a mesh or absorbent paper to dry. Do not expose them to direct sunlight.
4. Mason Bee Cocoon Selection
Select viable and healthy mason bee cocoons during cleaning and drying. When cleaning them, go for the cocoons that float in your cleaning water. Those that sink to the bottom of the container with water are not healthy. You should also use visual inspection for the selection of healthy cocoons. Those that are full in shape and without holes are the best for further use.
5. Best Cocoon Storage Practices
Store cocoons in conditions of 30-40 degrees Fahrenheit and a humidity of 60-70%. You may refrigerate them during storage. Ensure aeration of the cocoons during storage. Additionally, check on the cocoons periodically and control fungi that may grow on the cocoons.
How to Harvest Mason Bee Cocoons from Cardboard

Tubes made using cardboard material are used by some beekeepers to raise mason bees. The tubes are environmental-friendly and mason bees have no hesitation making their nests in the tubes. They are easy to use in mason bee houses. Both beginner and experienced beekeepers can successfully use cardboard tubes to rear mason bees. Cardboard tubes that you use without paper nesting inserts are not reusable.
1. Cardboard Tubes Removal
Get your cardboard tubes from the mason bee house and place them in a container or bag. This gives you an opportunity to clean the mason bee house. It also protects cocoons in the cardboard tubes from predators that would otherwise damage the cocoons.
2. Removing Cocoons and Sorting
Tear up the cardboard tubes lengthwise from one end to the other. It opens up the tube so that you get easy access to mason bee cocoons. You will see the cocoons sticking to the cardboard tube surface once you have torn it up along its length. Pry the cocoons from the cardboard tube using your fingers or a cocoon comb. Drop them into a collecting container or tub. Remove any mud debris from the collecting tub so that you remain with cocoons only in the tub.
3. Cleaning Harvested Cocoons
Your mason bee cocoons need cleaning after you remove them from their cardboard tubes. This is easy to do with some bleach water. Mix ¼ cup of bleach in a gallon of water for best results cleaning the cocoons. You should soak the cocoons in the water for 2 minutes with minor agitation of the bleach water. Rub away any mud remaining on the cocoons using your fingers. Put clean cocoons on a mesh or absorbent paper and leave them to dry. Avoid direct sunlight hitting the cocoons. You should also not heat the cocoons to speed up drying.
4. Selecting Viable Cocoons
Select viable cocoons during the cleaning and drying processes. The healthy and viable cocoons do not sink in the bleach water you use to clean them. The improper shape of the cocoons is another indicator of unviable cocoons. Healthy cocoons have an ovoid shape. They are not C-shaped, which is often a result of fungal infection of the cocoons. Lastly, healthy mason bee cocoons do not have holes or openings on them.
5. Storing Cocoons
Cocoon storage is an important part of harvesting mason bee cocoons. it helps ensure the cocoons survive to propagate the next generation of mason bees. Proper storage conditions of mason bee cocoons are a humidity level of 60-70% at a temperature of 30-40 degrees Fahrenheit. To ensure proper humidity levels, place a wet sponge in the storage container of the cocoons. You should also ensure aeration of the storage container.
How to Harvest Mason Bee Cocoons from Wood Trays
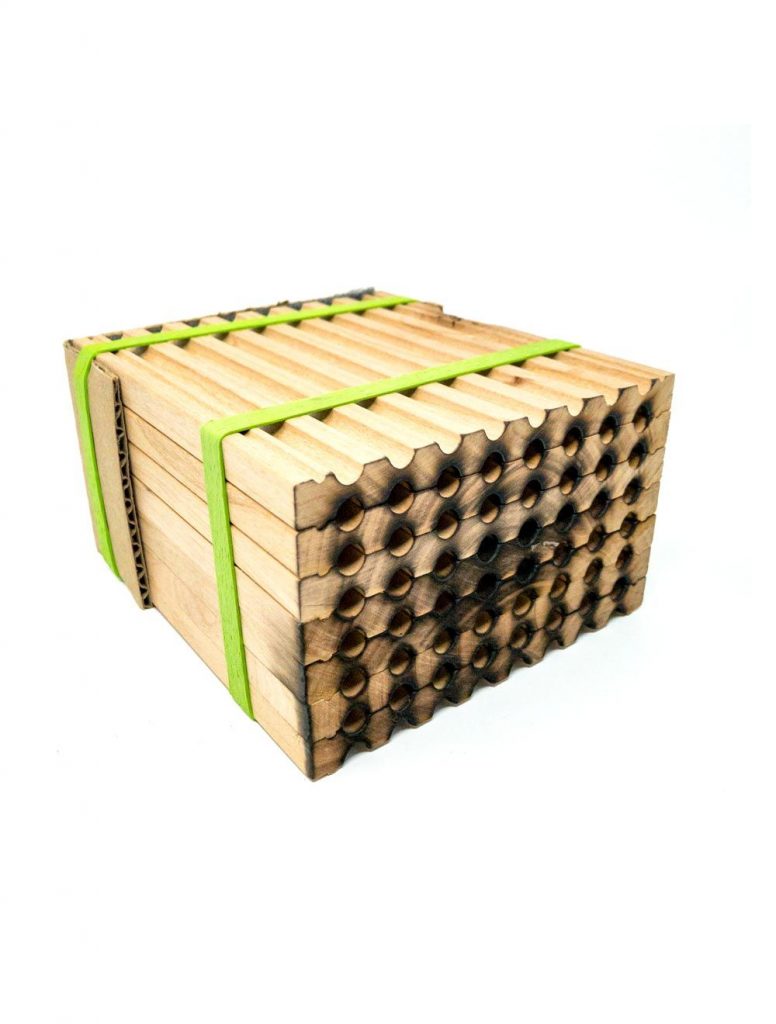
Precision-made wood trays are great for raising mason bees. They are easily reusable and readily accepted by mason bees. Wood trays for mason bee nesting come in sections or panels that you put together. They make nesting tubes with a round cavity of the proper diameter. You may use paper mason bee nesting inserts with the wood trays if you want to.
The wood of the nesting trays retains the nesting scent of mason bees and thus saves you from having to use attractants to encourage subsequent generations of mason bees to make their nests in the wood trays. They also provide the mason bees with excellent insulation and moisture control during nesting.
1. Removing Wood Trays
Remove the wood trays from the mason bee house you used. Put the complete wood tray sets in a container that does not damage them. Transport the trays to a working area that you have prepared for further processing of mason bee cocoons. Your working area should preferably be in a ventilated room with a flat and clean working surface.
2. Cocoon Removal and Sorting
Cocoons of mason bees stick to the walls of wood trays. Take apart the various panels making up the tray to access mason bee cocoons. Upon disassembly, the nesting tubes formed by the trays are in half, so you have great access to cocoons.
Use a cocoon comb to pry mason bee cocoons from the surfaces of nesting trays. Take care not to damage the cocoons during this process. Drop the cocoons into a tub or collecting container. They may come off with some mud debris sticking to them. Remove any free mud debris that falls into your collecting container and throw it away.
3. Cleaning Cocoons
Cleaning the cocoons you collect from wood trays is important. It ensures the cocoons stay healthy and gives you an opportunity to select healthy cocoons. Use a mixture of water and bleach to clean the cocoons. To prepare the water and bleach mixture, add ¼ cup of bleach to a gallon of water.
Soak mason bee cocoons in the bleach water for 2 minutes with gentle agitation. Most of the mud sticking to the cocoons comes off due to the gentle agitation. Remove any mud still sticking to the cocoons by rubbing the cocoons gently with your fingers.
Place clean cocoons on a mesh sieve or absorbent paper to dry them. Do not pat them or expose the cocoons to direct sunlight. Additionally, do not apply heat to the cocoons to speed up drying.
4. Selecting the Best Cocoons
Select healthy cocoons to use in the next mason bee rearing season by choosing only those that float in the bleach water during cleaning. Further visual inspection of the cocoons helps you remove the unhealthy cocoons that are C-shaped or have holes and openings on them.
5. Cocoon Storage
Store mason bee cocoons you harvest from wood trays until it is time to place them in a mason bee nesting house. Ensure the cocoons stay at a temperature of 30-40 degrees Fahrenheit, and that the humidity of the stored cocoons is at 60-70%. Do not allow fungal growth on the cocoons during storage.
Cleaning Mason Bee Cocoons
You should wash the collected mason bee cocoons after removing them. Use some water with bleach that you have prepared at a ratio of ¼ cup bleach in one gallon of water. Soak the cocoons in the bleach water for 2 minutes and then gently rub mud from the cocoons in your hand. The bleach in the water kills off fungi on the cocoons.
Once the cocoons are clean, place them on a mesh sieve and allow them to dry. You may also place them on absorbent paper for the drying process.
Mason Bee Cocoon Selection
Some mason bee cocoons you harvest and clean may not be viable. You should select the viable cocoons for further use. Healthy mason bee cocoons float in the bleach water that you use to clean them. Cocoons that are ovoid and full in shape are the best for propagating future generations of mason bees. Any C-shaped cocoons are unhealthy. You should discard them. Additionally, visual inspection of clean cocoons is important. Any holes you see on the cocoons are an indicator of unhealthy mason bee cocoons.
Mason Bee Cocoon Storage
Store mason bee cocoons until you need to place them in a mason bee house. You may refrigerate them or just place them in a clean aerated container. The cocoons should be at a humidity level of 60-70% during storage. Ideal temperatures for storing mason bee cocoons are between 30-40 degrees Fahrenheit. A small dampened sponge in the storage container is great for ensuring proper storage humidity for the cocoons. It should, however, not be in direct contact with any of the cocoons so that it does not wet the cocoons excessively.
Further Insights
The strong and well-insulated water proof and weather proof cocoon spun by the mason bee, is pinkish in color. It varies in size and this will be determined by the prevailing weather conditions, pollen and nectar availability, and nest cavity diameter. The length will also vary in size depending on whether it is a male of female cocoon. Female cocoons measure between 5 to 6 inches. Male cocoons on the other hand measure from 4 to 5 inches. They tend to be positioned at the outer part of the tube and will be the first to emerge. The female cocoons on the other hand will be positioned within the interior parts of the nesting tubes and will emerge last.
Harvesting mason bee cocoons will entail the removal of dried mud, parasites, fecal matter, dead bees, cocoon debris, and mites. The mason bees are hygienic by nature or design. They tend to prefer clean nests and not dirty old ones. That can explain why it is important to provide clean nesting areas for them. During harvesting you will be able to examine, identify, and remove any cocoon that is diseased or infected. You will also be able to identify underdeveloped cocoons and dispose them. The main goal of harvesting cocoons is to remain with healthy ones only. It is advisable to avoid cleaning cocoons with soap or detergents, since it will absorb these and will end up killing the developing adult bee. Cocoons should also be dried well before winter storage, otherwise mold can accumulate on them.
Conclusion
Harvesting cocoons is an important activity when raising mason bees. It is not only one of the best measures to control pests, parasites and diseases, but it also helps raise a healthy mason bee population. Mason bees are also very sensitive to temperature changes. It is therefore crucial that they are kept under controlled environs so as to prevent premature emergence.
Harvesting mason bee cocoons helps to cut short the life cycle of some common invaders such as pollen mites and parasitic wasps. It is the only sure way to remove these parasites, since most of them cannot be seen by a naked eye. It is also crucial to clean nesting trays after all tubes and cocoons are removed. They should also be disinfected and dried before storage. Never use them immediately thereafter. Instead keep the mason bee nest empty for one season, then use it the next season. Mason bee house rotation is important in curtailing the natural cycle of the mason bee pests, diseases and parasites.
Do you keep mason bees? Are you currently harvesting their cocoons? Leave a comment below and let us know.
new mason beekeeper for 2021, this article is very informative, although I plan on trying to get summer mason bees as well and could use a bit more info on them.
Hello Jack,
For more information on mason bees, you should definitely check out Crown Bees https://crownbees.com/?acc=e36cf5426895e81a26a2355ae4855b9d