
If you purchase an independently reviewed item through our site, we earn an affiliate commission. Read our affiliate disclosure.
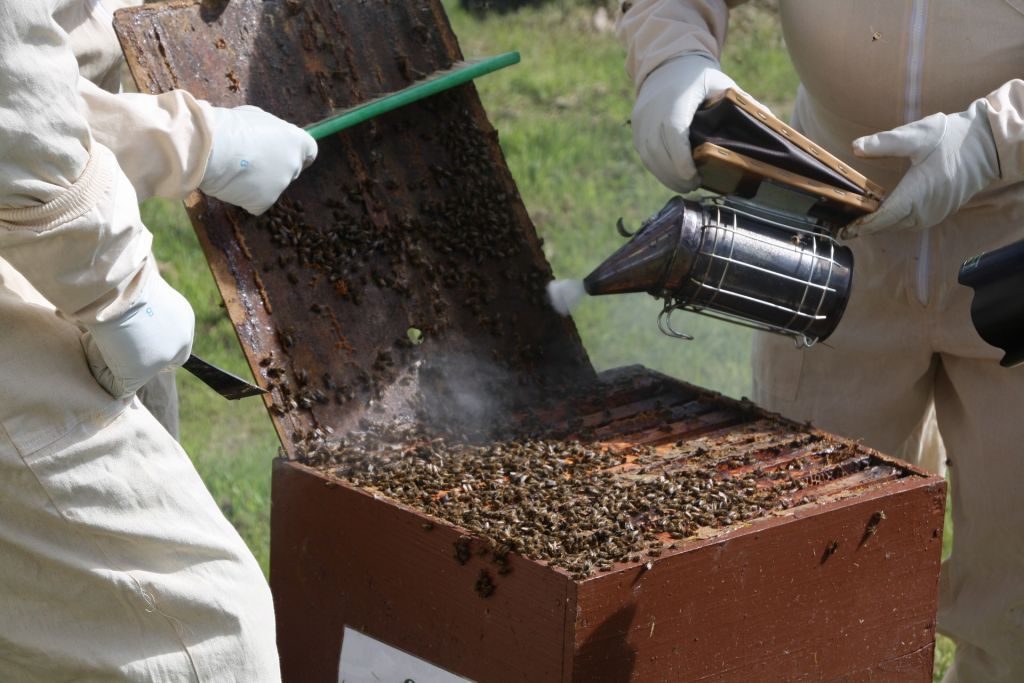
The bee smoker is an essential tool in beekeeping. It helps puff some smoke on the bees so as to calm them down when you are working on your beehive. It is required during honey harvesting and when conducting routine inspections on the beehive. You can buy a bee smoker from your local store, online, or just decide to make your own homemade bee smoker. The latter seems to be a feasible option for the adventurous beekeeper. It can be fun and will save you the cost you would have incurred in buying a smoker. All that is required for this project are local materials and tools. You also have to be a little creative in order to improvise some of the locally sourced materials. Also, be sure to check out our article on the best commercial bee smokers available.
Why the Bee Smoker Works
There have been so many beliefs and theories put forth to explain the reasons why the bee smoker works. Some believed the smoke sent signals to the bees that the hive was on fire and hence the reason they dive into the hive. Since they would never leave behind the honey and run away, the only thing to do is to remain within the hive and deplete what is in the honey stores.
In the recent past, this belief has been challenged and it is now believed that smoke inhibit the release of a hormone referred to as pheromone. This hormone is used by the bees for sending signals to the colony when attack is eminent and they need to defend their territory. The hormone sends the message quickly throughout the bee colony.
Smoke masks or blocks the defense pheromone and thus prevents the bees from sending defense signals to the entire bee colony. This therefore calms even the most aggressive bee colony. That notwithstanding, it is apparent that the bee smoker works, and can be a useful addition to any beekeeper’s tool box.
The bee smoker is also useful since it secures the bees from getting crashed when you are replacing one box on top of another. One can easily squash bees along the edges of a box when laying one box on top of another. However, when the bee smoker is used, the smoke generated forces the bees to vacate the top and the edges of the box and thus reduces the chance of crashing the bees. It also forces the bees to move to other areas of the hive which translates to more safety for your bees.
Advantages of a Homemade Bee Smoker
- You need simple tools and locally sourced materials to make a bee smoker. In fact, you will use recycled materials which in turn means a cleaner environment.
- It is a huge cost-saver instead of using the money to buy a commercial bee smoker. The homemade smoker is just as effective as the commercial one.
- It is extremely satisfying if you can make a bee smoker at home, by yourself. You would have learnt plenty and sharpened your skills greatly.
- A little show off to friends and guests goes a long way in boosting your confidence as a beekeeper. Why not make one and show it to them? You can even offer one or two homemade bee smokers to some of your friends.
How to Make a Homemade Bee Smoker
Materials
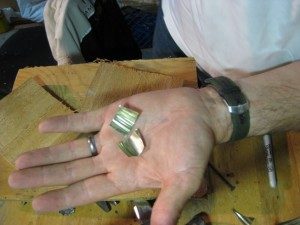
- 3 steel cans – 2 of same size and 1 smaller one.
- Plastic or leather material for making the bellows.
- Wood planks.
- Nails, staples, or wire for fixing bellows fabric to the bellows backs.
- Screws or wire.
- Hammer.
- Hacksaw, sharp machete, or tin snips.
- Wooden can that will help prevent the can from getting crushed when making the holes through the can.
- Screwdriver.
- Pliers but this is optional.
Step 1 – Making of the Fire Chamber
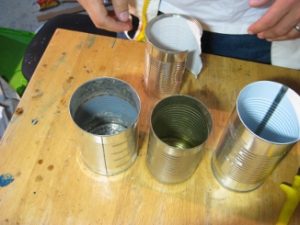
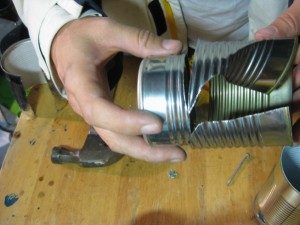
- Take one of the big cans and mark a circle. This is where an air hole will be drilled so that the bellows can blow in air. This hole should be located at the bottom of the can. The width of the hole should be approximately the thickness of a finger. The bellows holes will be smaller than this hole. The pushed air will flow through the hole to the can bottom and under the fire grate. See below:
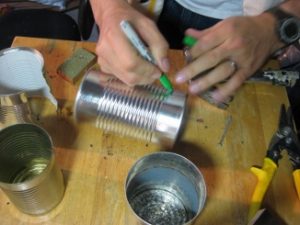
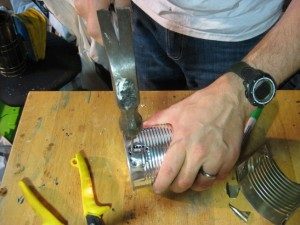
- After marking the circle on the can, use the wooden can wedge as support so that you can use the hammer and nail to make out the hole’s outline. The wedge will also help prevent the can from losing its shape when under the pressure applied when hammering. See below:
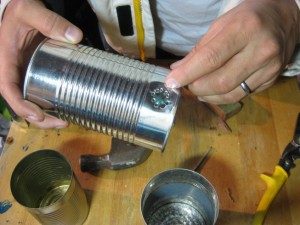
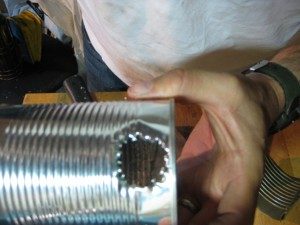
- Use the nail to poke a perimeter over the marked air hole. Once done, use the nail to remove the metal circle, thus creating the air hole. The fire chamber can is now done. Take a rock or use the hammer to smooth out the edges of the air hole. Place this can aside and embark on preparing the fire grate. See below:

Step 2 – Making of the Fire Grate
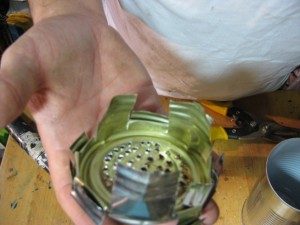
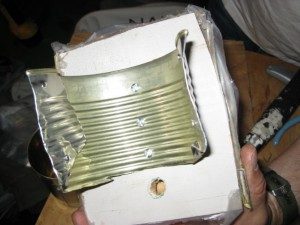
- The fire grate is made from the bottom of the smaller can. It should be a little taller than where the air holes come in. This is designed to allow the air blown to flow through the fire grate. Measure the distance from the bottom of the chamber to the top of the air hole, then cut the grate in such a way that it is taller than this distance. See below:
- Once this is done, use the hammer and the nail to punch in a number of holes at the bottom of the grate. These holes are required for bellows to direct air into the fire chamber. See below:

- Take your hacksaw and use it to cut out “legs” from the can walls. Ensure you remain with a 3 legged grate. You can remove the rest of the legs and keep them for later use as hinges. See below:
- As an optional step, you can further fold some of the cut legs to provide for a tighter fit. See below:
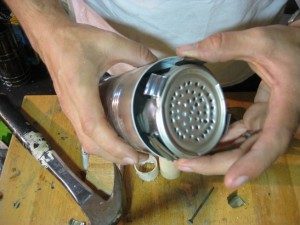
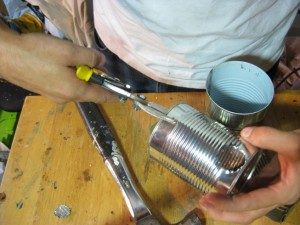
- Slide the grate into the fire chamber. If all was done well, the grate should stand taller than the air hole. See below:
Step 3 – Making of the Bellows
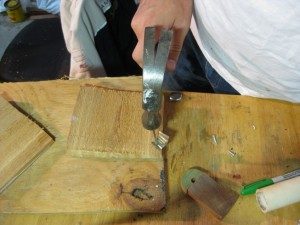
- You need two blocks of flat wood in order to do this. The block dimensions should be 8 x 6 x ½ inches in height, width and thickness respectively. You can use the machete to cut the wood then fashion the wood into two boards with the required thickness. You will use the leather or heavy plastic to make bellows cloth.
- Take those legs we had put aside when preparing the fire grate. We shall use them as hinges. Take any two then fold each into half then drill holes into the hinges to make it possible for you to screw nails through them. Take the bellows and screw in the hinges. You can also use aluminum can strip as hinges. As for the legs used as hinges, they will not last for more than a year.
Source: LearningBeekeeping.com
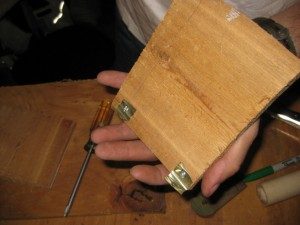
- Drill a hole at the center of the wooden board or bellows. You can use a screwdriver or knife blade to do this. A flint arrowhead will also suffice. This hole should be at least 0.6 inches wide or smaller than the air hole in the fire chamber.

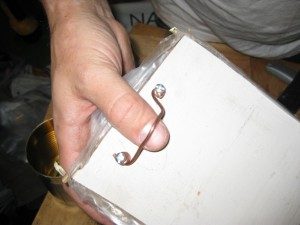
- Attach the leather or thick plastic as the bellows fabric. Leather makes the best material. Ensure the fabric is securely held into the bellows board. The bellows should be held in an open position, that is, about the width of your hand. To further improvise, attach a finger loop or two nails as arch for opening the bellows. Typically, a copper or electrical wire can be used for this.
Step 4 – Attach the Bellows to the Fire Chamber
- We shall utilize what was left over from the small can. This will be used for attaching the bellows to the fire chamber. Take the can and fold its edges so as to eliminate any sharp spots. This will also strengthen the can.
- Fold the edges of the can and use the nail and the hammer to create two holes on both of its sides. Poke also 3 holds at the center of the can to be attached to the back of the bellows. This should be attached to the part where the air hole is located.

- The bellows mount should now be screwed into the bellows. We have a total of 4 holes which will match with the 4 holes created in the fire chamber. This will then be attached to the fire chamber. The bellows out air should be in line with the fire chamber inlet air hole. Ensure a gap of 1.5 inches is left between the two air holes. That way, the bellows will never suck in sparks from the fire chamber.
Step 5 – Put on the Smoker Cap
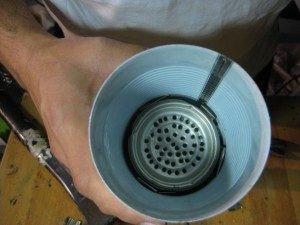
- Use the smoker cap to hold extra fuel and also direct the smoke as required when working on your beehive. You will use the second big size can for this purpose. You need to cut out a hole like the one cut it when creating the air hole inlet in the fire chamber. Punch a hole into the smoker cap using the nail and a hammer. Cut this hole near the top to be used for blowing out smoke. The wooden can-wedge will also come in handy when doing this. It will help keep the can from crushing or losing its shape.
- Smoothen out the edges of the exhaust hole using a rock or any metallic tool that will dull the edges. One of two big cans is then fit inside the other. Make a small cut of 1-inch at the bottom of the cap can and ensure the cut is in line with the exhaust blowhole.
- Squeeze the bottom where the cut is made into the fire chamber can and push it in to about ½ inch deep to allow for a tight and stable fit. Light the burner to ensure any plastic coating is burned off.
- Put the bottom of the smoker cap into the fire chamber and congratulations, your homemade bee smoker is now ready for use. You will use this to lull the bees when working on your hive. The metal chamber is used for burning fuel so as to create a thick smoke. The force created by the bellows helps generate more smoke and direct it through the opening of the funneled top. This is then directed to the bees thus distracting them from stinging you.
Using your Homemade Bee Smoker
You can use your smoker initially and occasionally when inspecting your hive or harvesting the honey. Nonetheless, never overuse your smoker to an extent where one would imagine you are setting the hives ablaze. If you are a new beekeeper, then avoid the tendency of overusing the smoker. Remember, more smoke does not translate to calmer bees per se. The amount of smoke used on the bees will depend on the nature of your bees.
If you are working on docile bees then a few puffs of smoke at the hive entrance will be sufficient. It is wise to approach your hive either from behind the hive or from the sides. Never wander in front of the hive when applying some smoke. If you are working on aggressive bees, then apply more puffs but be careful not to overdo it with too much smoke.
During a full hive inspection, apply a little puff on the exposed frames and wait a few minutes, at least 20 seconds then proceed to inspect your frames. Do not apply too much smoke on your hive. You should also avoid smoking all sides of the hive, that is, all corners, top of the hive, and hive bottom. This is certainly a bad way of smoking the beehive.
Conclusion
The homemade bee smoker features a simple design that is built using basic tools and materials. It will take 2 to 4 hours to make this type of smoker, assuming you have all the tools and materials at start of the project. Remember the simplistic design of the smoker may make the cap extremely hot when working on your hive and therefore you must use a cloth to hold the cap when you want to add smoker fuel to the smoker. This homemade bee smoker is just as effective as a commercial bee smoker and will definitely save the cost you would have incurred in buying a new one online or from the local stores. Not to mention the handy skills you would have learned.
What do you think of this DIY guide? How do you suggest it could be improved, or how would you do it in your own way? Leave a comment below and let us know.
Hi there. I visited your site looking for suggestions on how to make a bee smoker. I am going to share my story with you hoping for some input or feedback with ideas and or suggestions from you to your readers on whether this plan is likely to work or not or may refinements as to what might make it work better. Or why it won’t work at all and I should default to the bee experts who have been almost no help so far. I have a wild swarm moving into my front exterior porch wall. I have contacted… Read more »
Hi Ro, I’m glad you reached out. I do understand your dilemma, but I will say that I’m against killing the bees. It’s a shame that none of the professional bee removal companies have come through for you. This is really a job meant for the professionals. Though, in tackling the problem yourself, I’m glad that you’re careful to know that you must be highly protected, and I do believe your homemade bee suit, as mish mash as it may be, should the job. Just make sure the ankles, wrists and neck area and sealed tightly so that no bee… Read more »
Thank you for a good and helpful guide. I just had one question as I am going through the steps. If I understand it well, the grate it put above the hole from the bellow and the air is supposed to go through the holes in the grate and into the fire chamber. What is not clear to me is how you fasten the grate and again, if is is not supposes to have a bottom under the air hole to make sure the air does not go downwards instead of up and into the fire chamber. Please I will… Read more »
Hi Elizabeth.
If the grate is too loose, then you may consider using small nails to hold it in place.
Air will be directed upward as you puff the bellows.
Thank you so much for the reply. This makes me understand that the grate is placed above the air inlet from the bellow? I have been a bit confused on that since in other models, the air inlet is above the grate and blown directly into the fire chamber.
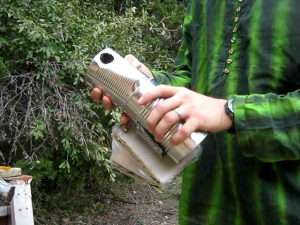
Hi Elisabet,
No not above. It’s still placed below. See this pic:
Once you start puffing the bellows, air will be directed upward through and out the can.
Thank you so much for your effort to reply. I understand now. It has been very helpful. Wishing you a nice day.
You are most welcome. Thank you.