
If you purchase an independently reviewed item through our site, we earn an affiliate commission. Read our affiliate disclosure.
The objective of keeping mason bees is to encourage this great pollinator in your garden, and you can bring the best out of them by planting pollinator-friendly plants. Now having gotten the background of the mason bee, let us now go into all the little details that are involved in the making of a homemade mason bee house.
For more information on high quality mason bee houses, be sure to check out Crown Bees, a highly reputed company specializing in mason and wild bees in the United States.
About Mason Bees
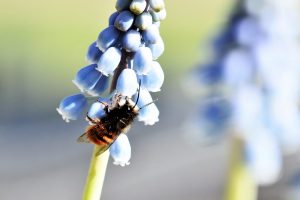
Mason bees have a black or metallic blue-green color, though they have been observed as very brightly colored in some instances. They range in sizes and typically are close to half the size of a honey bee. Unlike the honey bee, the mason bee is friendly and they rarely sting, so there will be no issues if you invite them into your garden as a pollinating agent. Indeed, when it comes to their efficiency in pollination, mason bees are even more efficient than honey bees.
It is important to note that mason bees, unlike other types of bees, do not exists in colonies; they are different from the honey bee on account of the solitary life that they live. The females of this breed do all the work on their own; they look for natural cracks and crevices in which they lay their eggs.
The female mason bee moves into tunnels bored into their little bee house to lay their eggs. Inside their nest, it is a common sight to find groups of female mason bees nesting together. Their eggs are dormant throughout the winter and fall, the offspring will emerge in the spring to live their lives and pollinate plants.
Making a Homemade Mason Bee House
The making of a homemade mason bee house is an exciting project that involves simple woodworking that will take just a few minutes to get through with. This is a project that the kids will love to take part in; watching the bees as they construct their nest will definitely give yourself and the kids a sense of fulfillment.
Our business is to show you how you to make the best out of your homemade mason bee house. Planning is very important; you will need all the materials for the project at your disposal. If you’re not interested in building your own, then you can check out the best mason bee houses available on the market. You should also be sure to check out Crown Bees, as they are a reputable supplier of all things mason bees.
When completed, this mason bee house design is expected to last for two years.
The Things You’ll Need
- 4 x 4 x 14 inches pine post
- 6 x 6 x ¾ inches thick board made from pine or hardwood
- Drill press or hand-held drill
- 5/16 inch drill bit
- Miter saw or hand saw
- Screws
- Sandpaper
- Dowel
Make sure that all the materials and tools are handy before you set out to build the mason bee house.
The Body
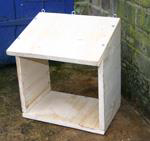
The body of the mason bee house is made from a 4 x 4 pine post. The size as well as the dimensions of the house is not very important, and you are at liberty to use whatever pieces of recycled wood/scrap that you can readily lay your hands on. You will get the same results if you simply combine a few pine boards by laminating them. If you make the boards wide, you will get enough space that will enable you to drill the holes that will act as the nesting tunnels.
You can use a piece of pine post which should be about 14 inches long. You are free to use a different type of wood, but do be advised not to use wood that is insect-resistant. If you use such a wood, then the mason bees will not have a natural attraction to it and they will be discouraged from building their nest inside it.
The Roof
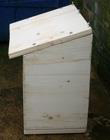
You have to take care of the roof in the design. The architecture of the top of the pine post should be shaped in a 22-½-inch degree angle, forming a sloped roof to provide protection from the rain. Depending on the capacity of your power miter box, if it cannot take you all through the way, you can revert to the use of the hand saw to finish the job.
The 6 x 6 inches roof can be cut from a piece of ¾-inch thick pine or hardwood. This can be gotten from an recycled old shelf unit that was destined for the landfill. As for the back edge, it can be cut at the same 22-½-inch degree angle so that it will match the slope of the roof.
Laying out the Holes
Mason bees nest inside holes, so if you’re going to build a mason bee house, then you need the holes. To start with, you have to think about the layout of the holes before you start drilling. Getting a uniform pattern will take you a few minutes to organize. Take time to mark out the pattern before you begin the actual process of drilling the holes into the board. You may need some mathematical calculations to get it right.
Steps
- You can start by measuring with the desire of finding the middle of the front side of the post. Take it up by drawing a center line which will go down the length of the pine board. You are to make sure that you mark the center at both the top and the bottom. The objective of this is to ensure that the line is placed down the center of your post.
- The next thing to be done is to ensure that the measurement of ¾-inch from each side is taken accurately. This time again, you have to ensure proper marking of both the top and the bottom of the post, you can then draw another set of lines for the other two rows of holes.
- Starting from the top of the post, measure down 2-inches and make a mark on the centerline which will indicate the location for all the first row of holes. With the aid of a square, you can transfer the first mark to the other two lines; this will produce a marking of three locations for the first set of the row of holes.
- The next thing that you will do is to measure down 1-inch from the first row; repeat the process for the second row for each of the holes. You have to continue the process until you get to the last hole; it should be about 1-½-inch up measuring from the bottom of the post.
Do not worry about the hole pattern
Mason bees are not selective when it comes to the patterns of the holes made for them. The layout lines are purely for the purpose of being appealing to the eye. Therefore, you can reduce the stress and burden involved when taking measurements and marking the holes by using a piece of pegboard that has equally placed holes as a template. This will deliver the even spacing and getting the locations of the holes with ease.
Drilling the Holes
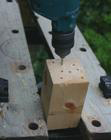
You will require a drill press to get through with the drilling of the holes in a fast and efficient fashion. There are 24 holes to be drilled in this version of the homemade mason bee house that we are considering. If this implement is out of your reach, then you can make do with a hand-held drill. You will get the same results, the difference is in the speed of the mechanical device as compared to that of the hand-held drill.
Steps
- The holes should be drilled as deep as possible, all the way through the depth of the post. You can conveniently make use of a 5/16-inch diameter drill bit. Why should you make the holes so deep? The answer lies in the fact that the female bees love laying their eggs inside deep tunnels. To complement the desire of the female bee, all the holes should be at least 3-½-inch deep. In the design of this house, you have to plan for wider holes that are very deep so that an allowance will be given for longer tunnels. The deeper the depth of the nest box, the more the comfort for the mason bees.
- The edges of the freshly drilled holes will be sharp and you’ll have to make it smooth so that the mason bees will find it easy to move around inside the holes. To make the edges of the holes smooth as well as the hole in itself, you will need a piece of sandpaper small enough to enter into the diameter of the borehole, which you are to wrap around a piece of dowel. You can now use it to effectively clean up the edges of the holes thereby making it smooth and comfortable for the mason bees.
- Next, you are required to cut a “backer board” at a dimension that will fit perfectly into the back of the post. Now attach this to the back of the mason bee house. You will need to do this with the aid of some weather-resistant screws so as to make it as durable as it can possibly be. The aim for installing this removable back section is to make cleaning of the debris from the tunnels possible after the mason bees might have left the nest.
How to Hang Your Homemade Mason Bee House
The above sums up how easy it is to make the mason bee house. After you have succeeded in making the house; there is the technical aspect of how best to hang the mason bee house. Even with the best of designs, and even when you have gotten everything right, there is the need to get the mason bee house properly hosted up in a way that will give you the desired results.
Just like the construction of the mason bee house, hanging the house is very easy; it is a simple DIY option that just about anyone can execute. We shall go into all the details involved below with the aim of making it as clear as possible.
The positioning of the house should be strategic. You are to place it in a place that is well exposed to direct sunlight, ideally a southeast facing position. The location should be such that it gets protected from the wind. This is very important if you want the mason bees to yield at an optimum level. The location should be covered from the sun; located in a shade. This is more important if your location is in the regions with warm spring and summer.
Protection from the Rain
The mason bee house should keep a decent distance away from the ground level. The height above the ground should be something between 3 to 5 feet. When it rains, you will be able to get a respectable distance that will not be disturbed by splashes of rain into the nest of the bee house. This is necessary so as to prevent any form of elemental distractions of the mason bees inside their nest.
There is also the need to protect the roof from the impact of the raindrops. You will be required to provide some form of roofing that will effectively shut out the rains away from the nest. If you allow water to get in through the top, then there will be the threat of mold taking root inside the nest.
However, if the mason bee house is located under some sort of cover (like the one under the cover of a roof), then there will be no need to provide a cover for the rooftop. In all, the mason bee house should be protected from water that splashes below, as well as water that drops from the sky. If you are able to guarantee this protection, then your homemade mason bee house will serve better and lasts for longer.
Protection from Birds
Having secured the house from the elements (wind, sun, and water), there is also the need to make sure that the house is protected from predator birds. The mason bee larvae will be at the mercy of the birds if there is no adequate cover given them to protect them from the elements. Though the depth of the hole will prevent the majority of birds from reaching the larvae, the flickers are determined creatures who will stop at nothing to get to the larvae. What’s more, the woodpecker has a long tongue that can get to the larvae if it is not put in check.
So what are you expected to do in that instant? You are strongly advised to keep the mason bee house covered with an hardware cloth fencing. It will serve a strong protection shield against the predator birds of prey.
Issues with this Design
Proper cleaning is the biggest issue with this design. That notwithstanding, the mason bees do not have any problem with this design. They make an efficient use of the house and are able to comfortably create their family within it.
Key Points to Note
- After you are through with the drilling; make sure the rough edges are smoothed out. That way, the masons bee will be comfortable inside their nests.
- Care must also be taken to ensure that the house is given adequate protection for it to last the expected duration of two years. It should be high enough above the ground level to protect from the underneath splash of water. The top should be covered to protect it from drops of rain above, so as to prevent the development of mold. The wind should be taken care of as well by the strategic placement of the mason bee house; ditto for the sun.
- To cap it all off, you are expected to protect the mason house from the predators by using a thick covering of hardware cloth fencing. When you put these measures in place, you will get the desired results that you wanted from this pollinating species of bees.
Conclusion
If you get the measurements perfectly in place, then you are good to go with your homemade mason bee house. You will get from your completed house all that you expected. The mason bees will find a home that they can proudly call theirs located in a conducive environment, and given the security that they need to carry out their pollination process without any hindrances.
When you sit back and watch the bees making a success out of the mason house; it will definitely give you a sense of satisfaction and of pride. Seeing the bees set up during the year and emerging in the spring is a thing of joy.
What are your thoughts on this DIY guide? Leave a comment below and let us know.
very gooooooooooooooooooooooooooooooooooooooooood.
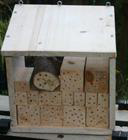
the hardware mesh for the mason bee house what size holes are the best to protect them?
It depends on what you’re protecting them from.
If it’s from birds, then standard size hardware mesh as seen in the featured photo will work just fine.
However, if you need to protect them from parasitic wasps, then you’ll need something like this fabric mesh: https://alnk.to/cHI7Pk2